Pages

Saturday, July 27, 2013

Summer in 3D Blog Hop!

Happy Saturday!
Welcome to the Summer in 3D Blog Hop!

I am so happy you could join us!
If you arrived here from Laura's blog, 
 Laura's Crafts & More, then you are in the right spot. 
If you just happened to stumble across the hop today on my blog and would like to start at the beginning, then just hop on over and see Joy at Joy's Life

For my project, I decided to make a fun little gift box that I found at SVGCuts.com:


I love the little row boat on top of the box lid!
I made this as a little gift for my hubby. 
He has been wanting a boat and always looks at them so I thought this would be cute and funny to give to him :)
Plus, he loves it whenever I make anything that involves candy! lol!

Here is a view from the top:


Inside the box, I put a big bag of Swedish Fish Candy:


Look at this cute little sentiment from the Pun In The Sun stamp set:

There are so many great sentiments on the Pun In The Sun stamp set!
You can find all of Joy's Products at her store HERE.

What's a blog hop without a little candy?
I am going to give the following prize away to a follower of my blog:

For your chance to win these 2 rolls of Washi Tape, all you have to do is:
1. Be a follower of my blog
&
2. Leave me a comment on this post. 

That's it!
I will have Random.org pick a winner from all the comments left on Friday August 2, 2013
so be sure and come back to see if you have won. 

Your next stop is the very talented
 Maria of Five Simple Things!

Here is the complete line up in case you get lost along the way:


I hope you have a great crafty day!
Have fun hopping!
Photobucket
*I created this project while on the Joy's Life Design Team*

Supplies:
Cardstock: Kraft (Recollections), Midnight Muse (SU!), White (Georgia Pacific)
Patterned Paper: The Guy Stack (DCWV)
Stamp: Pun In The Sun (Joy's Life Stamps)
Ink: Midnight Muse (SU!), Vintage Photo (Tim Holtz)
Silhouette: Picnic In The Park (SVGCuts.com)
Misc.: Hemp Cord, Foam Dimensionals (SU!)

Thursday, July 25, 2013

Porthole with CANDi


Hi everyone!
Today I get to show you another project using 
that awesome CANDi!


I decided to make this fun little no occasion  card to send to someone.
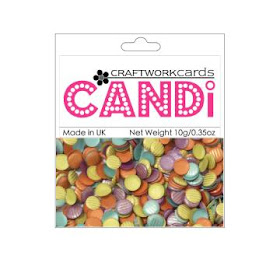
For my rivets on the porthole, I used some of that awesome CANDi!
One of the great things about CANDi is that they give your projects dimension without all the bulk.
That is great for saving yourself some money when it comes to postage :) 

For my project, I used Rainforest CANDi:


For the UK store, click HERE

You can also find CANDi in the US at many online retailers including

Thanks so much for stopping by!
I hope you have a fabulous crafty day!
Photobucket
Supplies:
Cardstock: White (Georgia Pacific), Kraft, Grays & Blues (Recollections), Dk. Brown (Core'dinations)
CANDi: Rainforest & CANDi Fix
Silhouette File: Porthole, Whale Tail (Design ID #45278)
Misc.: Crystal Effects (SU!), White Gel Pen (Marvy)

Tuesday, July 23, 2013

Krafty Girls #23--Anything Goes

Hello and Happy Tuesday!
Are you guys ready for another fun challenge from the 


Here are the cards that I created for the challenge:


I decided to make a little set of thank you cards to have on hand.
They are each sized at 3x3.

I simply stamped each card and then added a coordinating butterfly to each one. 
I added a little pearl to each butterfly.

You can find this stamp set, Too Kind, at my friend Janis' Stampin Up Store.

I hope you will head over to the 
and take a peek at the awesome inspiration from my amazing design team sisters as well as entering the challenge yourself :)
I would love to see what you create!

Thanks for stopping by!
I really appreciate it!
I hope you have a fabulous crafty day!

Photobucket
Supplies:
Misc.: Pearls (Queen & Co.), Classic Butterfly Punch (Martha Stewart)

Monday, July 22, 2013

Oopsy Daisy!!

Hi guys!
Happy Monday!
I hope you all had a great weekend!

Today I get to show you another project using those awesome

This week is all about 3D Flowers!

I decided to make this card and add some dimension to my daisy:

I found this cute little bear holding a daisy in the Silhouette Online Store.
It is titled Love Bug Bear (design ID 40965).
I cut out the daisy layer multiple times to layer them on top of each other with some foam adhesive to make my flower 3D. I then cut apart another daisy layer to give the illusion of some petals falling. I attached them by only adhering the top of the petal and then curling the bottom of the petal up. I added some faux stitching to my card as well as to my bear and flower stem/leaf. 

Here is a picture showing some of the dimension:


The "Oopsy Daisy" greeting from the You're So Punny stamp set from Joy's Life, was perfect for my card:


Look at all the great sayings on the You're So Punny Stamp Set:


So many great choices on here!

You can see all of Joy's Products at her store by clicking HERE

Thanks so much for stopping by and taking a look at my latest creation!
I really appreciate it!

Don't forget to check out the Joy's Life DT Blog for daily inspiration using Joy's Life Stamps!

I hope you have a fabulous crafty day!
Photobucket
*I created this project while on the Joy's Life Design Team*

Supplies:
Cardstock: Kraft, Yellow & Red (Recollections), White (Georgia Pacific), Black & Browns (Core'Dinations), Pear Pizzazz (SU!)
SIlhouette File: Love Bug Bear Design ID 40965
Stamp: You're So Punny (Joy's Life Stamps), PK-494 (Peachy Keen)
Ink: Tuxedo Black (Memento)
Misc.: Foam Adhesive (SU!), Yellow Stickles, White Gel Pen (Marvy), Pearls (Queen & Co.)

Saturday, July 20, 2013

Fintastic Day!


Hi everyone!
Happy Saturday!
I hope your weekend is off to a fabulous start!

Today I get to show you a fun little card using those awesome


I decided to make an all occasion card to have on hand. 
I love that little fish!
I found him in the Silhouette Online Store. The file is titled Fish In Bowl, design ID 39243.
I ran my top blue layer through the cuttlebug using my swiss dots embossing folder. 
I added some firefly stickles to my kelp and some crystal effects to some of the rocks as well as the bubbles. 


Here he is getting ready to swim by


to say HI!:

Action Wobbles bring so much fun to all your projects!

You can purchase Action Wobbles at the

Thanks so much for stopping by!
I hope you have a fabulous crafty day!
Photobucket
*I created this card while on the Action Wobble Design Team*

Supplies:
Cardstock: Midnight Muse (SU!), White (Georgia Pacific), Kraft (Recollections), Green & Oranges (?)
Cuttlebug: Swiss Dots Embossing Folder
Stamp: Pun In The Sun (Joy's Life Stamps)
Ink: Midnight Muse (SU!)
Silhouette: Fish In Bowl (39243)
Misc.: Crystal Effects 9SU!), White Gel Pen (Marvy), Firefly Stickles, Action Wobble

Thursday, July 18, 2013

Hello Friend!


Hi everyone!
Today I get to show you another project using 
that awesome CANDi!


I decided to make a fun little card to send to a crafty friend.
I stamped that adorable little image and then popped her up on some foam adhesive.
I added a satin ribbon bow and the finished the bow off with a flower made out of some 
Craftwork Card CANDi. I also added some CANDi to the top left of my card.

Here is a close up of my CANDi flower as well as the CANDi at the top of my card:

For my project, I used the Covent Garden CANDi:
Covent Garden is so pretty with it's subtle gold metallic stripes!

For the UK store, click HERE

You can also find CANDi in the US at many online retailers including

Thanks so much for stopping by!
I hope you have a fabulous crafty day!
Photobucket
*I created this project while on the Craftwork Cards USA DT*

Supplies:
Cardstock: Pink (Recollections), White (Georgia Pacific)
Patterned Paper: Happy Day (MME)
Punches/Dies: Classic Ovals (Spellbinders), Word Window & Modern Label (SU!), Doily Lace (Martha Stewart)
Stamp: Sweet Popsicle Puns (Joy's Life Stamps), Stamping Anya (The Greeting Farm)
Ink: Tuxedo Black (Memento)
Misc.: Ribbon (Offray), Pearls (Queen & Co.), Bic Markers, Spectrum Noir Markers, Dimensionals (SU!)

Tuesday, July 16, 2013

Krafty Girls #22--Birds Of A Feather

Hello and Happy Tuesday!
Are you guys ready for another fun challenge from the 

Create a paper project that is inspired by a bird theme. 

Here is the card that I created for the challenge:


For my card, I used my Straight from the Nest cricut cartridge and cut out my little birthday birdie at 4". I popped her up with some foam adhesive onto my kraft cardstock layer that I embossed with my swiss dots cuttlebug folder. I finished off my card with some ribbon and of course I had to add a button with some twine to my bow :) For my sentiment, I simply stamped it onto some blue cardstock and then notched out one end to create a banner shape and attached it to my card with the edge hanging off of the card just a little bit to give my card a little more dimension. The sentiment banner is also popped up with some foam adhesive. 

I hope you will head over to the 
and take a peek at the awesome inspiration from my amazing design team sisters as well as entering the challenge yourself :)
I would love to see what you create!

Thanks for stopping by!
I really appreciate it!
I hope you have a fabulous crafty day!
Photobucket
Supplies:
Card stock: Kraft & Blue (Recollections), Wisteria Wonder, Pear Pizzazz & Calypso Coral (SU!)
Patterned Paper: Flower Shower Spring Stack (DCWV)
Cricut Cartridge: Straight From The Nest
Punch: Daisy Scallop (EK Success)
Cuttlebug: Swiss Dots Embossing Folder
Stamp: Wild Life Puns (Joy's Life Stamps)
Ink: Tuxedo Black (Memento)
Misc.: Pear Pizzazz Ribbon (SU!), Button, Twine (Queen & Co.), Dimensionals (SU!), Googly Eyes, White Gel Pen (Marvy), Mint Ice Stickles

Saturday, July 13, 2013

Beary Best Wishes!

Hi guys!
I hope your Saturday is off to a great start! Today I get to show you another project using those awesome

This week the Joy's Life DT is having a free for all!!
Since I am running a little low on birthday cards, I decided to make one to add to my card stash.


I fell in love with this little bear with the frosting all over his face as soon as I saw him in the Silhouette store.
The bear is titled Party Bear (design ID 43753). The oval also came from the Silhouette store, Nesting Ovals Pinked Edge (design ID 4585). I stamped my sentiment and then I ran the oval through my cuttlebug using the swiss dots embossing folder.  I then popped up the oval  with some foam adhesive.  The little bear is also popped up with some foam adhesive. For my cupcake sprinkles, I drew them with a marker and then added some fruit punch stickles to each sprinkle. 


Look how perfect that sentiment is for my card!
My sentiment came from the Punny Animals set.
Look at all the great greetings on there:


So fun!!

You can find all of Joy's stamps at her online store by clicking HERE

Thanks so much for stopping by and taking a look at my latest creation!
I really appreciate it!

Don't forget to check out the Joy's Life DT Blog for daily inspiration using Joy's Life Stamps!

I hope you have a fabulous crafty day!
Photobucket
*I created this project while on the Joy's Life Design Team*

Supplies:
Cardstock: Blue (Recollections), White (Georgia Pacific)
Patterned Paper: American Crafts
Ink: Strawberry Slush (SU!)
Cuttlebug: Swiss Dots Embossing Folder
Silhouette Files: Party Bear (43753) & Nesting Ovals Pinked Edge (4585)
Misc.: Ribbon (Offray), Dimensionals (SU!), Fruit Punch Stickles

Friday, July 12, 2013

Hello Friend!

Hi there and happy Friday!!
Any fun plans for the weekend?
I hope to get a lot of crafting done and cross off some of the many projects on my growing to-do list.

Today I was able to make a card for 2 different challenges.

They are:


And


Here is the card that I created:


I love the simplicity of the sketch and had an idea in mind as soon as I saw it.
For my flower, I simply laid out some Washi Tape onto some white cardstock and then ran it through my cuttlebug using my Classic Scallop Circles from spellbinders. Once I had my scallop circles cut out, I simply used my scissors and cut a small line on every other scallop down to almost the center. Once cut, I simply rumpled them a little bit and folded under just a tad to give them some dimension. I layered them on top of each other and attached to my card. I finished off my flower with a button center and some leaves from a leaf punch. 

Thanks so much for taking the time to stop by my blog and take a look at my latest creation!
I really appreciate it!
I hope you have a fabulous day!
Photobucket
Cardstock: Red (Recollections) & White (Georgia Pacific)
Patterned Paper: The Sweetest Thing (MME)
Stamp: Studio G
Ink: Real Red (SU!)
Punches/Dies: Scallop Sentiement Border Punch (Fiskars), Rose Leaf (Martha Stewart), Classic Scallop Circles (Spellbinders)
Cuttlebug: Swiss Dots Embossing Folder
Misc.: Washi Tape (Darice), Button, Pearls (Queen & Co.)

Thursday, July 11, 2013

Thinking Of You!


Hi everyone!
Today I get to show you another project using 
that awesome CANDi!


I decided to make this fun little Thinking Of You card to send to someone.
One of the great things about CANDi is that they give your projects dimension without all the bulk.
That is great for saving yourself some money when it comes to postage :) 

For my project, I used Icing Sugar CANDi:
Icing Sugar is one of my favorite colors in the CANDi collection.
I love the little bit of shimmer on them. 

For the UK store, click HERE

You can also find CANDi in the US at many online retailers including

Don't forget to stop by the Craftwork Cards CANDi USA DT blog for daily inspiration!

Thanks so much for stopping by!
I hope you have a fabulous crafty day!
Photobucket
Supplies:
Cardstock: Coastal Cabana (SU!), White (Georgia Pacific)
Stamp: Hot Air Balloon Collage (TPC Studio)
Ink: Coastal Cabana, Crisp Cantaloupe & Daffodil Delight (SU!)
CANDi: Icing Sugar & CANDi Fix
Misc.: Dimensionals (SU!), Bling (Offray)

Tuesday, July 9, 2013

Krafty Girls #21---Die Cuts

Hello and Happy Tuesday!
Are you guys ready for another fun challenge from the 

Create a paper project that incorporates a die-cut! 

Here is the card that I created for the challenge:

For my card, I used my Teddy Bear Parade Cricut Lite cartridge and cut out my bear at 3". 
He is popped up on some foam adhesive and I also added some twine for his fishing line. 
My granny enjoys getting mail so I love having cards like this on hand to write a little letter to send to her.

I hope you will head over to the 
and take a peek at the awesome inspiration from my amazing design team sisters as well as entering the challenge yourself :)
I would love to see what you create!

Thanks for stopping by!
I really appreciate it!
I hope you have a fabulous crafty day!
Photobucket
Supplies:
Cardstock: Core'dinations
Patterned Paper: Scoot (Echo Park)
Cricut Cartridge: Teddy Bear Parade
Ink: Studio G
Punch: Xtra Large Photo Corners (SU!)
Misc.: Trendy Twine, Foam Adhesive (Recollections), White Gel Pen (Marvy)

Sunday, July 7, 2013

Clutch Purse

For my blog hop winners post, please click HERE

Hi everyone!
I hope you are all having a fabulous Sunday!

Today I would like to share with you this little clutch purse that I made from a free file at SVGCuts.com.
Right now, they are having a promotion where you can get the free clutch file, create one and send them a photo and get a gift credit to their store. 
How cool is that???
You can read all about the promotion on their site or by clicking HERE

Here is the purse that I created:

I love making 3D items so this file is right up my ally :) 
For my purse, I used some patterned paper from My Mind's Eye and cut it out with my silhouette.
Assembly was so easy!

I also added some faux stitching to go along with the challenge going on over at 

I will also be adding this project to the 3D challenge going on over at

Thank you so much for stopping by my blog today and taking a look at my latest creation!
I really appreciate it!

I hope you have a fabulous crafty day!
Photobucket
SVG File: Clutch from svgcuts.com
Patterned Paper: Hattie Happy Boutique (MME)
White Gel Pen
Queen & Co. Pearls