Saturday, September 28, 2013

Boo!

Hi everyone!
Happy Saturday!
I hope your weekend is off to a great start
 and you have a lot of fun things planned!

Today I get to show you a fun little card using those awesome


I decided to make a cute little Halloween card to send to my daughter.

I cut my cute little vampire pumpkin out using my Cricut Expression 2 and the Create A Friend Cartridge.
I wanted him to be able to fly so of course, I popped him up using an Action Wobble!


He is ready to fly into the night:


And here he comes to say BOO!


Action Wobbles bring so much fun to all your projects!

You can purchase Action Wobbles at the

Thanks so much for stopping by!
I hope you have a fabulous crafty day!
Photobucket
*I created this project while on the Action Wobble Design Team*

Supplies:
Card stock: Recollections
Patterned Paper: America Crafts
Cricut cartridge: Create A Friend
Punch: Spiderweb (Martha Stewart), Extra Large Photo Corner (SU!)
Ink: Black Staz On
Misc.: Grunge Rumple Ribbon (LoveBug Creations), Black Sharpie, White Gel Pen, Glossy Accents, Action Wobble, Bling (Queen & Co)

Thursday, September 26, 2013

Sweet Little Pumpkin

Hi crafty friends!
Happy Thursday!

This week the Joy's Life design team is showing you projects that feature buttons, burlap, kraft and/or twine and of course those awesome Joy's Life Stamps!

I decided to make a cute little fall card.

I managed to use a button, burlap and some kraft cardstock. :) 
I found that cute little bear with the pumpkins in the silhouette online store. I popped her up on my card with some foam adhesive.

For my greeting, I used this adorable sentiment from the 
It's All Fall Puns stamp set:

Look at all the great greetings on the It's All Fall Puns stamp set:


You can see all of Joy's Products at her store by clicking HERE

Don't forget to check out the Joy's Life Design Team blog for daily inspiration!

Thanks so much for stopping by and taking a look at my latest creation!
I really appreciate it!

I hope you have a fabulous crafty day!
Photobucket
*I created this project while on the Joy's Life Design Team*

Supplies:
Joy's Life Products:

Other Products:
Cardstock: Old Olive (SU!), Pinks & Oranges (Recollections), All Others (Core'dinations)
Patterned Paper: Thankful (Authentique)
Silhouette File: Fall Girl Bear Sitting With Pumpkins Design ID 46702
Ink: Jet Black (StazOn)
Punch: Scallop Sentiment (Fiskars)
Misc.: Burlap Ribbon (Offray), Button, Pearls (Queen & Co.), Foam Dimensionals (SU!), White Gel Pen (Marvy)
Wednesday, September 25, 2013

Warlock Root Bottle

Hi crafty friends!
Today I get to show you another project that uses that awesome
Rumple Ribbon from Lovebug Creations.


I used some of that gorgeous Monster Skin Rumple Ribbon on my spooky 
potion bottle that is filled with candy.
I found my potion bottle in the Silhouette Online Store.
After I tied my bow around the neck of my bottle, I simply wrapped a brad around the center of the bow. 
I also added a few black pearls to my bottle lid. 

Have you heard the news? 
LoveBug Creations has a FB group where you can show your crafty projects using those fabulous LoveBug Creations Products called The Lovebug Lounge!
Starting today, there are going to be 
monthly challenges in the
Be sure to head over there to read about the challenge and to enter your project, 
you have almost an entire month and there is a great prize to be won :)
I hope to see you and your project there!

Thanks so much for stopping by my blog and taking a look at my latest creation!
I really appreciate it!

Don't forget to stop by the Lovebug Creations Blog to see the gorgeous creations my wonderful Creative Team Sisters did :)

If you would like to purchase some Rumple Ribbon or Mama's Mesh, you can check out the Lovebug Creations Store by clicking HERE

I hope you have a fabulous crafty day!

Photobucket
*I created this project while on the Lovebug Creations Creative Team*

Supplies:
LoveBug Creations Products:

Other products Used:
Silhouette Online Store: 3D Halloween Warlock Root Bottle by Lori Whitlock (Design ID 33329)
Cardstock: Black (Core'dinations), Green (Recollections)
Misc.: Crystal Effects (SU!), Pearls (Queen & Co.), Brad (Studio G)
Saturday, September 21, 2013

Halloween in 3D Blog Hop

Happy Saturday!
Welcome to the Halloween in 3D Blog Hop!

I'm so glad you could join us today!
If you arrived here from Maria's blog, then you are in the right spot!
If you just happened to stumble across the hop on my blog today and would like to start at the beginning, just hop on over and see Joy @ Joy's Life.

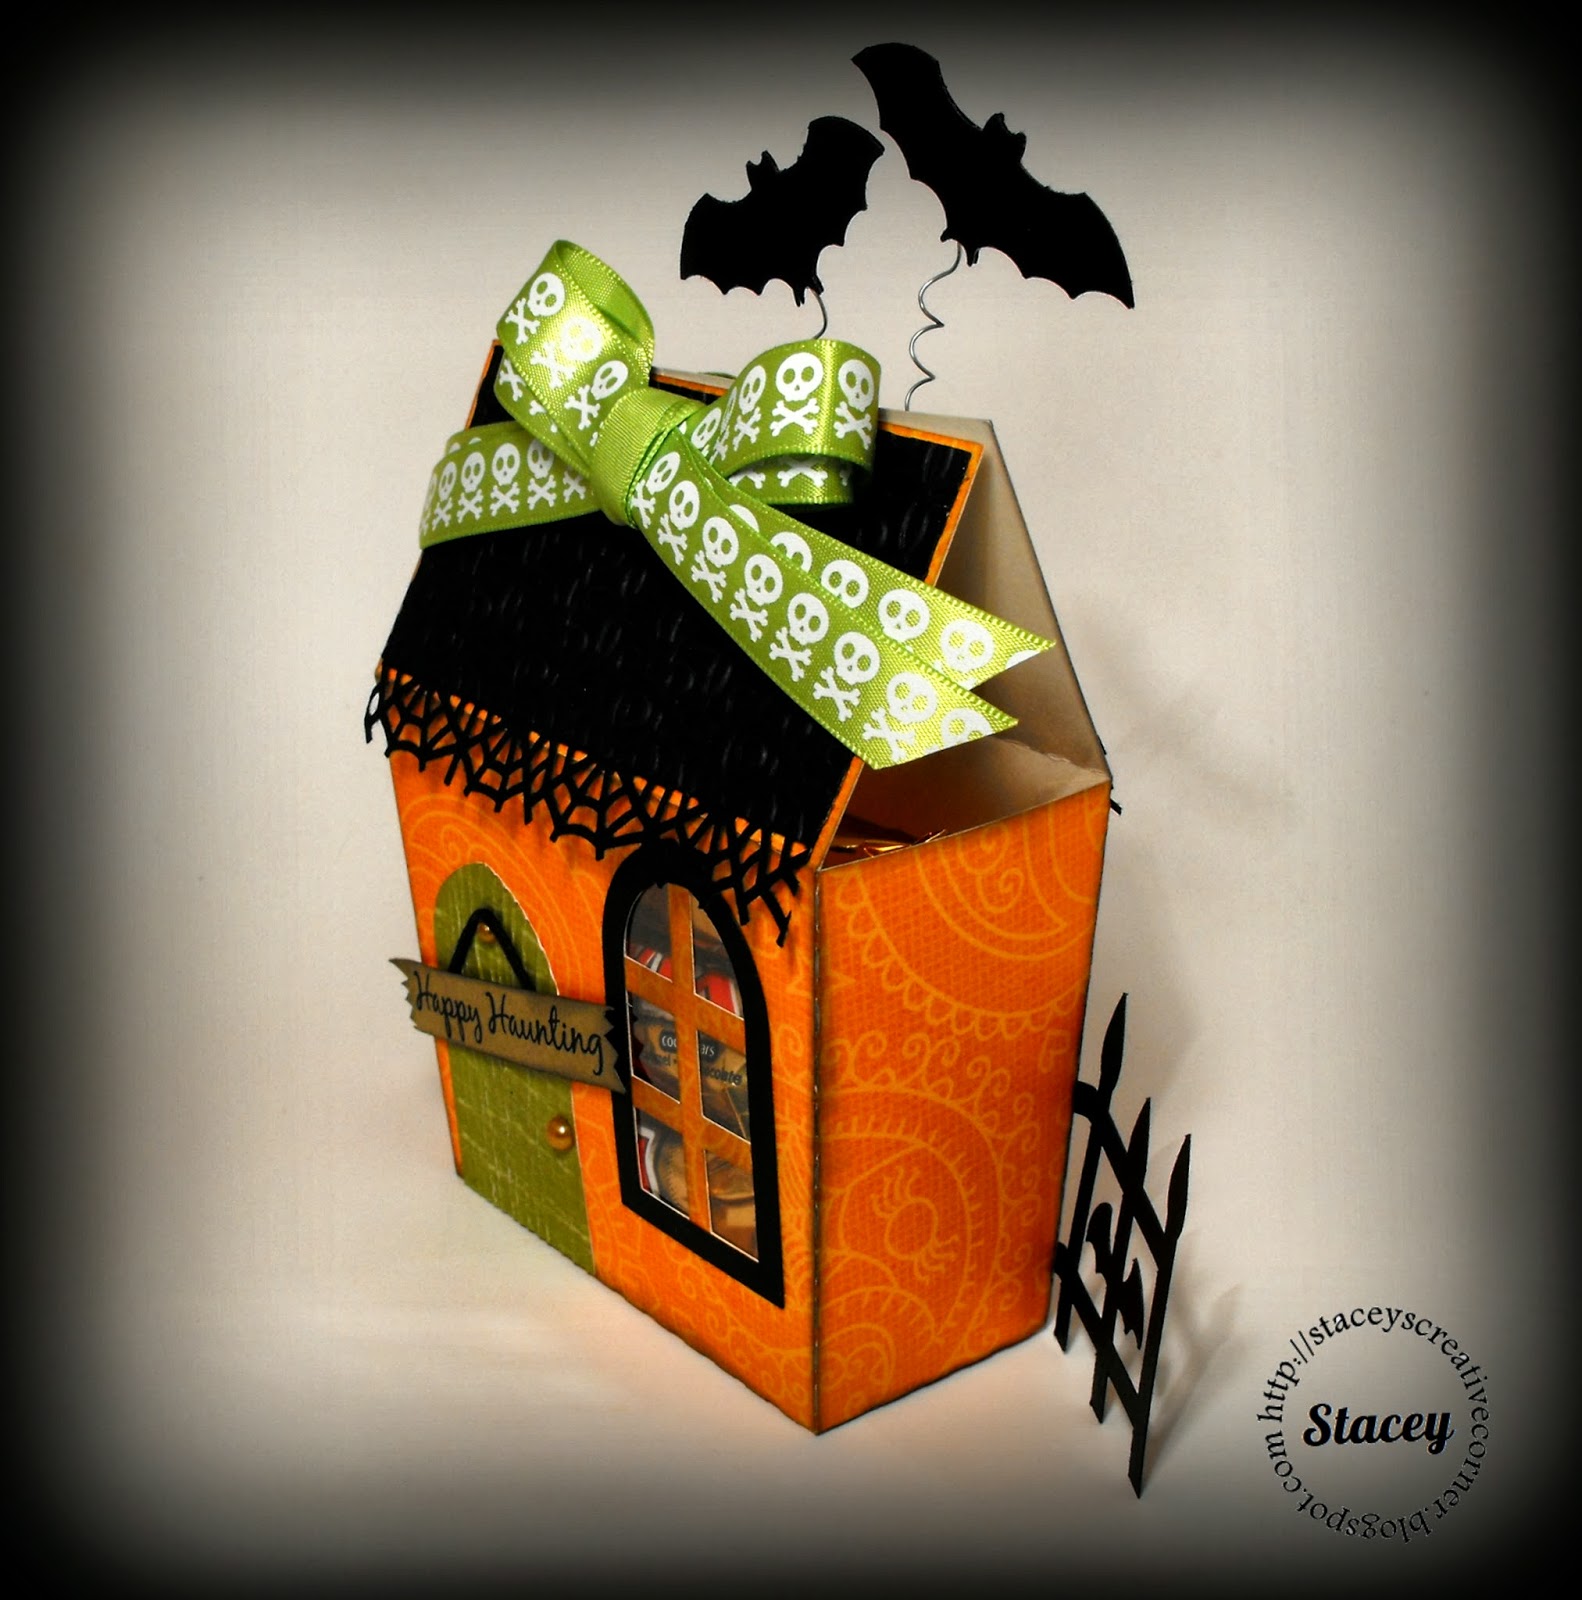
For my project, I decided to make a little haunted house filled with some candy.

I found this adorable little house in the Gimme Candy Boxes kit from SVGCuts.com and knew I had to make it as a gift for my hubby for Halloween. I added a spiderweb "gutter" to my roof using a border punch.  I also wanted to add some bats "flying" around the house so I simply curled some thin wire and sandwiched it in between some bats that I punched out. I then glued the bottom of my wire in between the roof and roof layer. I love how it turned out!

Here is a side view so you can see the thickness of the box.
 I was able to fit quite a bit of fun size candy bars in there.

For my sentiment, I wanted it to look like a decoration on the front of the door. All I did was simply stamp "Happy Haunting" from the Halloween Puns Stamp Set
onto a piece of Kraft cardstock and then trimmed it down and cut notches out at each end to give it the appearance of a broken board. I added a little hemp cord to "hang" my sign on the door.

There are so many fabulous greetings on the Halloween Puns stamp set!
You can see all of Joy's Products by checking out her store HERE

What's a Halloween blog hop without a little candy?
I am going to give the following prize away to a follower of my blog:

For your chance to win this 6x6 paper pad, all you have to do is:
1. Be a follower of my blog
&
2. Leave me a comment on this post. 

That's it!
I will have Random.org pick a winner from all the comments left on Thursday Sept. 26, 2013
so be sure and come back to see if you have won. 

I'm your last stop on the hop, I hope you had a great time!

Here is the complete line up:

Maria
Stacey (you are here)

Thanks so much for stopping by!
I hope you have a fabulous crafty day!
Photobucket
* I created this project while on the Joy's Life Design Team*

Supplies:
Joy's Life Products Used:

Other Products Used:
Silhouette: Gimme Candy Boxes from SVGCuts.com
Cardstock: Kraft & Black (Recollections)
Patterned Paper: Withches Brew Stack (DCWV)
Ink: Black StazOn
Punches: Bitty Bat (SU!), Spiderweb (Martha Stewart)
Embossing Folders: Paper Lace II (Cuttlebug), Woodgrain (Paper Studio)
Misc.: Ribbon (Studio G), Pearls (Queen & Co.), Hemp Cord

Friday, September 20, 2013

Happy Birthday Zeni!!

Hi everyone!
Happy Friday!

Today at Lovebug Creations, we are celebrating a fellow creative team members birthday!
Happy Birthday Zeni!!

Here is the card that I made for Zeni:

For my card, I cut my card base out of my Silhouette using a file that I found in the Silhouette Online Store titled: A2 Flag Shaped Card by Lori Whitlock (Design ID 44135)
I used a Penny Black stamp for my image. Isn't she cute? 
I put a little scallop border at the top of my card using a border punch and then adhered some of that gorgeous Rumple Ribbon from LoveBug Creations!

For my card, I used Panther Pink Rumple Ribbon:

You can check out all the other birthday cards that were made for Zeni over at the

If you would like to wish Zeni a "Happy Birthday!" you can visit her at her blog HERE!

Thanks for stopping by!
I hope you have a fabulous crafty day!
Photobucket
*I created this project while on the LoveBug Creations Creative Team*

Supplies:
LoveBug Creations Products:

Other Supplies:
Cardstock: Pink (Bazzill) & White (Georgia Pacific)
Patterned Paper: Hootenanny (MME)
Silhouette File: A2 Flag Shaped Card Lori Whitlock (44135)
Punches/Dies: Classic Scallop Circles (Spellbinders) & Scallop Sentiment (Fiskars)
Ink: Tuxedo Black (Memento)
Stamp: Sweet Thing (Penny Black)
Misc.: Bic Markers, Offray Bling, Dazzling Diamonds (SU!), Button, Twine (Trendy Twine)
Thursday, September 19, 2013

Christmas Layout

Hi everyone!
Happy Thursday!

Today I am here to show you my project for the 
Joy's Life Design Team
This week the design team is showing you layouts!
Whether it is a scrapbook layout, project life, smash book, etc. 

I am really behind on my layouts so I decided to do one to catch up on our Christmas album.
(or at least try to catch up lol)

For my layout, I used a sketch from Pamela Young of Pamela's World Of Scrap.
All of my patterned papers came from the Mod Holiday Specialty Paper Pad from K & Company.
I love using paper pads whenever I am doing layouts, it takes all the guesswork out for me of what matches and what doesn't. 

I also used many stamps from the 

There are so many more great sayings on the 


You can see all of Joy's Products at her store by clicking HERE

Don't forget to check out the Joy's Life Design Team blog for daily inspiration!

My layout was also made for the September 2 pg. sketch challenge over at Scrapbook.com

Thanks so much for stopping by and taking a look at my latest creation!
I really appreciate it!

I hope you have a fabulous crafty day!
Photobucket
*I created this project while on the Joy's Life Design Team*

Supplies:
Joy's Life Products Used:

Other Products Used:
Cardstock: White (Georgia Pacific), Real Red (SU!)
Patterned Paper: Mod Holiday Specialty Paper Pad (K & Company)
Ink: Real Red (SU!)
Punches/Dies: Circle Punch (Marvy), Labels 4 & Classic Scallop Circle (Spellbinders), Word Window and Modern Label (SU!), Diamond lace border punch (EK Success)
Misc.: Buttons, DMC Floss, Foam Adhesive, Bling (Offray), White Gel Pen (Marvy), Real Red Marker (SU!), Thickers
Wednesday, September 18, 2013

Candy Corn....YUM!

Hi everybody!
Happy Wednesday!

Today I get to share with you another project that uses that awesome 

Every Halloween, I mail my daughter a Halloween box from home that is filled to the brim with lots of yummy candy and surprises. I try to make a bunch of different boxes for each type of candy.
When I saw this cute little box in the Silhouette Online Store, I knew it would be perfect to hold some candy corn. 


I used some stickles to make my pumpkin sparkle and shine. I didn't have any black bling on hand, so I just simply used a black sharpie and colored some regular bling to achieve the look that I wanted.
I used some Grunge Rumple Ribbon and made a bow and then adhered a black button to the center of my bow. 

Here is a close up of that gorgeous Grunge Rumple Ribbon:

Isn't that Rumple Ribbon fabulous??

Thanks so much for stopping by my blog and taking a look at my latest creation!
I really appreciate it!

Don't forget to stop by the Lovebug Creations Blog to see the gorgeous creations my wonderful Creative Team Sisters did :)

If you would like to purchase some Rumple Ribbon or Mama's Mesh, you can check out the Lovebug Creations Store by clicking HERE

I hope you have a great crafty day!!
Photobucket
*I created this project while on the LoveBug Creations Creative Team*

Supplies:
LoveBug Creations Products:

Other Products Used:
Cardstock: Recollections
Silhouette Online Store: Bag Jack O Lantern by Samantha Walker (Design ID 32474)
Misc.: Candy Corn, Orange Peel Stickles, Button, DMC Floss, Blong (Offray)
Tuesday, September 17, 2013

Joy's Life Fall Parade

Hi everyone!!
Happy Tuesday!

Have you guys heard that there is a parade in town?
Joy of Joy's Life is having a parade of projects that use stamps from her
on her blog, Joy's Life.

Here is the project that I made for the parade:

I decided to make a little box to hold some candy


Here is a closeup of my sentiment that came from the


Isn't that sentiment the cutest?? I love it for little edible gifts!!

Thanks so much for stopping by and taking a look at my latest creation!
I really appreciate it!
Don't forget to stop by Joy's blog to see the rest of the projects in the parade!

I hope you have a fabulous crafty day!
Photobucket
*I created this project while on the Joy's Life Design Team*

Supplies:
Joy's Life Products Used:

Other Products:
Cardstock: Orange (Bazzill), Red, Kraft & Back (Core'dinations), Whie (Georgia Pacific)
Patterned Paper: Thankful (Authentique)
Silhouette: Turkey box from the "Happy Thanks" set from SVGCuts.com
Ink: Jet Black StazOn
Misc.: Ribbon, Bling (Darice), Hemp Cord, White Gel Pen, Brown Sharpie, Foam Adhesive
Saturday, September 14, 2013

Frankie Wants To Dance!


Hi everyone!
Happy Saturday!
I hope your weekend is off to a fabulous start!

Today I get to show you a fun little project using those awesome

Who's ready for Halloween??


I adore making Halloween crafts! 
I decided to make a little treat holder and fill it with some peanut butter cups.
Every year, I send my daughter a box of goodies for Halloween. 
I found this cute little treat box at the silhouette online store (file name at bottom under supplies) and thought it would be perfect! After I filled the box with the candy, I tied each end closed with some black tulle. My Frankenstein is actually a sticker from Studio G that I got last year and never used. I cut out a scallop circle using a spellbinders die, and simply placed the sticker on top and added some faux stitching. 

Here is a picture of my wobble:

Action Wobbles bring so much fun interaction to all your projects!
My little Frankenstein is ready to dance:


Maybe he is doing the Monster Mash?? ;)


You can purchase Action Wobbles at the

Thanks so much for stopping by!
I hope you have a fabulous crafty day!
Photobucket
*I created this card while on the Action Wobble Design Team*

Supplies:
Patterned Paper: The Witches Brew Stack (DCWV)
Silhouette Online Store: Candy Wrapper Box by Amy Robison Design ID# 47493
Die: Classic Scalloped Circles (Spellbinders)
Ink: Vintage Photo (Ranger)
Misc.: Sticker (Studio G), Action Wobble, Tulle (Celebrate It), Black Sharpie
Thursday, September 12, 2013

How's It Growing Flower Pot Card

Hi everyone!
Happy Thursday!
Ready for the weekend?

Today I get to show you another fun project using those

This week, the design team has been showing you shaped cards.

I decided to make a fun little flower pot card to send to my daughter.


For my card, I used a file that I found in the Silhouette Online Store. It made putting this card together so easy!

I thought the "How's It Growing?" from the Barnyard Puns Stamp set was perfect for my card.

Here is a look at the card out of the flower pot envelope:

Take a look at all the cute sayings on the Barnyard Puns Stamp Set:


You can see all of Joy's Products at her store by clicking HERE

Don't forget to visit the Joy's Life Design Team blog for daily inspiration!

Thanks so much for stopping by and taking a look at my latest creation!
I really appreciate it!

I hope you have a fabulous crafty day!
Photobucket
*I created this project while on the Joy's Life Design Team*

Supplies:
Cardstock: Pistachio Pudding, Calypso Coral, Crisp cantaloupe, Coastal Cabana, Bermuda Bay (SU!), White (Georgia Pacific)
Silhouette Online Store: Card Kit Flower Pot by Lori Whitlock  Design ID 8696
Ink: Calypso Coral (SU!)
Embossing Folder: Swiss Dots (Cuttlebug)
Misc.: Buttons, White Gel Pen, Ribbon (Offray), Bling (Offray)
Wednesday, September 11, 2013

Bless This House

Hi everyone!
Happy Wednesday!
 I hope your day is off to a great start!
Today I get to share with you another project that uses some of that awesome

I decided to make a little home decor project to hang beside my front door.
I saw these little ceramic coasters at my local Wal-Mart and knew it would be perfect for my project.

Here is what the coaster looked like before:

Here is what it looks like now:

I simply cut out my quote from some Vinyl and stuck it to my ceramic square.
 To give it a little color, I added a red gem to each one of the vinyl flowers.
I replaced the raffia hanging cord with some
I then tied a double loop bow, also with the Simply Black Rumple Ribbon, and glued a red satin rose to the center of my bow.

Here is a close up of my bow and that gorgeous Rumple Ribbon:

Thanks so much for stopping by my blog and taking a look at my latest creation!
I really appreciate it!

Don't forget to stop by the Lovebug Creations Blog to see the gorgeous creations my wonderful Creative Team Sisters did :)

If you would like to purchase some Rumple Ribbon or Mama's Mesh, you can check out the Lovebug Creations Store by clicking HERE

I hope you have a great crafty day!!
Photobucket
*I created this project while on the LoveBug Creations Creative Team*

Supplies:
LoveBug Creations Products:

Other Products Used:
Silhouette Online Store: Bless this House Vinyl Design ID 42442
Misc.: Ceramic Coaster, Red Bling (Studio G), Red Ribbon Rose (Offray), Vinyl (Provo Craft)
Tuesday, September 10, 2013

A New Blog Hop Winner!!

Hi everyone!!
Earlier I posted the winner for the blog candy that I was offering for the 

The winner was
Well, she has graciously asked me to pay it forward!

How nice is she??
Thank you Tanya!

So tonight I had Random.org pick a new number from the 
comments left and the new winner is:

#16 Kate said:
So Cool I love your Project especially the color you used my fave

Congrats Kate!!!
You are now the lucky winner of the 6x6 paper pad!
Thanks so much for hopping with us!

Please send me an email with your shipping address to 
staceyscreativecorner @ gmail . com (no spaces)
with Wicked Blog Hop Winner in the subject line so that I can get your prize mailed out to you
(Winner has until Sept. 24, 2013 to claim prize)

 I hope you all have a great crafty night!
Photobucket

Blog Hop Winner and Exciting News!

Hi everyone!
I hope your Tuesday is off to a great start!
I  have a couple of announcements to share with you today.

First, I would like to announce the winner for my blog candy for the
Something Wicked This Way Comes Blog Hop

Thank you all so much for hopping along with us!
I had Random.org pick a winner from the comments and the lucky winner of the 6x6 paper pad is:

#24 Tanya who said:
Wow!!! Love the card and matching jar!! Great job toots!!
Congrats Tanya!!!
Please send an email with your shipping address to staceyscreativecorner @ gmail . com (no spaces) with blog hop winner in the subject line to claim your prize.

Now onto my second announcement :)
I have some pretty exciting news to share with you today!
I was chosen to be on the new design team for 
Craftin Desert Divas!!

WooHoo! I am pretty excited and can't wait to start!

Here are the new Craftin Desert Divas Design Team Members....

Please be sure to visit their blogs and leave them some bloggie love.


A Mermaid's crafts
Lisa @ A Mermaids Crafts
Lori @ got2bcrafting

Stacey @ Stacey's Creative Corner (that's me!!)


Mayra @ Mayras Designs

Michelle @ Michelle's Cricut Fun

Emily @ Mollie's Motif


picasion
Kathy Jo @ I'm a Little Teapot...


Michelle @ Purple Monkey Moments

Shelly @ My Paper Love


One Cut Designs by Robin


The new design team will be starting Oct 28th so be sure to stop back and see what I create for the challenge!!

A big THANK YOU to
Tara of Craftin Desert Divas for allowing me this great opportunity!!

I hope you all have a fabulous crafty day!!
Photobucket
Related Posts Plugin for WordPress, Blogger...