Pages

Friday, September 25, 2015

Halloween Treat Bag

Happy happy Friday!!! 
Today I would like to share with you a fun little treat bag that showcases that adorable house from the Witch House stamp set from Pink & Main


For my bag, I simply used my gift bag punch board from WRMK. I doodled some black lines onto the front and added a gray scallop border all the way around the top. I stamped my greeting, also from the Witch House stamp set and assembled my bag. I punched a hole on each side and threaded some Rebar Tie Wire through the holes to create my handle. Once that was all done, I got busy coloring! Yay!! Isn't that house so fun?!?! I had a blast coloring it! Once I had the house colored, I used the coordinating Witch House Dies to cut out my house. I also used the stamp set and dies to place a couple of bats onto the front of my bag. The house and the bats were adhered to the bag with some foam tape just to give a little more dimension. I filled my bag with some purple paper shred and some yummy candy! 
I don't know if the candy will make it to Halloween, my kiddos keep eyeballing it ;) 

There are still a couple of days to enter Pink & Main's very first challenge. You can find more info on that by clicking HERE. There is also a Pink & Main Creations Gallery group on Facebook! We would love to have you join us over there :)

You can see the Pink & Main Blog HERE ,
the Pink & Main Store HERE

Thanks so much for stopping by today and taking a look at my latest creation!
I really appreciate it!!

I hope you have a great crafty day!

 photo signaturecopy_zpsa1897fa6.png
Supplies Used:
Cardstock: White (SSS), Gray & Green (Recollections)
Inks: Tuxedo Black (Memento)
Copics: B000, B04, C1, C2, C3, C5, C7, E23, E37, E39, Y11, YG06, YG13, YR04, YR21, YR68, V15, V17
Misc.: Scallop Sentiment Border Punch (Fiskars), Gift Bag Punch Board (WRMK), Silver Gel Pen

Monday, September 21, 2015

Card Harmony --- Geek Love

Happy Monday!!
I hope you all had a fabulous weekend!

Today Kimberly and I are back with another Card Harmony post.
Here is a link to my blog post that tells a little bit about what Card Harmony is all about. 
We basically take turns purchasing stamps each month and then we both make a card using the same stamp set to see how alike or different our cards turn out. We add a little twist each month though to make it a little more challenging. 

This month, Kimberly chose the adorable stamp set from
Avery Elle titled Geek Love for us to use. 
The added challenge was to also incorporate the following sketch from


Here is the card that I created based on the above sketch and the Geek Love Stamp set

I used some bright & fun pattern paper from Doodlebug for my card and colored my image based on some of the colors in the papers. After I had my image all colored, I used a die from My Creative Time to cut her out. Before I adhered her to my card with foam tape, I used a notebook style punch for my middle strip of paper and then heat embossed the greeting with some white embossing powder.  I added a bit of glossy accents to her glasses as well as her shoes. I finished off my card with some faux stitching and some bright enamel dots. 

Be sure to check out Kimberly's blog, Kimberly's Crafty Spot to see the awesome card that she made!! Here is a little sneak peek of her card:


Thanks so much for stopping by my blog today and taking a look at my latest creation!!
I really appreciate it!!

I hope you have a great crafty day!!

 photo signaturecopy_zpsa1897fa6.png
Supply List:
Cardstock: Real Red (SU!), White (Simon Says Stamp)
Pattern Paper: Take Note (Doodlebug)
Stamp: Geek Love (Avery Elle)
Ink: Tuxedo Black (Memento)
Copics: B04, C2, C4, C6, E25, E31, E33, E37, E50, E51, R11, R29, R46, RV29, RV52, RV55, Y13, YG06, YR04
Dies/Punches: Scalloped Stitched Oval Dies (MCT), Binding Edge Border Punch (EK Success)
Misc.: Enamel Dots, Glossy Accents, White Gel Pen, Foam Tape

Friday, September 18, 2015

Happy Fall Y'all!

Hi there!!! I hope you are all having a fabulous Friday! 
Today I have a fun Fall themed card that showcases the super cute Scarecrows stamp set that was released last week from Pink & Main. 


I love everything about this stamp set, from the cute scarecrows, corn, pumpkins and that adorable little crow!! I thought it would be cute to create a fun little scene for my card. To create my grassy hills, I used the Scallop Wave Dies and cut them out from some Old Olive SU! cardstock. I stamped my greeting, also from the Scarecrows set, and then adhered my hills to some fun burlap paper from DCWV and added some crinkle ribbon. Then I got busy coloring my images with my copics :) After I had everything colored in, I used the coordinating Scarecrows Dies and cut out all my pieces! I love the little white border that the dies leave!! I started building my little scene by tucking some pieces under the hills and then I popped the scarecrow up with some foam tape as well as the crow. So fun!! 

There is still plenty of time to enter Pink & Main's very first challenge. You can find more info on that by clicking HERE. There is also a Pink & Main Creations Gallery group on Facebook! We would love to have you join us over there :)

You can see the Pink & Main Blog HERE ,
the Pink & Main Store HERE

Thanks so much for stopping by today and taking a look at my latest creation!
I really appreciate it!!

I hope you have a great crafty day!

 photo signaturecopy_zpsa1897fa6.png
Supply List:
Cardstock: White (Simon Says Stamp), Old Olive (SU!)
Pattern Paper: Mabel (MME), Burlap (DCWV)
Stamp: Scarecrows (Pink & Main)
Dies: Scarecrows & Scallop Wave Dies (Pink & Main)
Inks: Tuxedo Black (Memento)
Copics: B12, B14, B16, B18, E23, E25, E31, E33, E35, E37, E51, E79, G16, G19, R29, R46, RV13, Y13, Y15, Y26, Y35, YR24, Y38, YR04, YR07, YR68, YG63, G43, Y11, Y17
Misc.: Glossy accents, Crinkle Ribbon, Foam tape

Friday, September 11, 2015

Trick or Treat

Hi crafty friends!!
 I hope you are having a wonderful Friday!
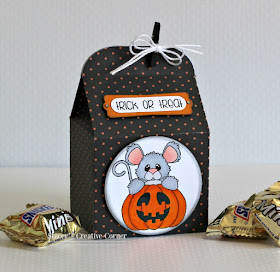
Today I have a super cute little project that features the adorable little Pumpkin Mouse stamp from Pink & Main. This stamp is the Free With A $30 Purchase stamp set for September. 
So cute!!


When I saw this Pumpkin Mouse, all I could think about is how this little mouse was hoping some treats would drop his way! haha! I figured he would make the perfect little focus for a little box filled with some candy :) I used the Baker's Box thinlet from SU to create my box. I then stamped that cute little mouse onto some white cardstock from Simon Says Stamp and started coloring him in with my Copics. After he was all colored in, I used a circle die from WRMK and popped him up with some foam tape. For my greeting, I used the "trick or treat" from the Planning Fall stamp set.  I punched it out with a couple of SU! punches and popped that up with foam tape also. I added a little clothespin and a bow from some crochet thread to hold my box closed. 

A couple of reminders, Pink & Main has started doing challenges!! There is still plenty of time to enter our very first challenge. You can find more info on that by clicking HERE. There is also a Pink & Main Creations Gallery group on Facebook! We would love to have you join us over there :)

You can see the Pink & Main Blog HERE ,
the Pink & Main Store HERE

Thanks so much for stopping by today and taking a look at my latest creation!
I really appreciate it!!

I hope you have a great crafty day!

 photo signaturecopy_zpsa1897fa6.png

Supply List
Cardstock: Pumpkin Pie (SU!), White (Simon Says Stamp)
Patterned Paper: Toil & Trouble (AC)
Stamps: Planning Fall & Pumpkin Mouse (Pink & Main)
Dies: Baker's Box (SU), Nesting Circles (WRMK)
Inks: Tuxedo Black (Memento), Onyx Black (Versafine)
Copics: C1, C2, C3, YR04, YR07, R11, R20
Misc.: Modern Label & Word Window Punch (SU!), Foam Tape, Bling, Mini Clothespin, Crochet Thread

Friday, September 4, 2015

Best Witches Halloween Card


Happy Friday!!
Today I have a card to show you (as well as a little sneaky peek) that uses one of the new stamp sets from Pink & Main called Best Witches.


I know it is only September but ..... I love love love Halloween!! With that being said, I couldn't wait to color this little cutie when I saw her. I stamped her onto some Neenah cardstock and got busy coloring with my Copics. I added a few dots and doodles to her with my white gel pen after I was done coloring. Then I ran her through my cuttlebug with a Spellbinders die called Floral Ovals, and inked all around the edges with some Black Soot Distress Ink. I popped her up with some foam adhesive for a little dimension. I stamped my sentiment, punched it out, inked the edges and also popped that up. I finished off my card with a bow, some black star confetti and of course some Wink Of Stella for a little more sparkle. I also added some pearls to the corners of my card base. 


Have you heard?? Pink & Main has started doing challenges!!! Woot Woot!! You can read all the details about that by visiting the Pink & Main Challenge Blog.

You can see the Pink & Main Blog HERE ,
the Pink & Main Store HERE
and the Pink & Main Creations Gallery on Facebook HERE
We would love to see what you have been creating :) 

Thanks so much for stopping by today and taking a look at my latest creation!
I really appreciate it!!

I hope you have a great crafty day!

 photo signaturecopy_zpsa1897fa6.png
Supply List:
Cardstock: Neenah & Recollections
Pattern Paper: Toil & Trouble (AC)
Inks: Tuxedo Black (Memento) & Black Soot Distress (Ranger)
Dies: Floral Ovals (Spellbinders)
Copics: C4, C6, C8, E000, E00, E02, E15, E27, E37, R20, V04, V15, V17, Y17, Y26
Misc.: Star Confetti, Ribbon, Ticket Corner Punch (SU!), Modern Label Punch (SU!), Pearls, Foam Tape, White Gel Pen

Tuesday, September 1, 2015

Pink & Main Challenge #1

Happy Tuesday and happy September!!!

Have you guys heard the news??
Pink & Main has started monthly challenges!!
The very first challenge starts today and it has the theme of.....
Anything Goes!!
You just need to simply create a new project, post it to your blog and enter by adding it to the inlinkz at the Pink & Main Challenge Blog.
Easy Peasy!!

Here is the card that I created for the challenge:


Since it is almost Fall (my favorite season), I thought it would be fun to create a Fall themed card. For my little scene, I used the Scallop Waves Dies to create my little grassy hills. Once I had those adhered to my card, I stamped a branch from the Happy Fall stamp set and started layering some leaves in different fall colors. I also thought it would be cute if some of the leaves had gathered on the ground so I fussy cut a few out and applied them to the grass. Isn't that little squirrel holding his acorn just the cutest?? He is also from the Happy Fall stamp set. I fussy cut him out and adhered him with some foam tape for a little dimension. I finished off my card by adding some wink of stella to the leaves for a bit of sparkle and some glossy accents to the acorn and the little squirrels nose. 

I hope you will create a project and join us for the 
I would love to see what you create!!

Thanks so much for stopping by my blog today and taking a look at my latest creation!
I really appreciate it!!
I hope you have a great crafty day!!

P.S. I will also be entering this card into the current challenge at

 photo signaturecopy_zpsa1897fa6.png
Supply List:
Cardstock: Cream (Recollections), Old Olive & Pear Pizzazz (SU!), Orange (DCWV)
Pattern Paper: The Natural Matstack (DCWV)
Inks: Vintage Photo & Peeled Paint Distress Inks (Ranger), Old Olive, Pumpkin Pie, Crushed Curry, Cherry Cobbler, Baked Brown Sugar (SU!)
Misc.: Wink of Stella Clear, Ribbon, Glossy Accents, Copics