Friday, October 28, 2016

DCWV & Pink and Main Fall Blog Hop

Hey crafty friends! I hope you are having a fabulous Friday so far!
Thanks so much for joining us today for the hop!


Can it really be the end of October already? In most places Fall is in full swing with beautiful changing colors and crisp breezes in the air. I love seeing the colors of Fall. Taking drives and seeing the leaves and the gorgeous colors are one of my favorite things to do in the Fall. Wearing jeans and hoodies, drinking hot cider and the smell of fireplaces when you step outdoors. lol! I could go on and on! Fall is my absolute favorite season!

We have a fun and inspirational blog hop for you today from the awesome teams at Pink and Main and Die Cuts With a View (DCWV)! Be sure to check out each blog in the hop and leave some love along the way. Also, don't miss entering for a chance to win some great prizes on the DCWV blog and the Pink and Main blog.

You should have arrived here from Sukie's awesome blog.

If you just happened to stumble upon the hop on my blog today, be sure to start at the DCWV blog for the beginning. 

I know there are a lot of stops and you are probably itching to see all the fabulous projects so I am going to try and keep my post short and sweet so I don't keep you too long :) 

I made two projects for today's hop. The first one is a little candy box that will sit on one of the end tables in the living room for the rest of the fall season.


For my project, I used some of those gorgeous papers in the Autumn Leaves & Autumn Leaves Mini Stacks from DCWV. Aren't those patterns fabulous! I love the florals, wood grains and plaid! Perfect combination in my opinion! I inked all my edges and added a shimmery bow the the handle of my lid. I added that sweet little bear from the Sunflowers stamp set from Pink & Main with some foam tape so that the lid would still close. I love how the sunflower the bear is holding goes so well with that patterned paper! They compliment each other so well! The box is from SVGcuts.

I filled the box with some yummy caramel candy!

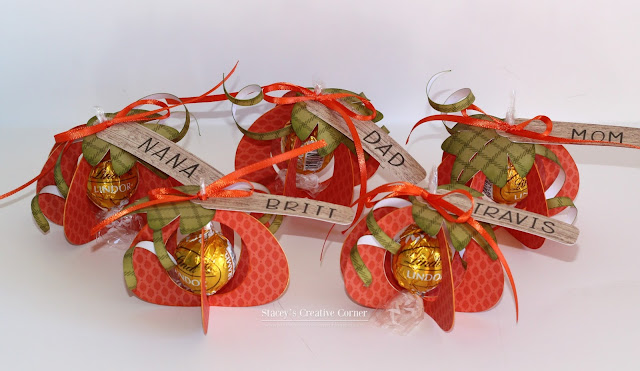
For my second project, I thought it would be cute to have these sweet little pumpkins on the Thanksgiving table.


I used some more of that gorgeous paper from the Autumn Leaves stack by DCWV to create these pumpkins from a file in the Silhouette store. I added our names with the fun letters that are in the Banner Alpha stamp set from Pink & Main. So cute and I am sure my family will enjoy the candy lol!


Thanks so much for taking the time to stop by today!


Your next stop is the fabulous Kimberly!


Here is the complete lineup:

2. Yolie
4. Pamela
5. Pam
6. Karen H.
7. Lisa
10. Karla
11. Katka
12. Monique
13. Sukie
14. Stacey (You Are Here)
15. Kimberly (Next)
16. Beth
Have fun hopping!!
I hope you have a great crafty day!

 photo signaturecopy_zpsa1897fa6.png
Supply List:
Octagon Box:
--Cardstock: White (Coredinations)
--Patterned Paper: Autumn Leaves & Autumn Leaves Mini Stack (DCWV)
--Stamp: Sunflowers (Pink & Main)
--Dies: Sunflowers (Pink & Main)
--Inks; Tuxedo Black Memento, Vintage Photo Distress
--Copics; E33, E35, E53, E49, G14, Y19, Y35, YG09
--Misc.: Foam Tape, Ribbon, Bling, White Gel Pen, Chalk
--SVG: Octagon Box from the Maison de Madeline SVG Kit by SVGcuts

Place cards:
--Patterned Paper: Autumn Leaves Mini Stack & Autumn Leaves Stack (DCWV)
--Ink: Versafine Onyx Black, Peeled Paint & Spiced Marmalade Distress
--SVG: Pumpkin Truffle Center Table Favor by Snapdragon Snippets Silhouette Id #70321
--Misc.:Ribbon (Offray)
Wednesday, October 26, 2016

It's All About The Candy!!

Hi crafty friends!
I hope you are having a wonderful Wednesday!

Today I am here to share a fun little project that uses some of those awesome
 Pink & Main stamps and dies!


I just couldn't resist making one last Halloween project for this year lol!


This was really easy to create and would be super simple to mass produce. I took a little 2.5" x 2.5" square box and folded/assembled it except for the lid. Instead of folding that on the score lines, I just kept it going straight and adhered some patterned paper to it. I stamped that sweet little kitty and her hat from the Witch Brew stamp set and then used the coordinating dies to cut her out. I popped her up with some foam tape to the front of my box. I stamped the spider web from the Witch Brew stamp set 9 times, cut them out with the dies and adhered them to my box to create a fun little edge. I stamped that cute sentiment from the Punkin stamp set and cut it out using a die from the Stitched Greetings dies. I added a bag of candy corn and a fun orange bow to finish it off, as well as a few pieces of star confetti.:) 

You can see the Pink & Main Blog HERE ,
the Pink & Main Store HERE
and the Pink & Main Creations Gallery on Facebook HERE

Thanks so much for stopping by!
I appreciate it so much!
I hope you have a great crafty day!

 photo signaturecopy_zpsa1897fa6.png
Supply List:
--Cardstock: White (Coredinations)
--Patterned Paper: Eek-a-boo Stack (DCWV)
--Stamp: Witch Brew & Punkin (Pink & Main)
--Dies: Witch Brew & Stitched Greetings (Pink & Main)
--Ink: Black Soot Distress, Memento Tuxedo Black
--Misc.: Glaze Pens, Kraft Box (Inkadinkado), Star Confetti, Foam Tape, Glossy Accents
Tuesday, October 25, 2016

Shopping Our Stash #275

Hey everyone and happy Tuesday!!
It's time for a new challenge over at 

This week challenge #275 is....
Three Trees
(use at least 3 trees on your project)

Here is the card I created:


 I started off by adhering some ribbon to my pattern paper and attaching it to my card base. I stamped my trees from a Stampin' Up stamp in brown ink and added some dazzling diamonds glitter to the snow banks and tree branches. There is so much sparkle on my card, this picture really doesn't capture it at all :( I finished it off with a bow and a greeting in the corner.

Neglected items from my stash that I used are:
--Lovely As A Tree Stamp set from Stampin' Up! (bought it used from a friend almost a year ago and used it for the first time on this card)
--Teeny Tag Holidays Stamp set (At least a year since I used it)
--Walnut Stain Distress Ink (can't remember ever using it before)

Be sure to head over to the Shopping Our Stash Challenge Blog to see what my design team sisters created. I hope you will decide to make a project and join us, I would love to see what you create! If you would like to be considered to be a guest designer, simply add DT after your name when you link up :)  

Thank you so much for stopping by my blog and taking a look at my latest creation!
I really appreciate it!
I hope you have a great crafty day!

 photo signaturecopy_zpsa1897fa6.png
Supply List:
--Cardstock: Coordinations
--Patterned Paper: Altitude (Bo Bunny)
--Stamp: Lovely As A Tree (SU!), Teeny Tag Holidays (My Creative Time)
--Ink: Walnut Stain Distress Ink (Ranger)
--Dies: Rounded Stitched Rectangles (Pink & Main)
--Misc.: Dazzling Diamonds Glitter (SU!), Ribbon (Offray)
Friday, October 21, 2016

Hello Pumpkin

Hey crafty friends and happy Friday!!
I hope your day is off to a great start!

Today I have a card to share with you that I made for the 


Great sketch right? Here is my take on it:


I kept my card base pretty simple by leaving it white and just doodling wonky lines around the perimeter with a black pen. All of my patterned paper came from the dollar spot at Target. I was very surprised to find 3 different 6x6 paper pads at my local target's dollar spot and am kicking myself now for not getting more than one of each. I love the patterns in the papers. I colored my pumpkins from the Bountiful Harvest stamp set by Verve with my Copics and used a circle die to cut them out. I layered everything together and added my sentiment onto some kraft cardstock and finished it off with a cardstock button and twine. 

Thank so much for taking the time to stop by my blog and take a look at my latest creation!
I really appreciate it!!
I hope you have a great crafty day!!

 photo signaturecopy_zpsa1897fa6.png
Supply List:
--Cardstock: White (Coordinations), Kraft (Recollections)
--Patterned Paper: Target Dollar Spot
--Stamp: Bountiful Harvest (Verve Stamps)
--Ink: Memento Tuxedo Black
--Dies: Bunch Of Fun Circles (MCT), Nesting Circles (WRMK), Button Quartet (MFT)
--Copics: E25, E35, E57, Y15, YG03, YG67, YR02, YR07
--Misc.: Trendy Twine, Foam Tape
Thursday, October 20, 2016

DCWV October Stach-a-Holic Sketch Challenge

Hi there crafty friends!
I hope you are having a terrific Thursday!!

Today I would like to share a card that I created for the

Here is the card sketch for the month of October:


and here is the card I created based on the above sketch:


I love all the prints in the Coastal stack from DCWV and knew right away I wanted to use some of them for my card. I paired them up with a fun anchor die cut and nautical sentiment and my card was pretty much done. So easy! I love when it all comes together so fast and easy, all thanks to a great sketch & some beautiful and inspirational papers!

Thank so much for taking the time to stop by my blog and take a look at my latest creation!
I really appreciate it!!
I hope you have a great crafty day!!

 photo signaturecopy_zpsa1897fa6.png
Supply List:
--Cardstock: Gray (Recollections)
--Patterned Paper: Coastal (DCWV)
--Stamp: Hey Sailor! (My Creative Time)
--Die: Anchors & Heart and Bunch Of Fun Circle Dies (My Creative Time)
--Ink: Onyx Black Versafine
--Misc.: Foam Tape, Sequins (CTMH)
Wednesday, October 19, 2016

Trick or Treat Candy Box

Hi crafty friends!
I hope you are having a wonderful Wednesday!

Today I am here to share a 3D project that uses some of those awesome
 Pink & Main stamps and dies!


With Halloween fast approaching, I thought I would make one more little candy/treat box. 


I created my box using a die and doodled on the top flap. To keep the box closed, I created a little belly band out of some spider web patterned paper. I decorated the belly band by stamping the haunted house and bats from the Punkin stamp set and cutting it out with one of the Nested Hexagons dies and layering it on top of a Scallop Hexagon. I fussy cut the ghost from the Punkin set and adhered that onto my hexagons. My greeting came from the Planning Fall stamp set. I attached my hexagon to my belly band with some foam tape and added some wink of stella for some shimmer.


I wanted there to be a little "surprise" when you opened the box, besides the candy lol. That cute little spider came from the Punkin stamp set. I stamped him with some black ink and drew a little line from his web to him.

I will also be entering this into the challenge over at
Simon Says Stamp Monday Challenge: Treat Bag/Box

You can see the Pink & Main Blog HERE ,
the Pink & Main Store HERE
and the Pink & Main Creations Gallery on Facebook HERE

Thanks so much for stopping by!
I appreciate it so much!
I hope you have a great crafty day!

 photo signaturecopy_zpsa1897fa6.png
Supply List:
--Cardstock: Fake Tan (Lawn Fawn), White (Georgia Pacific), Acetate
--Patterned Paper: Boo (Pebbles)
--Stamp: Planning Fall & Punkin (Pink & Main)
--Dies: Scallop Hexagons & Nested Hexagons (Pink & Main), Shaker Box (Sizzix)
--Ink: Tuxedo Black (Memento)
--Misc.: Copic Multiliner, Foam Tape, Word Window Punch (SU!), Clear WInk Of Stella, Black Glaze Pen
Tuesday, October 18, 2016

Shopping Our Stash #274

Hey everyone and happy Tuesday!!
It's time for a new challenge over at 

This week challenge #274 is....
Hey Ghoulfriend!!
(Create a Halloween card/project)

Here is the card I created:


This card was so easy to put together and fast!! I started off with my gray cardbase and inked around the edges. I cut a piece of  patterned paper, inked around the edges and adhered to my base. I used a die to cut out my oval, inked the edges and popped it up with some foam tape. I added a couple pieces of bling onto the oval and added a 3D sticker to the middle. Voila! Card was done in less that 10 minutes. Gotta love that!!

Neglected items from my stash that I used are:
--Patterned Paper: I used two stacks, both of them are over a year old and I removed the seals from both for this card.
--3D Sticker: I bought this sticker a while ago. I wanna say about 2 years ago, can't remember. I have been hoarding it but am so happy how it looks on this card.
--Oval Die: Been at least 6 months since I last used it


Be sure to head over to the Shopping Our Stash Challenge Blog to see what my design team sisters created. I hope you will decide to make a project and join us, I would love to see what you create!

Thank you so much for stopping by my blog and taking a look at my latest creation!
I really appreciate it!
I hope you have a great crafty day!

 photo signaturecopy_zpsa1897fa6.png
Supply List:
--Cardstock: Gray (Recollections)
--Patterned Paper: Haunted Photo (Martha Stewart) & Midnight Magic (Recollections)
--Dies: Stitched Rectangular Frame Dies & More (MCT), Floral Ovals (Spellbinders)
--Ink: Black Soot Distress
--Misc.: Bling, Foam Tape & Recollections Trick or Treat Sticker
Monday, October 17, 2016

Trick or Treat

Hey everyone!
I hope your Monday is off to a great start!

Today I have a pretty simple card to share with you that I made for a couple of different challenges.

They are:

October Card Sketch


Here is what I created for the challenges:

I'm still in Halloween mode so I couldn't wait to make another Halloween card. 
I dug deep in my stash for this one lol! The Halloween stamp is quite old and I honestly can not remember the last time I used it but it was perfect for the sketch. After I had my image all stamped up, I used a circle die to cut it out as well as the layering circles. I cut an orange strip, added some faux stitching, and added a spider web border to the back. I adhered it to my card base and added my die cut circles and image on top. I finished off my card with some doodles around the edge. Simple but I like it :) 

Thanks so much for stopping by my blog today and taking a look at my latest creation!
I really appreciate it!
I hope you have a great crafty day!

 photo signaturecopy_zpsa1897fa6.png
Supplies:
--Cardstock: Recollections
--Patterned Paper: Halloween Parade (Doodlebug)
--Stamp: Halloween (Recollections)
--Ink: Memento Tuxedo Black
--Dies: Nesting Circles (WRMK) & Bunch Of Fun Circles (MCT)
--Misc.: Bic Markers, Glossy Accents, Spider Web Border Punch (Martha Stewart), Foam Tape, Clear WInk Of Stella, Black Copic Multiliner
Tuesday, October 11, 2016

Shopping Our Stash #273

Hey everyone and happy Tuesday!!
It's time for a new challenge over at 

This week challenge #273 is....
A Color Challenge!!

Simply create a project with the above colors in mind. 


Here is the project that I created for this challenge:


This plaid patterned paper was perfect for the challenge! It was just screaming to be used! I pulled out some stamps and started coloring. Aren't those hedgehogs adorable? I love them! Anywho, once I had them colored in, I fussy cut them out and adhered them to a white stitched rectangle. (The die cut rectangle should be a tad bit longer, but I just adjusted it in my machine so that there wasn't too much empty space). I used a scalloped curved edge die on my wood grain paper, attached some ribbon and them attached everything to my card base. Easy peasy! I love that it isn't too bulky, makes it so much easier to mail :o) 

Neglected item that I used on my card are:
--Scalloped Edge Die (Won it Dec. 2015, used for the first time)--
--Stampin' Up Daffodil Delight Ribbon (Can't remember last time I used it)--

Be sure to head over to the Shopping Our Stash Challenge Blog to see what my design team sisters created. I hope you will decide to make a project and join us, I would love to see what you create!

Thank you so much for stopping by my blog and taking a look at my latest creation!
I really appreciate it!
I hope you have a great crafty day!


 photo signaturecopy_zpsa1897fa6.png
Supply List:
--Cardstock: White (Crafter's Companion)
--Perfectly Plaid (Lawn Fawn), Holiday (AC)
--Stamp: Happy Hedgehogs (MFT)
--Ink: Memento Tuxedo Black 
--Dies: Bag & Tags Dies (Concord & 9th), Stitched Rounded Rectangles (Pink & Main)
--Copics: BG45, BG49, E21, E23, E25, E31, E50, E51, R11, Y15, Y19
--Misc.: White Gel Pen, Ribbon, Chalk, Corner Rounder (WRMK)
Friday, October 7, 2016

It's a Pink Christmas!!!

Hey crafty friends!!!
I hope you are all having a wonderful Friday!!

I am so honored to be a part of a Pink Christmas over at Jingle Belles!!
Here is a little bit of information about what it is all about:


What is it? 
A challenge to make and link *PINK* holiday cards in honor of Breast Cancer Awareness Month.

Where is it?

Whom does it benefit?
Lauren and Stephanie (aka the Jingle Belles) are each donating $2 per linked up card to the Breast Cancer Research Foundation.

How many cards can I link?
As many as you want to, there's no limit!

What if I don't celebrate Christmas?
You're welcome to make pink Hanukkah, pink Solstice, pink Kwanzaa or pink New Year cards instead.

Does my card have to be ALL pink?
Nope! But it should be noticeably pink, so there should be more than, say, the blush on Mrs. Claus' cheeks, if you see what we mean?

What's with the "(GAH!)"?
Our friend and fellow papercrafting blogger, Leslie Hanna (aka the Crooked Stamper) passed away last December. Each year, Leslie was one of the most enthusiastic supporters of this event... which was pretty cool, seeing as how she really REALLY did not like the color pink, at all. A fact she wrote about quite hilariously on many occasions. So it's a bit of a tribute, and a way to have her with us in spirit!

Please join us to Think Pink and Link Pink at Jingle Belles!
♥♥♥♥♥
------------------------------------------------------------------------------------------------------------------------

How cool right?? 
Thank you Lauren for allowing me to be a part of this!!
When I started brainstorming for my project, for some reason my brain kept leaning towards a shimmery card with pink snowflakes. haha! So here is what I ended up creating:


I love watching snowflakes fall, especially the light airy ones. Almost looks like they are dancing in a way. I thought I would give try making a spinner card with the snowflake that spins when the card is opened. I used some striped patterned paper and adhered it my card base with some temporary adhesive. I ran it through my die cut machine with a circle die to create the opening. I ran some white thread down the center of my circle and permanently attached the patterned paper to my card base being careful to line up the circle openings together. I die cut my snowflake out of some pink glitter cardstock twice. I adhered them together, sandwiching the string in between the two pieces. I finished off my card by adding a white glitter circle frame, my greeting and some sequins. I think it turned out so pretty! 

I hope you will join in the challenge over at Jingle Belles and make a pink holiday card to support a great cause! Let's make blogland PINK and help raise some money for research to find a cure!!

Image result for breast cancer awareness ribbon free
Thanks so much for stopping by my blog today and taking a look at my latest creation!
I really appreciate it!
I hope you have a great crafty day!!

 photo signaturecopy_zpsa1897fa6.png
Supply List:
--Cardstock: White (Georgia Pacific)
--Patterned Paper: Merry Little Christmas (MME)
--Stamp: Warm Holiday Fun (My Creative Time)
--Ink: Pink to Red Ombre (Hero Arts)
--Dies: Bunch Of Fun Circles, Winter Flake Dies (My Creative Time)
--Misc.: Dazzling Diamonds (SU!), Sequins, Bling, Crochet Thread
Wednesday, October 5, 2016

A Sweet Christmas

Hi crafty friends!
I hope you are having a wonderful Wednesday!

Today I am here to share a sweet little Christmas card that uses some of those awesome
 Pink & Main stamps and dies!


To create my card, I used the Cocoa Kisses stamp and coordinating dies for those sweet little gingerbread. I colored them in with my Copics and added a bit of chalk to their cheeks, as well as some cute little freckles. I added them both to a white rectangle that was cut using the Stitched Rounded Rectangle and popped up the sitting gingerbread with some foam tape. The white scallop was cut using the Scallop Borders die set. 

Inspiration for this card came from a couple of places that currently have challenges going on. 

They are:


and

(Week 43:Photo Challenge)

You can see the Pink & Main Blog HERE ,
the Pink & Main Store HERE
and the Pink & Main Creations Gallery on Facebook HERE

Thanks so much for stopping by!
I appreciate it so much!
I hope you have a great crafty day!

 photo signaturecopy_zpsa1897fa6.png
Supply List:
--Cardstock: White (Georgia Pacific)
--Patterned Paper: Merry Little Christmas (MME)
--Stamp: Cocoa Kisses (Pink & Main)
--Copics: E33, E35, R27, R89
--Misc: Ribbon, Chalk, White Gel Pen, Foam Tape, Memento Tuxedo Black Ink
Tuesday, October 4, 2016

Shopping Our Stash #272

Hey everyone and happy Tuesday!!
It's time for a new challenge over at 

This week challenge #272 is....
Duck, Duck, Goose!
(use birds and/or feathers)

Here is the project that I created for this challenge:


Confession....I bought the Tim Holtz Bird Crazy & Crazy Things stamp sets at a stamp expo last October (2015) and have never used them. This challenge was the perfect time for me to dig them out and ink them up!  I stamped my bird onto some watercolor cardstock and used some watercolor crayons to color it up. I stamped my greeting from a Pink & Main stamp set onto some blue cardstock and adhered it to my watercolor panel. I added a few doodle lines with a black pen and popped it up onto my card base with some foam tape. I finished off my card with some glitter glue on the polka dots. 

Neglected items from my stash that I used on my card are:
--Bird Crazy Stamp Set (a year old, first time using them)--
--Crazy Birds stamp set (a year old, first time using them)--
--Watercolor Crayons (bought in June, first time using them)--
--Glitter Glue (can't remember the last time I used it)--

Be sure to head over to the Shopping Our Stash Challenge Blog to see what my design team sisters created. I hope you will decide to make a project and join us, I would love to see what you create!

Thank you so much for stopping by my blog and taking a look at my latest creation!
I really appreciate it!
I hope you have a great crafty day!

 photo signaturecopy_zpsa1897fa6.png
Supply List:
--Cardstock: Recollections & Watercolor
--Patterned Paper: Perfectly Plaid (Lawn Fawn)
--Stamps: Birthday Wishes (Pink & Main), Bird Crazy & Crazy Things (Tim Holtz)
--Ink: Jet Black Archival
--Misc.: Foam Tape, Glitter Glue (Studio G), Watercolor Crayons (Recollections), Copic Multiliner
Saturday, October 1, 2016

October Pink & Main Challenge

Hey everyone!
Happy October!!
The first of the month marks the start of a new challenge at the

BlogButton

The theme for the October challenge is......
Fall/Halloween
For the challenge you simply need to make a Fall or Halloween themed project, post it to your blog and enter by adding it to the inlinkz at the
Easy Peasy!!

Here is the project that I created for the challenge:


I love making little candy treat bags/boxes for Halloween so I got out my Gift Bag Punch board and made a purple one. I stamped and colored the Witch from the Witch Brew stamp set and used the coordinating die to cut it out,. I added it to the front of my bag with some foam tape and added some confetti stars. I added a spider web to my top flap for a little extra fun :) I stamped my sentiment from the Witch Brew stamp set, matted it onto some black cardstock and placed it under my glittered clothespin. The clothespin is also holding my bag closed. I added a little bow to my clothespin and some clear wink of stella onto my black cardstock pieces for some shimmer. 

I hope you will create a project and join us for the 
I would love to see what you create!!
You can find all of the rules there (there aren't many) and don't forget that you do not have to
 use Pink & Main products on your project. 

Thanks so much for stopping by my blog today and taking a look at my latest creation!
I really appreciate it!!

I hope you have a great crafty day!!

 photo signaturecopy_zpsa1897fa6.png
Supply List:
--Cardstock: Recollections
--Stamp: Witch Brew (Pink & Main)
--Dies: Witch Brew (Pink & Main)
--Ink: Memento Tuxedo Black
--Copics: Y04, Y06, Y08, Y19, Y26
--Misc.: Star Confetti, Gift Bag Punch Bpard (WRMK), Clear Wink Of Stella, Spider Web Border Punch (Martha Stewart), Glittered Clothespin, Twine


Related Posts Plugin for WordPress, Blogger...