Pages

Wednesday, May 31, 2017

Get Well Soon

*This post contains affliate links, which means I will receive a small commission if you make a purchase using any of the links in this post (at NO additional cost to you). Thank you for your support!*

Hello crafty friends!!
I hope you are having a wonderful Wednesday!
 Today I am back with another project that showcases some of those awesome 


I decided to make a Get Well Card. Seems like a lot of people are still struggling with allergies/Spring type of colds around our area.


This card was so super duper easy to make! I created my A2 card base from some Kraft cardstock and layered a piece of chevron baby blue paper on top from the Be Brave paper pad. I then cut another piece of kraft and added a border to the side using some more of that paper from the Be Brave paper pad and a border from the Scallop Border Dies. I added a white doodled edge and some crochet thread and popped it up onto my card, being careful to match the pattern up, with some foam tape. To decorate the front of my card, I decided I wanted some band aids. These were super easy to make! I used the oval shape die from the Stitched Greetings Die set and cut out four from some tan polka dot paper in the Take Flight 2 paper pad. I then cut a square-ish shape from two so that I had the center of my bandage and popped it up with some foam tape. I stamped the greeting onto one using the Wishes stamp set and then die cut the Wishes from the wishes dies and layered it on top of my band aids. I finished it off with some white nuvo drops and some sequins. 

Note:  I noticed when I was writing this blog post that I forgot the stitching on one of the bandages. That has been fixed now :) 

You can see the Pink & Main Blog HERE,
 the Pink & Main Store HERE
and the Pink & Main Creations Gallery on Facebook HERE.

 Thanks so much for stopping by!
I appreciate it so much!
I hope you have a great crafty day

Supply List:
--Cardstock: Kraft (Recollections), White (Georgia Pacific)
--Patterned Paper: Be Brave & Take Flight 2 (Pink & Main)
--Stamp: Wishes (Pink & Main)
--Dies: Wishes, Scallop Borders & Stitched Greetings (Pink & Main)
--Ink: Tuxedo Black Memento, Vintage Photo Distress
--Misc.: White Gel Pen, Foam Tape, Pretty Pink Posh Sequins, Simply White Nuvo Crystal Drops.


Monday, May 29, 2017

FCCB #302: Graduation


 Happy Monday and welcome to another Monday challenge!


Challenge #302-Graduation
Make a project about any kind of Graduation!

This Weeks Sponsor


Dreaming Tree SVG's

The winner will receive a $20 Gift Certificate!

To qualify for the prize, be sure to use at least 1 Cricut cut on your project and if it's not obvious, let us know what cartridge you used. If you use a Cricut Explore machine, at least one cut must be from the Cricut catalog of images.

If it isn't a card, you will get two entries into the drawing!

Here is my project-


My daughter needed a card for her boyfriend's sister who will be graduating in just a couple of weeks so this challenge was perfect timing for me! I opened up Cricut Design Space and created a rectangle in the size I wanted for my top panel. I used the Roly Poly font on the Plantin Schoolbook cartridge and arranged my 2017 across the front. I loaded up my mat and let the Cricut do it's thing lol! Once the 2017 was cut out, I stamped the "Class of", drew some lines, added my ribbon and some acetate to the back. I applied foam tape all around the perimeter and added some gold star confetti as well as some gold and burgundy micro beads. I added a white piece of cardstock to the back to hold everything in and also make the 2017 stand out more.I added my shaker piece onto my cardbase and tied a little bow. I thought it still needed something so I went back to the cricut and cut out a grad cap from the Wrap It Up cartridge and added it to my card front. I added a few stars to the front of my card and voila! Done! lol! I hope she likes it :) 

I will also be entering this card into the graduation challenge going on over at 
Die Cuttin' Diva's (#318)
Thanks so much for stopping by and taking a look at my latest creation!
I really appreciate it!

Be sure to stop by the Fantabulous Cricut Challenge Blog to see the projects that my design team sisters created! I hope you will power up that Cricut and make a Graduation project for the challenge! I would love to see what you create!

 I hope you have a great crafty day!! 
Supply List:
--Cardstock; Acetate, Cranberry Cocktail (MFT), Black (Neenah), Honey (bazzill)
--Cricut: Plantin Schoolbook, Wrap It Up
--Misc.: Ribbon, Confetti, Micro Beads, Black Micron Pen, Foam Tape, Glossy accents


Sunday, May 28, 2017

You Are Mermazing

Hey crafty friends!
I hope everyone is having a wonderful Sunday!
Today I have a card to share with you that I made for a couple of different challenges in mind. 

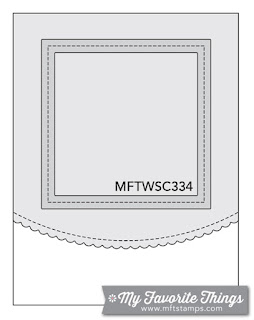
The first challenge is the sketch challenge over at MFT Card Challenges.
Here is a look at their sketch #334:


Here is the card that I created based on the above sketch:


I used some older patterned papers that I had in my stash and built up my card base according to the sketch. I took that sweet little mermaid and rock from the Mermazing stamp set by MFT and colored them in with my Copics. After I had them colored, I fussy cut them out and added them to my little square window frame. I finished off my card with some crochet thread and a few sequins. 

I am also entering my card into the following challenges:
&

Thanks so much for stopping by today and taking a look at my latest creation!
I really appreciate it!
I hope you have a great crafty day!

Supply List:
--Cardstock: White (Copic & GP)
--Patterned Paper: Good Day Sunshine (MME)
--Stamps: Mermazing (MFT)
--Dies: Stitched Scallop Basic Edges & Stitched Square Scallop Frame (MFT)
--Ink: Tuxedo Black Memento
--Copics; BG23, E000, E00, E11, E35, E37, E53, E70, E74, R22, R24, R32
--Misc.: Pretty Pink Posh Sequins, Crochet Thread, White Gel Pen, Glossy accents

Saturday, May 27, 2017

Seas & Greetings!

Hi crafty friends!
I hope you are having a fabulous Saturday!
Today I am back to share a card that I created using some fabulous stamps and dies that can be found in the
 Dies R Us Store

I love interactive cards and was so super excited to give the 

I started out by cutting out all my panels in some fun patterned papers and a coordinating solid:

I then figured out which patterned papers I wanted to use and placed then onto my solid cardstock and adhered my panels together.


Now came the fun part! I cut out some fun nautical pieces from the Nautical die set from Cutter Bee and some scallops from the Accordion Circle Card set  and started decorating my panels.


Here is what my finished card looks like:


I stamped my greeting onto a banner from the Banners die set from Cutter Bee and finished off my card with a couple of sequins and some paper buttons. I think it came out so cute and it was really simple to put together. I love all things nautical!

Here is a view from the top:

Here is a quick peek (with links) to the products that I used on my card today that can be found in the Dies R Us store:


Don't forget to come join in the fun at the Dies R Us Challenge Blog There's a new challenge theme offered on the 1st and 15th of each month and one lucky randomly drawn winner will receive a gift voucher prize to the Dies R Us StoreFor your convenience, all the important Dies R Us links are provided below. 


click below for:


Thanks so much for stopping by today!
I hope you have a great crafty day!


Supply List:
--Cardstock: Night Shift Blue (MFT), White (Georgia Pacific)
--Patterned Paper: Crimson (AC)
--Stamp: Hey Sailor! (My Creative Time)
--Ink: Tuxedo Black Memento
--Dies: Accordion Circle Card (Elizabeth Craft Designs), Banners & Nautical (EK Success Cutter Bee), Sweet Buttons Embosslits (SU!), Xtra large Photo Corner Punch (SU!)
--Misc.: White Gel Pen, White Crochet Thread, Sequins


Friday, May 26, 2017

A Spring Hello

Hi crafty friends!
Happy Friday!

Today I have a card to share with you that I made for the


When I saw this inspiration board, I was inspired by a few things. I have recently been planting flowers and getting hanging baskets to add color to my front/back yards. A couple of years ago, my wonderful son built me a wooden flower box underneath the window on our shed. I love getting flowers and planting in that every year since then. The flowers and the basket in the above photo made me think of that. I was also drawn to the pink and purples and of course that adorable kitty!
With all of that in mind, I set out to make my card. I knew I was going to try and create a scene so I used a few different stamp/die sets. Here is a look at what I was inspired to create:


For my card, I used the Wonderful Window die from Lawn Fawn and cut out all the pieces in white. I colored my window box to appear as wood and colored each tulip alternating between pink and purple. Before I adhered my window to my card front, I added a little valance curtain and my light blue "wall". I used the grass from the Chirpy Chirp Chirp stamp set and well as the butterfly. My little kitty actually came from the Spooktacular stamp set and the Hello was one of the little freebies from placing a order. I think this came out so super cute!!

Thanks so much for stopping by!
I really appreciate it!!

I hope you have a great crafty day!! 

Supply List:
--Cardstock: White (Georgia Pacific & Copic)
--Patterned Paper: Cedar Lane (Pink Paislee)
--Stamps: Chirpy Chirp Chirp, Spooktacular, Hello (Lawn Fawn)
--Dies: Wonderful Window, Spooktacular, Chirpy Chirp Chirp (Lawn Fawn), Lacy Border Dies (Pink & Main)
--Inks: Tuxedo Black Memento
--Copics: E23, E27, G24, R32, RV10, V12, W1, W3, W5
--Misc.: Foam Tape, Clear Wink Of Stella, Glossy accents, White Gel Pen, Black Micron Pen

Thursday, May 25, 2017

Ring...Ring...Hello

Hi crafty friends!
I hope your Thursday is off to a terrific start!

Today I have a card to share with you that I made for the sketch challenge over at
I played along with sketch #98 which is:


and here is a look at the card I made based on the above sketch:


I recently purchased the stamp set with the telephone a few days ago and was happy to pull it out and use it so fast! Normally I just hoard new stamps and never use them haha! The stamp/die set is actually meant to be used as a shaker element but I decided to just pop up all the center pieces with foam tape and give it another look. I also had this fun patterned paper in my stash that coordinated perfectly with the telephone stamp so everything came together rather quickly. I love when that happens lol!

Thanks so much for taking the time to stop by my blog and take a look at my latest creation!
I really appreciate it!!
I hope you have a great crafty day!

Supply List:
--Cardstock: Kraft (Recollections), White (Georgia Pacific)
--Patterned Paper: Switchboard (Pink Paislee)
--Stamp: Call Me (Jillibean Soup)
--Ink: Onyx Black Versafine
--Dies: Call Me (Jillibean Soup)
--Misc.: Simply White Nuvo Crystal Drops, Foam Tape, Clear WInk Of Stella

Tuesday, May 23, 2017

May Project Life Cards

Hey crafty friends!
I hope you are all having a wonderful Tuesday!
It is rainy and stormy here so I'm staying inside and getting some crafting done.
I managed to make some more Project Life cards for a future PL layout using the May sketches from Sketches In Thyme Project Life Style Challenge Blog.

I pulled out some fun Polka Dot cardstock and a couple of old sticker sheets to create my cards and once again I had a blast making these cards. If you guys are into pocket style scrapbooking, you really should check out the Sketches In Thyme PL Style Challenge Blog, I love their sketches. 

Here is a look at each sketch and the pocket card I made:


My take;


My take:


My take:


My take:


Here is a look at all four cards together:


Ok so last month when I played along, I posted where I was at in each of my three PL albums. I thought it would be kinda neat if I kept myself accountable each month by posting my progress. Here are my stats that I posted last month per album (album year/month currently on):

 2015: November
2016: June
2017: March

Well, I did not work on any of my albums so I have no progress to update. I am hoping there will be a change next month. Fingers crossed!! lol!

Thanks so much for stopping by my blog and taking a look at my latest creation!
I really appreciate it!
I hope you have a great crafty day!!

Supply List:
--Cardstock: White (Georgia Pacific)
--Patterned paper: Basics (Pebbles)
--Misc.: Hello Summer Stickers (Echo Park), Black Micron Pen, Pretty Pink Posh Sequins

Supplies were the same for all cards with the exception of added patterned paper from Hello Sunshine (Pink Paislee & Sticker from Journaling Tidbits (Teresa Collins) for Sketch #70

Monday, May 22, 2017

Stick It Down May Card Sketch Challenge

Hi crafty friends!
 I hope your day is off to a marvelous start!
 Today I am here to share a card sketch with you from the Stick It Down Challenge Blog
Stick It Down is a monthly sketch challenge blog. They provide sketches not only for a card once a month, but also for double and single page layouts! Cool right?? The sketches are normally posted on the first of the month with reveals of the design team's interpretations throughout the month. Today the card team designers are showing what they created for this month's card sketch.

Here is another peek at the card sketch for May 2017:


Here is the card that I created based on the sketch:


When I saw the sketch, I immediately thought of a long/tall card. I created my card base out of a piece of 7.5" x 9" cardstock. Once folded my card measures, 3.75" x 9". I stamped that cute little Penny Black image onto some white cardstock and colored her with my copic markers.  I stamped my greeting with some chalk ink and drew some lines around the border with a purple micron pen. I popped up my white panel with some foam tape. 

I hope you will stop by the Stick It Down Challenge blog & take a peek at what my design team sisters created with the sketch. I hope you are inspired to join us! I would love for you to link up so I could take a peek at what you created :) 

 Thanks so much for stopping by my blog and taking a look at my latest creation!
 I really do appreciate it!
 I hope you have a great crafty day!

Supply List:
--Cardstock: Recollections
--Patterned Paper: Not sure, it's an older piece in my stash
--Stamps: Mimi's Heart (Penny Black), My Happiness (Little Yellow Bicycle)
--Inks: Memento Tuxedo Black & Ocen (Martha Stewart)
--Copics: Skin: E50, E51, E21. Dress: BG13, BG15, BG32. Hair: E35, E39, E59. Heart/Headband: V12, V15, V17
--Misc.: Purple Micron .05 Pen, White Gel Pen, Foam Tape, Chalk (cheeks)

Sunday, May 21, 2017

Christmas Card Challenges #13

Hello crafty friends! I hope you are having a wonderful Sunday :) 
Today marks the beginning of another challenge at
Christmas Card Challenges!!


Here is a look at my wreath card:


I used some stamps from Concord and 9th to create my wreath and then I fussy cut it out. I popped it up onto my card with some foam tape for a little added dimension. I added some red stickles to the berries for some sparkle. Can never have too much sparkle on a Christmas card right?? lol! I added my die cut word to the center and added some glossy accents for more shine. I finished off my wreath with a little red satin bow. 

 Be sure to head over to the Christmas Card Challenges blog to see the amazing cards my design team sisters created. I hope you are inspired and decide to join us and play along with the challenge. I would love to see what you create :) 

 Thank you so much for taking the time to stop by and take a look at my latest creation!
I really appreciate it :) 
 I hope you have a great crafty day!

Supply List:
--Cardstock: Wild Cherry (MFT), White (Georgia Pacific)
--Patterned paper: Gifts of Gold (Paper Studio), Welcome Christmas (Pebbles)
--Stamp: Love it. Mean it. (Concord & 9th)
--Ink: Cranberry & Evergreen (colorbox), Baked Brown Sugar (SU!)
--Dies: Boughs Of Holly (MCT)
--Misc.: Foam Tape, Ribbon, Xmas Red Stickles, Glossy Accents, White Gel Pen

Saturday, May 20, 2017

You Are Out Of This World!

Hi crafty friends!
I hope you are having a fabulous Saturday!
Today I am back to share a card that I created using some fabulous stamps and dies that can be found in the
 Dies R Us Store

I have been seeing a lot of Galaxy type backgrounds lately and I thought it would be fun to give it a try and create a card with this technique. 

I started out by gathering all my distress inks that I wanted to use.

The colors of distress inks that I used were: Mustard Seed, Worn Lipstick, Wilted Violet, Mermaid lagoon, Blueprint Sketch and Black Soot. 

Next I stamped my images from the Lawn Fawn Out Of This World stamp set and colored them in with my Copic markers. Please forgive the dark pictures, it was night when I was creating this card.


Next up, I used the coordinating Lawn Fawn Out Of This World dies to cut out my stamped images.


They line up perfectly!

Here is a look at my finished card:


To create my moon, I free hand cut a domed shape and used a hole punch to cut out some "craters". I placed some cardstock behind the moon a little bit darker so that the holes had some dimension. I popped up my astronaut and planets with some foam tape and added a bit of shimmer to my vellum for just a bit of sparkle. 

Here is a look at the Dies R US products that I used on my card today:


Don't forget to come join in the fun at the Dies R Us Challenge BlogThere's a new challenge theme offered on the 1st and 15th of each month and one lucky randomly drawn winner will receive a gift voucher prize to the Dies R Us Store.  For your convenience, all the important Dies R Us links are provided below.   
click below for:


Thanks so much for stopping by today and looking at my latest creation!
I really appreciate it!
I hope you have a great crafty day!
Supply List:
--Cardstock: White (Copic), Blackberry Bliss (SU!), Vellum (Neenah), Narwhal (Lawn Fawn)
--Stamps: Out Of This World (Lawn Fawn)
--Dies: Out Of This World (Lawn Fawn)
--Inks: Tuxedo Black Memento, Wilted Violet Distress, Mermaid Lagoon Distress, Blueprint Sketch Distress, Black Soot Distress, Worn Lipstick Distress, Mustard Seed Distress
--Copics: B00, B01, C1, E50, E51, E37, G02, V09, V12, V17, W1, W3, W5, Y15, Y19
--Misc: White Gel Pen, Clear Wink Of Stella, Foam Tape, White Acrylic Paint