Tuesday, July 28, 2020

Beachy Keen!

Hi everyone!
I hope you are having a fabulous day!

I have a fun card to share with you today that I made with a few challenges in mind.
The challenges that I will be entering are:
&


Here is a look at the card that I created:


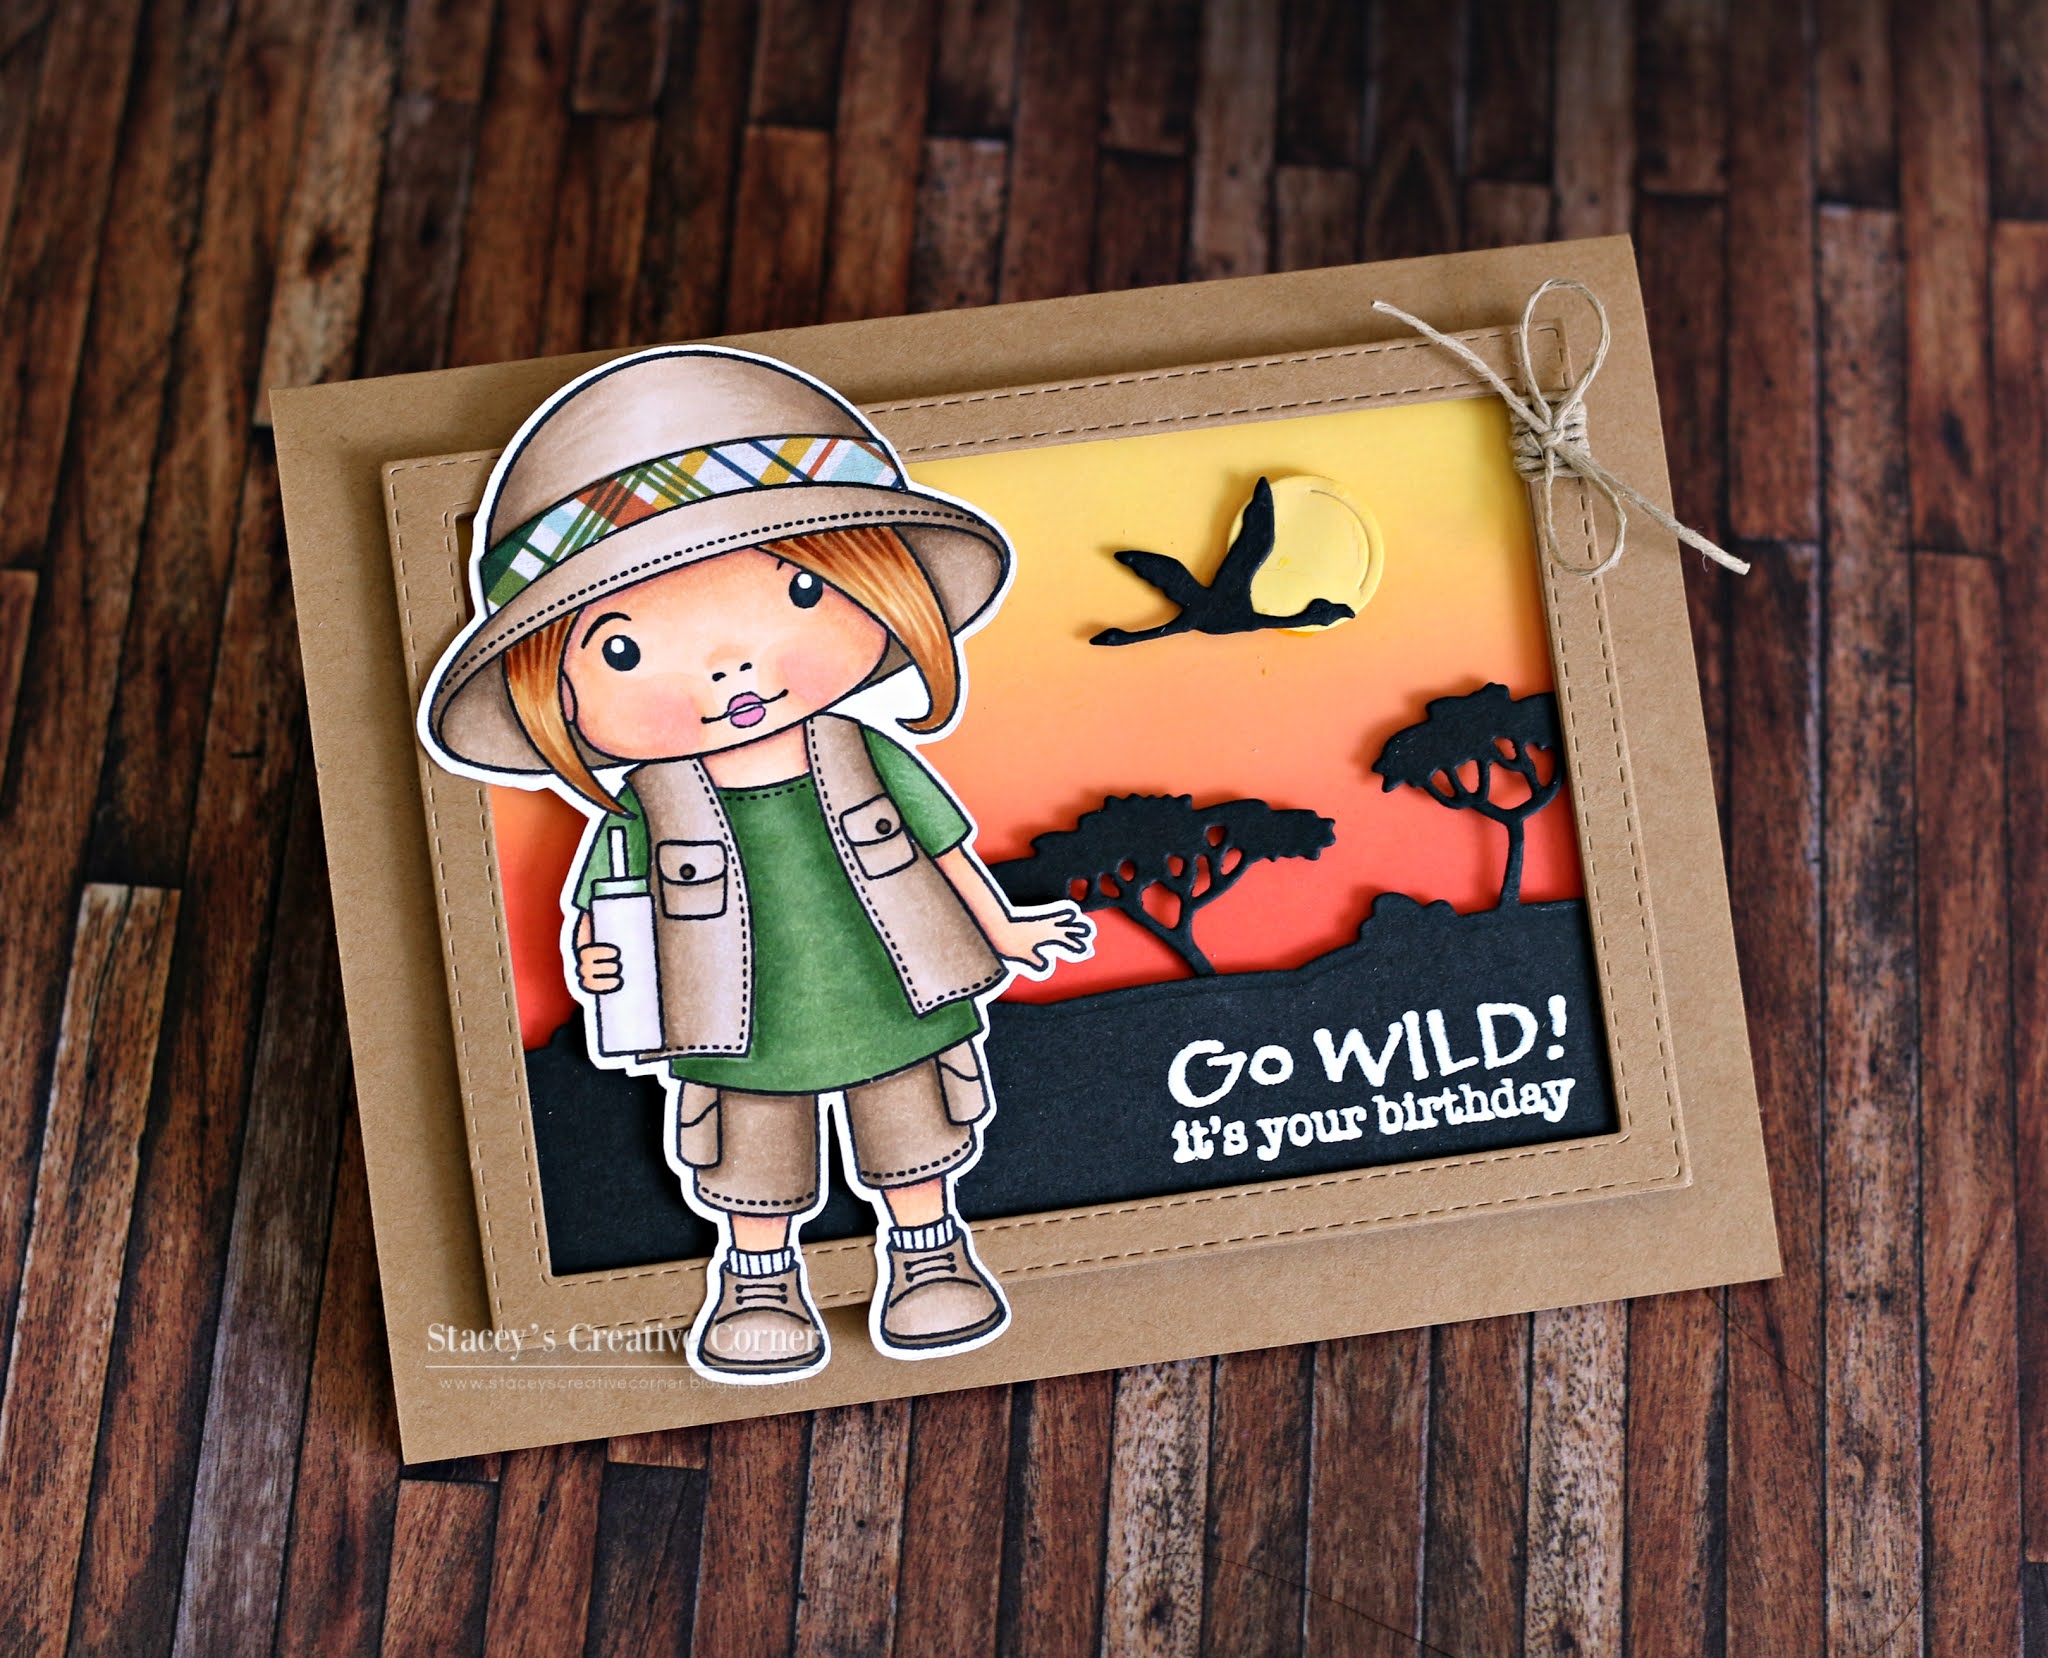
I've had this stamp in my stash for a few months now and finally got around to putting her to use!! Gotta love that!! I stamped her with some Memento Tuxedo Black Ink and colored her with my Copic Markers. I used a Zig Zag Stitched Rectangle to cut her out and matted her onto a piece of blue cardstock. I popped her up onto my card front with some foam adhesive and added my greeting along the bottom. I completed my card with some red enamel dots. 
So super simple but I really LOVE how it turned out!!

Thanks so much for stopping by today and taking a look at my latest creation!
I really appreciate it!!
I hope you have a great crafty day!

Supplies Used:
--Copic Markers: 
  • Skin: E50, E51, E21, E11, R20, R00
  • Hair: E41, E43, E44
  • Suit: R27, R29, R59, C00, C0
  • Sand: E40, E41, E43
--Cardstock: Whie (Georgia Pacific & Hammermill), Blue (Recollections)
--Patterned Paper: Color Vibe II (Snap), Kraft In Color (Doodlebug)
--Stamp: Merkini (CC Designs)
--Ink: Memento Tuxedo Black
--Dies: Stitched Rectangular Frame Dies & More (MCT), Zig Zag Stitched Rectangle Stax (MFT)
--Misc.: Enamel Dots, Glossy Accents, Foam Tape, Clear Wink Of Stella
Monday, July 27, 2020

Go Wild!

Hi everyone!
Happy Monday! I hope you had a great weekend!

Today I have a card to share with you that I created using my 
new Club La-La Land kit that I received in the mail. 
Here is a look at the card that I created:


I had so much fun creating this card! The first thing that I did was to create my background sky by using some distress oxide inks. Once I had the sky created, I set it aside to let it dry a bit while I worked on the rest of the card.  I used the Safari Skyline Border dies that came in the kit, and cut the tree and bird from some black cardstock. I heat embossed my greeting with some white embossing powder and adhered it to a frame that I created using some Kraft cardstock. I popped up my frame with some foam tape onto my sky background and added the sun and bird.  I adhered my background scene to a A2 Kraft cardbase. I stamped Safari Marci with some Memento Tuxedo Black ink and colored her with my Copic markers and cut her out using my Scan N Cut. I popped her up with some more foam tape and my card was done! 


This card is so simple but I think that really lets the focus stay on the sky and the adorable image!
 I am so pleased with how it turned out!

I will be entering my card into the following challenges:
&

Thank you so very much for stopping by today and taking a look at my latest creation!
I really appreciate it!
I hope you have a great crafty day!

Supplies Used:
--Copic Markers:
  • Skin: E04, E11, E21, E50, E51, R20, R00, R83
  • Vest/Hat/Shirts/Boots: E42, E43, E44
  • Shirt: YG61, YG63, YG67
  • Hair: Y21, E31, E33, E35, E37
  • Cup: E40, YG63
--Cardstock: Kraft (Recollections), White (Hammermill)
--Patterned Paper: Jungle Safari (Echo Park)
--Inks: Versamark, Memento Tuxedo Black, Distress Oxide Inks in: Squeezed Lemonade, Wild Honey, Ripe Persimmon & Candied Apple
--Dies: Stitched Rectangular Frame Dies & More (MCT), Safari Skyline Border (LaLaLand Crafts)
--Stamps: Safari Marci & Ape About You from the July 2020 Club Kit (LaLaLand Crafts)
--Misc.: Hemp Twine, Foam Tape, White Embossing Powder

Friday, July 24, 2020

Christmas Wishes

Hi everyone!
I hope your day is off to a great start so far!
Today Digi Doodle Studios is having a special release of some adorable
 Christmas Puppies!! Yay!! 
Here is a look at my project that features just one of the new stamps, called 


Isn't that puppy the cutest?? I thought it would be fun to put him on a little gift box and try to get a tiny bit ahead with some little gifts. I printed out the Dasher Dachshund Christmas Puppy onto some white Copic friendly cardstock, colored him up and used a circle die to cut him out. I layered him on top of a red scallop circle and popped him up onto my bag that I made using a file from the Silhouette store. I added a fun little double layer paper bow and my greeting to the top of the bag and completed the look with some little jingle bells. I finished my bag by adding some white doodles with a gel pen and some Nuvo drops. As it gets closer to the holidays, I will fill the bag with some Hershey's Candy Cane Kisses. Yum! I love to have little things like this on hand readily available to give out.

I will also be entering my project into the following challenges:

&

Thanks so much for stopping by my blog and taking a look at my latest creation!
I really appreciate it!
I hope you have a great crafty day!
Products Used:
--Copics:
  • Puppy: E11, E13, E15, E18, C4, C6, C8, R30, R31
  • Hat/Shirt: R24, R27, R29, R59, C0, C1, G94, G46, G28
  • Candy Canes: R29, R59, C0
--Cardstock: Kraft (Craft Smart), Red (Recollections), White (Hammermill Digital Copy)
--Patterned Paper: Mad 4 Plaid Christmas (Photo Play)
--Digital Image: Dasher Dachshund Christmas Puppy (Digi Doodle Studios)
--Sentiment: Peppermint Season (Jaded Blossom)
--Dies: Fun Sized Scallop Stitched Bow & Small Stitched Scalloped Bow (My Creative Time), Nesting Circles (WRMK), Scallop Circle Dies (Pink & Main)
--Silhouette File: 3D Tall Ribbon Tie Treat Box By Lori Whitlock Design ID 48958
--Misc: Foam Tape, White & Ruby Slippers Nuvo Drops, Jingle Bells, White Gel Pen


Tuesday, July 21, 2020

Happy Happy Birthday!!

Hi everyone!
I hope your day is off to a great start!
Today I am sharing a super fun birthday card that I created using an adorable image from Digi Doodle Studios called Party Cats.


Isn't this fun?? I started by creating a frame by using some dies by Hello Bluebird and some fun patterned papers. I printed out my Party Cats and colored them in with my Copic markers. Once I had them colored, I fussy cut them out and glued the bottom edge of the fence to the back of the polka dot frame. I adhered my blue striped frame to a white card base and added some fun party streamers towards the top. I popped up my Party Cats panel with some foam tape for a bit of dimension and added my greeting, popped up with more foam tape, along the front of the fence. I completed my card with some sequins and some white gel pens doodles.


I think this turned out so fun!! I just love these happy Party Cats!

I will also be entering my card into the following challenges:
&

Thank you so much for stopping by my blog and taking a look at my latest creation!
I really appreciate it!
I hope you have a great crafty day!

Products Used:
--Copic Markers:
  • Black Kitty: N0, N3. N5, R000, R00, R20
  • Orange Kitty: Y32, YR21, YR24, YR27, E33, E40, E31
  • Fence: E33, E35, E37
  • Balloons/Hats: YG00, YG01, YG03, B000, B00, BG53, RV52, RV55
--Crdstock: White (Georgia Pacific and Hammermill)
--Patterned Paper: Hey Cupcake & Hello Sunshine (Doodlebug)
--Sentiment Stamp: Happy Banner (MFT)
--Dies: Gallery Frame Die #3 (Hello Bluebird), Banner Dies (Jaded Blossom)
--Misc.: Sequins, Foam Tape, Clear Wink Of Stella, White Gel Pen


Monday, July 20, 2020

Wanna Hang Out?

Hi everyone and happy happy Monday!
Today starts a new challenge over at the Bitten By The Bug 2 Challenge Blog!
The theme for this challenge is...

Cute Critters
Let's see some Cricut themed projects the feature an adorable critter.
*Your project must include a Cricut cut on it somewhere*

Here is a look at the fun card that I created to share with you today:


I used a metal die from Jaded Blossom to create my shaped card base. I simply cut two scallop rectangles out from some Kraft cardstock, scored along the back piece to make opening easier and adhered them together above the score line. Once I had my base created, I layered some wood grain paper on top. I cut that adorable monkey from the Life's A Party Cricut Cartridge and added her to a circle that I cut out using a metal die. I popped up my circle piece to the front of my card with some foam tape and started working on my greeting. I thought this sentiment from Stamping Bella was perfect! I stamped it onto a piece of white cardstock with some brown ink and added some greenery behind it. I was going for a jungle look and while I don't think I really achieved what was in my brain, I'm happy with how it turned out. I added a few little white flowers and some white doodles with my white gel pen for a little bit more interest and gave her a little bow to complete my card. So cute!

**Cricut Cuts Used**
Life's A Party

Thanks so much for stopping by today and taking a look at my latest creation!
I really appreciate it!!
Be sure to stop by the Bitten By The Bug 2 Challenge Blog to see the creations my DT sisters  created and I hope you will create a project and join us! I would love to see what you create!
I hope you have a great crafty day!

Products Used:
--Cardstock: White (Hammermill), Cilantro (Lawn Fawn), All Others (Recollections)
--Patterned Paper: Knock On Wood (Lawn Fawn)
--Cricut: Life's A Party
--Stamps: Upside Down Squidgy (Stamping Bella)
--Ink: Brown (Heidi Swapp), Peacock Feathers Distress Oxide
--Dies: Scallop Rectangle Dies 2, Spring Banner Dies & Tropical Flower Dies (Jaded Blossom), Nesting Circles (WRMK)
--Misc.: White Nuvo Drops, Foam Tape, Crochet Thread


Friday, July 17, 2020

Your Friendship Warms My Heart

Hi everyone!
I hope you are having a fabulous day!


Today is my day to take over the Paper Nest Dolls blog and I created a bright and happy card to share with you today. 


To create my card, I started by creating an A2 card base from some Kraft cardstock. Next I built my card front layers by cutting some fun coffee themed patterned paper and layering it with some green patterned paper. I added a white strip, along with my sentiment, tied a hemp twine bow and attached everything to my Kraft card base. I colored that adorable image from the Paper Nest Dolls, Avery with Coffee, with my Copic markers and used my Scan N Cut to cut her out. I popped her up onto my card with some foam tape for a little extra dimension. I finished my card with a little heart by the sentiment and some enamel dots in the top corner.


I think this turned out so cute!

Paper Nest Dolls Products Used:

You can check out the Paper Nest Digital Stamp store by clicking HERE
You can check out the Paper Nest Dolls Rubber Stamp Store by clicking HERE

I will also be entering my card into the following challenges:
&

Thank you so much for stopping by today!
I really appreciate it!
I hope you have a great crafty day!
Products Used:
--Copics:
  • Skin: E50, E51, E21, R20, R00
  • Hair: E31, E33, E35
  • Coffee: E42, E31, C0, C1, C2, C4, C6, C8, R83, R85
  • Pants: E41, E42, E43
  • Jacket: BG90, BG93, BG96
  • Shirt: C0, C1
  • Shoes: E31, E33
--Cardstock: Kraft (Recollections), White (Hammermill)
--Patterned Paper: Coffee (Echo Park)
--Ink: Jet Black (lawn Fawn)
--Sentiment Stamp: You Are Perk-fect (MCT)
--Dies: Zig Zag Stitched Rectangle Stax (MFT)
--Punches: Scallop Edge (Fiskars), Heart (Recollections)
--Misc.: Hemp Twine, Enamel Dots, Foam Tape, White Gel Pen


Thursday, July 16, 2020

Hello There Watercolor Card

Hi everyone!
I hope you are all doing well and staying happy & healthy :) 

Today I have a card to share with you that I made for my friend, Kimberly.
We actually challenged each other to make a card that incorporated watercoloring and then send them to each other. Watercoloring is definitely not in my comfort zone, but I gave it a go lol! 
Here is a look at my card:


I started by heat embossing my image from Pink Fresh Studio with some gold embossing powder onto a piece of Bristol Smooth cardstock. I used my Zig Clean Color Real Brush Markers to fill in my image. Once it was dry, I used a die from MFT to cut it out, stamped my greeting and used a little bit of Spun Sugar Distress Oxide ink to lightly go along the outside edges. I tied a bow with some crochet thread and popped it up with some foam tape onto a piece of polka dotted vellum. I attached everything to a bright pink cardbase and added a few sequins, drops of shimmer and Nuvo drops to complete my card! 

I will be entering my card into the following challenges:
&

Thank you so much for stopping by my blog today and taking a look at my latest creation!
I appreciate it so much!!
I hope you have a great crafty day!

Products Used:
--Cardstock: Razzleberry (MFT), Vellum (Neenah), White (Bristol Smooth)
--Stamps: Teeny Tag Greetings (MY Creative Time), Spring Flowers (Pink Fresh Studio)
--Inks: Spun SUgar Distress Oxide, Versamark
--Dies: Hip Hip Hooray (MFT)
--Misc.: Zig Clean Color Real Brush Markers, Orange Marmalade Nuvo Drops, White Nuvo Drops, Sequins, Gold Embossing Powder, Foam Tape, Liquid Stardust Shimmer (Lawn Fawn)


Saturday, July 11, 2020

Be Merry

Hi everyone!
I hope you are having a wonderful Saturday so far!
It is quite warm in my area today so I stayed inside and created a card for a few challenges.

Here is a look at the card that I created:


 I fell in love with this adorable Christmas Snowman from StarJamLines and was itching to color him up. I have been trying to make at least one Christmas card a month to try and ease a bit of stress this holiday season so this was the perfect time to print him out and get coloring. To create my card, I started by making my A2 card base from some white cardstock. I used a stitched die to cut out my red and green patterned paper and layered that on top. I colored up that sweet image with my Copic Markers and used a Cross Stitch die to cut him out and then layered that piece onto a piece of vellum. I popped up my image layer with some foam tape and added some white Nuvo drops and snowflake sequins. I completed my card with a cute little bow for the little bunny. So cute!!!

I will be entering my card into the following challenges:
&

Thank you so much for stopping by my blog today and taking a look at my latest creation!
I really appreciate it!
I hope you have a great crafty day!


Products Used:
--Copic Markers:
  • Snowman: C0, C1, E33, E35, C8, YR12, YR14, R27, R29, R59
  • Hat: R27, R29, R39, R59, C4, C6, C8, 110, YG63, G07
  • Bunny: C0, C1, C2, C4, R20, R00, R000
  • Bird: B41, E31, R24, R27, R39
  • Trees: Y11, Y13, Y15, E25, YG63, G46
--Cardstock: White (Georgia Pacific & Hammermill), Vellum
--Patterned Paper: My Favorite Christmas (Echo Park)
--Digi Stamp: Christmas Snowman (StarJamLines)
--Sentiment: Snow Fun (Avery Elle)
--Dies: Stitched Rectangular Frame Dies & More (MCT), Cross Stitch Rectangle Stax (MFT)
--Misc.: White Nuvo, Foam Tape, Glossy accents, Gold Gel Pen, Snowflake Sequins, Crochet Thread, White Gel Pen
Wednesday, July 8, 2020

The Beach Is Calling!

Hi everyone!
I hope your day is off to a great start!
Today I have a slimline style card to share with you that I made using an adorable image from La-La Land Crafts along with some dies from Lawn Fawn and My Favorite Things. 

Here is a look at the card that I created:


I started by creating my cardbase with some bright pink cardstock and then using one of the stitched dies from Lawn Fawn to layer another piece of bright pink cardstock on top so that my card had the stitched lines. Next, I started creating my scene. I used a cloud stencil from MFT and lightly inked up my sky with some Broken China Distress Oxide ink. I then used another die from Lawn Fawn to cut out my sky panel also cutting some blue and Kraft so that the stitches lines up on all sides. Once I had that cut out, I cut out my waves using a die from MFT and did a bit of paper tearing for my sand layer. I stamped my greeting and added a bow before popping up my panel with foam tape onto the base. I used some more dies from Lawn Fawn to cut out my palm tress and tucked them behind my sand. I colored that sweet Reading On The Beach Marci from the LLLC June 2020 Club with my Copic markers and used my Scan N Cut to cut her out. I decided to paper piece her towel and bikini with some patterned paper for a little whimsy. I popped her up with more foam tape and added some white doodles to complete my card. 


I had so much fun making this Slimline style card! 

I will be entering my card into the following challenges:
&

Thank you so much for stopping by my blog today and taking a look at my latest creation!
I really appreciate it!
I hope you have a great crafty day!
Products Used:
--Copic Markers:
  • Skin: E50, E51, E21, R20, R00, R85
  • Hair: E51, E53, E55, E57
  • Book: RV14, E40, E41
--Cardstock: White (hammermill digital), Cilantro (Lawn Fawn), All Others (Recollections)
--Patterned Paper: Summer Bliss (Echo Park)
--Stamp: Reading on the Beach Marci & The Beach Is Calling (Club LaLa Land Crafts June 2020)
--Dies: Pop Up Wiper Components (MFT), Tropical Backdrop, Large Slimline w/Sliders, Small Slimline w/Lift The Flaps (Lawn Fawn)
--Inks: Jet Black (Lawn Fawn), Mowed Lawn Distress & Broken China Distress Oxide 
--Misc.: Foam Tape, Crochet Thread, White Gel Pen, Cloud Stencil (MFT)


Tuesday, July 7, 2020

Summer Vibes

Hi everyone!
I hope your day is off to a great start!
I have some pretty exciting news to share with you all. 
I was asked to be a DT Creative Member for Digi Doodles Studios!!

Yay!! I'm so excited to be a part of this team!
 Digi Doodle Studios is a digital stamp company that has some of the cutest images!! They even have a monthly challenge blog that you can find HERE
I fell in love with so many of the images and have had so much fun coloring them!
 You can also find Digi Doodle Studios on Instagram!

Here is the card that I created to share with you today:


As soon as I saw this image in the Digi Doodle Studios Store, I knew I had to have it! My daughter LOVES to read and will read wherever she can! One of her favorite things to do during the summer is to read at the beach or the pool, although I don't think she has been brave enough to try to read while floating in water lol! I thought it would be fun to make a card that she can relate to and send to her. I started my card with a card base that I created from some Bermuda Bay cardstock and layered it with a white piece of cardstock that I cut out using a scalloped edge die. Next, I printed out this adorable image titled, Summer Reads onto a piece of white cardstock and colored her with my Copic Markers. Once I had her colored in, I used a stitched die to cut her out and then went around the edges with a Copic Marker to create a "sky".  I popped her up onto my card base with some foam tape for some dimension and added a few clouds to help with the scene. I created my sentiment on my computer with Word, printed it on cardstock, trimmed it down and added a twine bow before adhering it to my card.


I added some sparkle to the flower on her hat, the sun on her suit and the clouds with a Wink Of Stella pen but the camera didn't pick it up.

I will also be entering my project into the following challenges:
&

Thank you so much for stopping by my blog and taking a look at my latest creation!
I really appreciate it!
I hope you have a great crafty day!
Products Used:
--Copics: 
  • Hair: E34, E37, E39
  • Skin: E50, E51, E21
  • Suit/Hat: Y11, Y13, Y15, BG13, BG11, C0, C1
  • Book/Float: R81, R83, R85
  • Butterfly: BG02, C6
  • Water/Sky: BG0000, BG000
--Cardstock: Beruda Bay (SU), White (Hammermill)
--Sentiment: Computer Generated
--Dies: Stitched Rectangluar Frame Dies & More (My Creative Time), Blueprints 27 & Puffy Clouds (MFT)
--Misc.: Twine, Foam Tape, Clear Wink Of Stella, Black Sharpie Pen, 


Monday, July 6, 2020

You Rock!


Hi everyone and happy happy Monday!
Today starts a new challenge over at the Bitten By The Bug 2 Challenge Blog!
The theme for this challenge is...

Stars!
Use at least 3 different size stars on your Cricut project.

Here is a look at the card that I created:


I was searching through images on the Rock Princess cartridge and immediately knew I wanted to use this cool chick on my project. I cut her out using some fun bright colors for her clothes and added some sparkle onto her white jacket with my Wink Of Stella pen. It didn't show up on the picture but trust me, her jacket is sparkly lol! I die cut a rectangle from some white cardstock and added some stars cut from the Rock Princess cartridge that coordinated with her clothing. I trimmed the ones that hung over a bit and layered a piece of vellum behind the white panel before adding it to my bright green card base. I popped up that super cool chick with some foam tape and added my greeting, cut from Jubilee. I completed my card with some Nuvo Drops as well as some black sharpie pen doodling. I love how this turned out!! I really wish I had a pair of those boots lol!!

Cricut Cartridges Used:
--Rock Princess--
--Jubilee--

Thanks so much for stopping by today and taking a look at my latest creation!
I really appreciate it!!
Be sure to stop by the Bitten By The Bug 2 Challenge Blog to see the creations my DT sisters  created and I hope you will create a project and join us! I would love to see what you create!
I hope you have a great crafty day!

Products Used:
--Cardstock: Cilantro (Lawn Fawn), White (hammermill), Vellum, All Others (Recollections)
--Dies: Zig Zag Stitched Rectangle Stax (MFT)
--Cricut: Rock Princess and Jubilee
--Misc.: Black Sharpie Pen, Ebony Black Nuvo Drops, Shocking Pink Nuvo, Apple Green Nuvo, Simply White Nuvo, White Gel Pen, Foam Tape, Clear Wink Of Stella, Glossy Accents


Saturday, July 4, 2020

Sending Sunshine

Hi everyone!
I hope you are having a fabulous day!
Happy Fourth Of July to my friends in the States!

Today is my day to take over the Paper Nest Dolls blog and I created a bright and happy card to share with you today. 


To create my card, I started with a white card base and layered some striped patterned paper on top. I used a border punch to create a lacy edge to the sides of a white cardstock panel and trimmed down a piece of light blue paper to fit in the center. I stamped my greeting along the bottom, added some twine and then popped up my panel onto my card front with some foam tape. I printed out Sunshine Ellie from Paper Nest Dolls onto some cardstock, sizing her at 4", and colored her with my Copic markers. Once I had her colored, I used my Scan N Cut to cut her out and I popped her up onto my card with more foam tape. I completed my card with some faux stitching with my white gel pen and a few sequins for some sparkle.


I just thought this image was so cute! I love sending happy mail and I hope this brightens someone's day with a little bit of sunshine (in paper form of course lol).

Paper Nest Products Used:

You can check out the Paper Nest Digital Stamp store by clicking HERE
You can check out the Paper Nest Dolls Rubber Stamp Store by clicking HERE

I will also be entering my card into the following challenges:
&


Thank you so much for stopping by my blog today and taking a look at my latest creation!
I really appreciate it!
I hope you have a great crafty day!

Products Used:
--Copics: 
  • Skin: E50, E51, E21, R20, R00
  • Hair: E51, E53, E55, E57
  • Balloon/Clothes: Y11, Y13, Y15, Y17
--Cardstock: White (Hammermill & Georgia Pacific), Light Blue (Craft Asylum)
--Patterned Paper: Hello Sunshine (Lawn Fawn)
--Ink: Memento Tuxedo Black
--Sentiment Stamp: Sunflower Sweetheart (My Favorite Things)
--Image Digital Stamp: Sunshine Ellie (Paper Nest Dolls)
--Misc.: White Gel Pen, Traditional Eyelet Border punch, Clear Wink Of Stella, Foam Tape, Sequins, Lemon Zest Trendy Twine


Wednesday, July 1, 2020

Plant Seeds Of Love

Hi everyone!
I hope your Wednesday is off to a great start!
It is hot and humid in my area. 
Perfect day to stay inside where it is nice and cool, craft the day away and
 create a card for a few challenges.

The challenges that I will be entering are:
&


Here is a look at the card that I was able to create with the above challenges in mind:


I created my card base from some dark blue cardstock and layered some cheery patterned paper on top from an older stack from Pebbles, called Family Ties. I printed out this adorable digi image from La La Land Crafts called In The Garden Marci and colored her with my Copics. Once I had her colored in, I used my Scan N Cut to cut her out and popped her up onto my card with some foam tape. I printed out the sentiment that comes with the digi image, notched the ends and tied a bow around one end. I popped up the sentiment with more foam tape. I completed my card with some polka dots on her headband with a white gel pen. Isn't she adorable? I think she is just precious!

Thank you so much for stopping by my blog today and taking a look at my latest creation!
I really appreciate it!
I hope you have a great crafty day!

Products Used:
--Copic Markers:
  • Skin: E50, E51, E21, R20, R00, R83
  • Hair: E41, E43, E44, E47
  • Clothes: C0, C1, B41, B45, C6
  • Flowers: Y11, Y13, C0
--Cardstock: White (hammermill), Breaker Bay Blue (Bazzill)
--Patterned Paper: Family Ties (Pebbles)
--Digi Stamp: In The Garden Marci (La La Land Crafts)
--Misc.: Crochet Thread, Foam Tape, White Gel Pen


Related Posts Plugin for WordPress, Blogger...

Would You Like Posts Delivered To Your Email?

Get new posts by email:

I Proudly Design For...

Jaded Blossom

Follow this blog with Bloglovin'

Follow on Bloglovin Follow on Bloglovin

Search This Blog

Blog Archive

My Blog List

Challenge Blogs I Love

Labels

2 Cute Ink (4) 3 Birds On Parade (1) 365 Cards (5) 3D Items (364) A Child's Year (5) AAA Birthday (4) Accent Essentials (5) Action Wobbles (18) Addicted To Stamps & More (14) All Dressed Up Stamps (18) All Mixed Up (3) All Occasion Cake Art (3) Altered Item (60) An Inky Situation (3) Anniversary/Wedding (10) Announcement (3) Artiste (13) Autumn (58) Avery Elle (9) Baby (21) Baby Steps (4) Banner (5) Best Wishes (5) Big Picture Classes (1) Birthday (238) Birthday Bash (9) Birthday Sundaes (9) Bits & Pieces (1) Bitten By The Bug2 (36) Blog Hops (53) Bloom (2) Box (2) Boys Will Be Boys (3) Breast Cancer Awareness (3) Bugaboo Stamps (1) C.C. Designs (13) Camp Create (21) CANDi (22) Candy (286) Car Decals (2) Card Folds (22) Card Harmony (10) Carousel (1) Cartridge Toss-Up (7) Celebrate With Flourish (3) Celebrations (5) Center Step Card (10) Christmas (225) Christmas Card Challenges (14) Christmas Cheer (7) Clean and Simple (113) Clearly Besotted (4) Colored Pencils (1) Congrats (19) Cooking With Cricut (34) Copic (7) Copics (635) CPS (18) Craft It Up & Link It Up! (8) Craftwork Cards (22) Crafty Creations (1) CreateACritter (27) CreateACritter2 (4) CreateAFriend (1) Cri-Kits (2) Cricut (404) Cricut 360 (13) Cricut Alphabet (5) Cricut Cardz Challenge (4) Cricut Essentials (1) Criss Cross Card (2) CTMH (21) Cupcake Inspirations (6) Cut Club (9) Cut It Up Challenges (23) Cuttlebug (144) Darcie's (3) DCWV (26) Design Team (2) Designer's Calendar (1) Di's Digital Stamps (12) Diamond Fold Card (1) Die Cuttin Divas (12) Dies R Us (12) Digi Doodle Studios (32) Digi Doodles (1) Digital Stamps (57) Don Juan (1) Doodlebug (57) DoodleCharms (15) Doodletype (1) Dr.PhilScraps (22) Easel Card (8) Easter (63) Elegant Edges (16) Embossing (1) Encouragement (84) Everyday Pop-Up Cards (4) Fall (38) Fantabulous Cricut Challenge Blog (8) Father's Day (8) First Friday Challenge (1) Flaunt It Fridays (5) Flower Shoppe (4) Foil (2) For You (3) Forever Young (6) Four Legged Friends (1) Fourth of July (16) Frantic Stamper (1) Frappachino Jars (5) French Manor (1) Freshly Made Sketches (1) Friendship (85) From My Kitchen (1) Galentine (1) Gate Fold (3) George and Basic Shapes (14) Gerda Steiner (21) Get Well (24) Gift Bag (60) Gift Card (37) Gnomes (1) Graduation (13) Graphically Speaking (3) Guest Designer (24) Gypsy (13) Gypsy Wanderings (3) Halloween (137) Hannah Montana (2) Happy Hauntings (4) Harry Potter (3) Heffy Doodle (1) Hello (255) Hello Bluebird (10) Hello Kitty Greetings (6) Holiday Card Workshop (5) Home Decor (14) Honey Bee Stamps (3) Hoot 'N' Holler (1) If You Give A Crafter A Cookie (11) Independence Day (2) Indie Art (1) Ink Blending (3) Ink N Splatter (30) Inking It Up Crazy (4) Inspiration Wednesday (4) Interactive (6) Invitation (1) Jaded Blossom (388) Jitterbuggin' (1) Journaling Spots (1) Joy's Life Stamps (122) Jubilee (2) Just Because Cards (9) Just For Fun (60) KaDoodle Bug (56) Kat Scrappiness (1) Kate's ABC's (1) Krafty Girls (17) La-La Land Crafts (14) Lacy Labels (12) Lawn Fawn (90) Lawn Fawnatics (14) Layout (29) Let's Capture These Sketches (1) Life's A Beach (5) Life's A Party (7) Live Simply (1) Locker Talk (4) Love (133) Love My Tapes (10) Love You A Latte (2) LoveBug Creations (51) Lovely Floral (2) Lyrical Letters (9) M.A.G. Challenge (1) Made In Minutes (4) Mama Elephant (14) Masculine (31) MCT Challenge (5) Memory Box (1) MemoryDex (6) Meow (1) Mer-May (5) MFT Sketch Challenge (17) Minc (3) Mini Album (5) Mini Monsters (6) Miss Kate's Cuttables (3) Miss You (1) Mo's Digital Pencil (1) Mojo Monday (35) Mother's Day (14) MPS Challenge (8) My Craft Space (1) My Creative Time (337) My Favorite Things (175) My Scrap Chick (8) Neat & Tangled (1) New Arrival (4) New Year (1) Nifty Fifties (3) Note Card (92) Nursery Rhymes (1) Once Upon A Princess (1) Online Card Class (16) Pack Your Bags (3) Paisley (2) Paper Doll Dress Up (10) Paper Nest Dolls (7) Paper Play Sketches (11) Paper Playtime (15) Paper Sweeties (2) Paper Therapy (24) Paperie Ink (1) Party Favors (3) Patriotic (6) Pause Dream Enjoy (22) PDE Linky Party (23) Peachy Keen Stamps (58) Penny Black (4) Perfect Sentiments (1) Photo Inspiration (1) Pink & Main (145) Pink & Main Challenge (11) Pink Gem Designs (17) Pinterest Inspired (1) Plantin Schoolbook (9) Pooh and Friends (2) Pooh Font (3) Pretty Cute Stamps (2) Pretty Paper Pretty Ribbons (2) Print & Cut (1) Project Life (7) Punch Board (7) Puns (41) RAM stamps (1) Rock Princess (6) S Fold (2) Scan N Cut (14) Scenes (1) Scrapbook.com (5) Scrapping The Little Things (7) Scrappy Moms (61) Scrappy Moms Release (21) Seize The Birthday (15) Sentimentals (5) Shabby Chic (1) Shaker Card (31) Shaped Cards (45) Shopping Our Stash (36) Silhouette (146) Silhouette Challenges (5) Simon Says Stamp (5) Simon Says Stamp Monday Challenge (7) Simon Says Wednesday Challenge (37) Simply Charmed (9) Simply Sweet (1) sketch (4) Sketch N Scrap (27) Sketches:Creatively Yours (6) Slimline (19) Smiley Cards (3) Sophisticated (2) Sorry (1) Spellbinders (15) Splitcoast Stampers (1) Spongebob Squarepants (1) Sports Mania (2) Spring (26) Spring Cottage (2) Spring Holiday Cards (1) SSS Wednesday Challenge (2) St. Patrick's Day (14) Stamp Anniething (86) Stamp/Die of the Month (2) Stampin' Up! (43) Stamping Bella (10) Stand and Salute (6) StarJamLines (1) Stencils (2) Stick It Down (7) Storybook (12) Straight from the Nest (8) Stretch Your Dies (5) Summer (58) Summer Celebrations (1) Sunny Day Crafting (6) Sunny Studio (5) SVG Attic (1) SVGCuts (15) SVGCuttingFiles (55) Swaps (5) Sweet November (1) Sweet Shop (1) Sweet Tooth Boxes (2) Sweet Treats (10) Sweethearts (8) Sympathy (3) Tacky Tuesday (6) Tags (27) Tags Bags Boxes and More (6) Tags Bags Boxes and More 2 (6) Taylored Expressions (3) Teacher Appreciation (1) Tear Drop (2) Teddy Bear Parade (7) Tent Topper (5) Terrific Tuesday Challenges (10) Thank You (72) Thanksgiving (24) The First Few Years (1) The Four Seasons Challenge (4) The Greeting Farm (11) The Paper Shelter (2) The Paper Variety (3) The Perfect Sentiment (11) The Rabbit Hole Designs (1) The Sweet Shop (1) The Sweet Stop (9) Thinking of You (95) Thrifty Thursday (5) Throwback Thursday (5) Tiddly Inks (2) Tie The Knot (2) Too Cute By Jessica (1) Trendy Twine (38) Trinity Stamps (3) Try Me Tuesday (4) Try Stampin On Tuesday (8) Tuesday Morning Sketches (5) Tutorial (1) Twinkle Toes (3) Unity Stamp Co. (4) Use It Tuesday (13) Valentine's Day (93) Valentine's Sentiments (1) Varsity Letter (1) Victorian Romance (1) Vinyl Projects (2) Wacky Wednesday (1) Waffle Flower (2) Washi (6) Watercolor (16) Welcome Home (1) What A Treat Wednesday (1) Whatever Wednesday (2) Whimsy Stamps (1) Wild Card (31) Winter (29) Winter Frolic (3) Winter Woodland (4) Wrap It Up (5) Your Next Stamp (5) Zig Clean Color (6)

Honorable Gnome

I was Spotted!

Camp Create 2016

Total Pageviews

>

Info

Occasionally I will be posting projects that use products that I have been given as a Design Team Member for a certain team. I will never endorse anything that I do not strongly believe in.

Copyright Info:

Please note that all of my work is original unless otherwise stated. It is for your own personal enjoyment only. Please do not copy for profit, publication, design contest or teams, or pass off as your own. Thank you and Enjoy!