Pages

Thursday, December 16, 2021

Comfort and Joy

Hi crafty friends!

I hope you are all having a fabulous day!

Today I am sharing a sweet Christmas card that I created using a new clear stamp set from


Santa sure looks comfy doesn't he? 
I created my card by creating a card base from some Kraft cardstock and then covering the front with a piece of red patterned paper from the Gentle Winter 6x6 Paper Pad. I die cut another piece of Kraft cardstock out using a scallop die, placed it on my card and then layered a strip of white and green patterned paper from the Christmas Holidays 6x6 Paper Pad along the bottom. I stamped that adorable Santa from the Santa's Treats Clear Stamp set and colored him with my Copic markers. Once I had him colored, I used the coordinating die to cut him out. I thought it would be fun to paper piece his blanket so I used more of the white and green patterned paper and added some shading & definition with some green copics. I stamped my greeting, die cut it out and adhered it to a piece of red cardstock. I added some red satin ribbon to a piece of white cardstock, adhered it to my card front and popped up my Santa and sentiment with some foam tape. I completed my card with a little bit of white stickles to his hat and whipped cream and some white doodles with my gel pen. So cute!!! It is really sunny in my area today so my ribbon is photographing a lot brighter than it really is. It is actually more along the shade of the sentiment banner. Sorry about that. 

Copic Colors Used:
--Skin: E000, E00, E11, R20--
--Hair: C00, C0, C2--
--Boots/Belt: C4, C6--
--Suit: R24, R27, R29, R39--
--Cup: R27, R29, G40, G46--
--Chair: E40, E42, E43, E47--
--Cookie: E31, E33--

I would also like to play along with the following challenges:
&


Thank you so much for stopping by my blog today and taking a look at my latest creation!
I really appreciate it!
I hope you have a great crafty day!

Hugs,
Ink N Splatter Products used:
  • Santa's Treats Clear Stamp
  • Santa's Treats Craft Die
  • Christmas Holidays 6x6 Paper Pack
  • Gentle Winter 6x6 Paper Pack
Other Products Used:
  • Cardstock: White (Neenah), Kraft (Pen Gear)
  • Dies: Stitched Rectangular Frame Dies & More (MCT), Blueprints 27 & Fishtail Foundations (MFT)
  • Misc.: Copic Sketch Markers, Red Satin Ribbon, Gold Gel Pen, Foam Tape, White Stickles, White Gel Pen


Tuesday, December 7, 2021

Sending Christmas Cheer

Hi friends!
I hope you are having a fabulous day!

Today starts a new challenge over at the


Here is a look at the card that I created:


I got this adorable little truck from Spellbinders a couple of months ago and I have been itching to use it! I'm not sure what it is about the red trucks and the holidays but I'm a bit obsessed lol! I started by covering my cardbase with some plaid patterned paper and adding a strip of green cardstock to the center. I die cut a white stitched panel and stamped my greeing with some Versafine ink and added it to my card front. I built my truck and popped it up with foam tape to the card and added some glossy accents to the tree ornaments, headlight and bumper. I also added some black enamel dots to act as the tire rims. I finished my card by adding some doodling with a black Micron pen. Super duper easy!

I hope you will stop by the Addicted To Stamps & More challenge blog to see the fabulous cards the team made as well as joining us and playing along! I would love to see what you create!

Thank you so much for stopping by today and taking a look at our latest creation!
I really appreciate it so very much!
I hope you have a great crafty day!

Crafty Hugs,

Products Used:
  • Cardstock: Old Olive and Cherry Cobbler (SU!), White (Neenah), Kraft & Black (Recollections)
  • Patterned Paper: Christmas Plaids (Recollections)
  • Inks: Mowed Lawn Distress & Onyx Black Versafine
  • Dies: Stitched Rectangular Frame Dies & More (My Creative Time), Holiday Haul (Spellbinders)
  • Stamps: Sending You (Spellbinders)
  • Misc.: Glossy Accents, Corner Chomper, Enamel Dots, Foam Tape, Black Micron Pen


Thursday, December 2, 2021

Christmas Joy

Hi crafty friends!

I hope you are all having a fabulous day!

Today I am sharing a sweet and simple Christmas card that I created using a new stamp set from


Aren't those little Wise Men the sweetest??
I knew I wanted to make a simple card when I saw this stamp set so that the focus of the card could remain on the images and sentiment. I started by ink blending a night sky and adding some yellow for the glow of the star. I splattered some gold metallic watercolor onto the background and then set that aside to dry. While that was drying, I stamped the three Wise Men from the Oh Holy Night stamp set, colored them with my Copic markers and used the coordinating dies to cut them out. I created an A2 cardbase from some white cardstock and adhered the night sky panel.  I layered some gold foil cardstock and white cardstock together, used a circle die to cut out an opening for the night sky to show through, stamped my greeting and popped it up onto my card front with foam tape. I heat embossed my star with some gold embossing powder, used some more of the gold metallic watercolor to color it in and popped it up with more foam tape. I completed my card by adding those adorable Wise Men.
So simple and sweet!

Copic Colors used:
**Wise Man #1**
 Hair: W3, W7, 100. Skin: E53, E55, R20. Outfit: Y26, G21, YG63, G46, V15.
**Wise Man #2**
Hair: E21, E23, E25. Skin: E000, E00, R20. Outfit: V12, V15, V17, Y26, Y28.
**Wise Man #3**
Hair: E31, E99, YR14. Skin: E00, E11, R20. Outfit: B21, B34, B37, Y26.

I would like to play along with the following challenges:
&


Thank you so much for stopping by my blog today and taking a look at my latest creation!
I really appreciate it!
I hope you have a great crafty day!

Ink N Splatter Products Used:
Other Products Used:
  • Cardstock: White (Neenah), Gold Foil (Park Lane)
  • Inks: Memento Tuxedo Black, Chipped Sapphire, Squeezed Lemonade and Wilted Violet Distress Oxides & Versamark.
  • Dies: Nesting Circles (WRMK)
  • Misc.: Gold Metallic Watercolor, Foam Tape, Gold Gel Pen, Gold Embossing Powder, Copic Sketch Markers.


Wednesday, December 1, 2021

Merry Christmas Snowman Card

  Hi friends!

I hope you are having a wonderful day!

Can you believe it is December 1??? 
The first of the month means it is time for a new challenge at 

Here is a look at the photo inspiration for this month: 

The picture is for inspirational purposes so if the picture doesn't strike your fancy, you can enter a WINTER themed project. The picture is purely optional.

I was inspired by a few things in the photo. The snowman, the red bird, the snow and the plaid on Santa's bag.  So many possibilities with this picture!

Here is a look at the card that I created:


I started my card by creating a white card base and covering it with some plaid patterned paper. I added a strip of red cardstock down the middle and added some doodled lines around the perimeter using a black sharpie pen. I stamped my image from Gerda Steiner with some black ink and used my Copic markers to color it in. Once I had it colored, I used a oval flourish die to cut it out & popped it up onto my card with some foam tape. I used some of the same plaid paper to paper piece his little scarf and hat band. I stamped my greeting with some black ink & used a fishtail die to cut it out. I cut a piece of red cardstock with the same fishtail die and just added the ends so that it helped the sentiment stand out a bit. I finished my card by adding some snowflake sequins and some white Nuvo drops to act as falling snow and some glossy accents to his coal buttons.

Copic Colors Used:
--Snowman: B0000, B000--
--Hat/Buttons: C3, C5, C7--
--Holly: R27, R89, G46--
--Broom: E33, Y26, E37, E39--
--Bird: R23, R27, R39, C5, G05, G07, YR12--
--Carrot: YR12, YR14--

Thank you so much for stopping by my blog today!
I really appreciate it!
I hope you will head over to The Four Seasons Challenge Blog 
to see what my DT Sisters created and create a project to play along!
I can't wait to see what you create!
I hope you have a great crafty day!

Products Used:
  • Cardstock: Red (Recollections), White (Neenah)
  • Patterned Paper: Poppies & Pines (The Paper Studio)
  • Ink: Memento Tuxedo Black
  • Stamp: Happy Snowman (Gerda Steiner)
  • Dies: Fishtail Foundations (MFT), Floral Ovals (Spellbinders)
  • Misc.: Snowflake Sequins, White Nuvo Drops, Foam Tape, Glossy Accents


Tuesday, November 23, 2021

Jolly Holidays

 Hi friends!

I hope are having a fabulous day!

Today starts a new challenge over at the


Here is a look at the card that I created:


I have this fun stamp set from My Favorite Things and was excited to finally break it out and get it inky! I started by stamping my image with some black Memento Ink and using my Copic markers to color it in. Once I had it colored, I cut it out and popped it up onto a piece of green patterned paper. I added some fun holly themed patterned paper to my white card base and did a little doodling around the perimeter before adhering my image piece. I stamped my greeting onto some white cardstock, used a fishtail die to cut it out and added a strip of red glitter paper behind before popping it up onto my card. I finished my card by adding a red glitter scallop frame to highlight my image and a bit of glossy accents to Rudolf's nose.

Copic Colors Used:
**Santa: E000, E00, E21, R20, R24, R27, R29, C00, C0, C1, C2**
**Elf: E50, E51, R20, E21, G05, G07, G09, E33, E35, E37, Y26**
**Rudolf: R29, R27, R24, E41, E42, E43, E44, E47, Y26**

I hope you will stop by the Addicted To Stamps & More challenge blog to see the fabulous cards the team made as well as joining us and playing along! I would love to see what you create!


Thank you so much for stopping by today and taking a look at my latest creation!
I appreciate it so very much!
I hope you have a great crafty day!

Crafty Hugs,

Products Used:
  • Cardstock: White (Spectrum Noir & Neenah), Red Glitter (Joanns)
  • Patterned Paper: Christmas Magic (Doodlebug)
  • Stamp: Christmas Elfies (MFT)
  • Ink: Memento Tuxedo Black
  • Dies: Fistail Foundations & Stitched Square Scallop Frame (MFT)
  • Misc.: Foam Tape, Black Sharpie Pen, white gel pen, glossy accents


Tuesday, November 9, 2021

Happy Birthday Card using Stencils

 Hi friends!

I hope are having a fabulous day!

Today starts a new challenge over at the


Here is a look at the card that I created:


This card looks like it took a lot of work but it was so ridiculously easy to make! I started by creating my floral focal point. I used a layering stencil from The Ton, picked some ink colors that I thought would pair well together and started building my flowers. Once I had the florals created, I cut them out using a stitched rectangle die, adhered them to a piece of blue cardstock that I had cut out using a scallop rectangle die and popped it up onto a white A2 cardbase. I stamped my sentiment, cut it out with a fishtail die and popped it up onto my card with more foam tape. I completed my card by adding just a few sequins and some Nuvo drops. I told ya it was simple! haha! Simple but oh so pretty!!

I hope you will stop by the Addicted To Stamps & More challenge blog to see the fabulous cards the team made as well as joining us and playing along! I would love to see what you create!

Thank you so much for stopping by today and taking a look at our latest creation!
I really appreciate it so very much!
I hope you have a great crafty day!

Crafty Hugs,
Products Used:
  • Cardstock: White (Bristol Smooth and Hammermill), Moonstone (Lawn Fawn)
  • Stamps: Inside: Birthday (Honey Bee Stamps)
  • Dies: Stiched Rectangular Frame Dies & More (MCT), Blueprints 27 & Fishtail Foundations (MFT)
  • Ink: Daffodil Delight, Crushed Curry, Marina Mist, Pacific Point, Wisteria Wonder, Old Olive (Stampin' Up)
  • Stencil: Peony Print Layering Stencil (The Ton)
  • Misc.: Glimmer Paste Nuvo, White Nuvo Drops, Sequins, Sparkle Gelly Roll, Foam Tape


Monday, November 1, 2021

Fall Blessings

 Hi friends!
I hope you are having a wonderful day!

It's the first of the month and that means it is time for a new challenge at 

Here is a look at the photo inspiration for this month: 


The picture is for inspirational purposes so if the picture doesn't strike your fancy, you can enter a FALL themed project. The picture is purely optional.

I was inspired by the sunflowers in the photo, along with the orange and white colors.
Here is a look at the card that I created:


To create my card, I started by layering some fun patterned papers onto a piece of Kraft cardstock. I then tied some twine around before adhering it to a white cardbase. I printed out my digital image, colored it with my Copic markers and did a bit of fussy cutting to cut it out. I matted another piece of Kraft cardstock onto some white cardstock, stamped my greeting and added my image. I popped up my image panel with some foam tape and my card was just about done! I added some little bling earrings, some Nuvo drops to the sunflower and some little patterned paper strips in the top corner to complete my card. Super simple really but I think it turned out so darling!

Copic Colors Used:
**Skin: E000, E00, E21, E04, R20, R00**
**Hair: E21, E23, E25, E27**
**Boots/Belt: E41, E42, E43, E44**
**Skirt/Shirt: YR12, YR14, YR27, YR30**
**Sunflower: E44, YG63, YR21, YR23**

 Thank you so much for stopping by my blog today!
I really appreciate it!
I hope you will head over to The Four Seasons Challenge Blog 
to see what my DT Sisters created and create a project to play along!
I can't wait to see what you create!
I hope you have a great crafty day!

Products Used:
  • Cardstock: White (Hammermill), Kraft (Recollections)
  • Patterned Papers: Pumpkin Spice & Swiss Dots Rainbow (Doodlebug)
  • Ink: Versamark Onyx Black
  • Stamps: Digital Image: Sunflower Girl (2 Cute Ink), Sentiment: Fall Flourish (Jaded Blossom)
  • Dies: Cross Stitch Rectangle Stax (MFT)
  • Misc.: Dark Walnut Nuvo, Foam Tape, Hemp Twine, Brown Micron Pen, Tiny Attacher, Clear Wink Of Stella, Gems, Glossy Accents.

Tuesday, October 26, 2021

Merry & Magical!

 Hi friends!

I hope are having a fabulous day!
Today starts a new challenge over at the
  Addicted To Stamps & More Challenge Blog and it is...


Here is a look at the Christmas card that I created to share with you today:


I went a bit non-traditonal for my card and created one that was more on the pastel side. I recently purchased this stamp set from Clearly Besotted during Stamptember and since unicorns just scream pastel colors to me for some reason, I just went with it lol! I colored the scene with my Copic markers and used a circle die to cut it out. I fussy cut the unicorn and gift and popped them up onto the scene with some foam tape. I die cut a zig zag circle from some white cardstock and glued my scene on top of it. I created my card base from some lavender cardstock and added a strip of polka dotted paper.  I stamped my greeting onto some white cardstock and backed it with some silver glitter cardstock, added some purple thread and added it on top of my polka dot panel. I popped up my little scene with foam tape, added some glitter to the mountain, some shimmer to the rainbow and glossy accents to the ornaments and my card was finished. My photo taking skills are not capturing how much shimmer is on this card. It is so sparkly in person!

Copic Colors Used:
**Unicorn: E000, E00, C00, C0, E42, E43, R20, BV000**
**Present/Mountain: BV000, BV01**
**Tree/Rainbow: YG11, G40, Y00, Y02, B000, B01, R12, YR12, R20, R85, R29**
**Clouds: BG0000, BG000*

I hope you will stop by the Addicted To Stamps & More challenge blog to see the fabulous cards the team made as well as joining us and playing along! I would love to see what you create!


Thank you so much for stopping by today and taking a look at our latest creation!
I really appreciate it so very much!
I hope you have a great crafty day!

Crafty Hugs,
Products Used:
  • Cardstock: Purple Passions (Recollections), Glitter (Recollections), White (Hammermill)
  • Patterned Paper:Swiss Dot (Doodlebug)
  • Stamps: Sentiment: Christmas Unicorn (Jaded Blossom), Images: Magical Christmas (Clearly Besotted)
  • Dies: Zig Zag Circle Dies (Pink & Main), Nesting Circles (WRMK)
  • Misc.: Lavender Crochet Thread, Foam Tape, Glossy Accents, Glitter, Clear Wink Of Stella


Thursday, October 21, 2021

Eek-A-Boo!

 Hi crafty friends!

I hope you are all having a fabulous day!

Today I am sharing a Halloween card that I created using a cute new stamp set from


I had so much fun making this card! I saw this sentiment on the stamp set and my wheels started turning as to how I could make it look like a little ghost was playing peek a boo. I decided to go with a mini slimline card. I created my card base from some white cardstock and covered it with some polka dotted patterned paper. Next I die cut a piece of black glitter cardstock and layered it on top. I cut a piece of orange patterned paper and die cut some circles out, trying my best to keep them spaced apart equally. I stamped some of the ghosts from the Ghostly Haunts stamp set, colored them with my Copic markers and used the coordinating dies to cut them out. I placed them inside the circles and cut off any overhang with my scissors. I added some doodle lines around the perimeter of my card and popped it up onto my glitter panel with some foam tape. I colored that little spider, also from the Ghostly Haunts stamp set, die cut it out and popped it up with more foam tape. I stamped my greeting onto a piece of white cardstock and backed it with more polka dotted paper before popping it up onto my card with foam tape. I completed my card with a few black confetti stars and a few glittery Nuvo drops. So fun and cute!!

Copic Colors Used:
**Ghosts: B0000, B000, R000**
**Spider: N3, N5**

I would like to join along in the following challenges:


Thank you so much for stopping by my blog today and taking a look at my latest creation!
I really appreciate it!
I hope you have a great crafty day!

Ink N Splatter Products Used:
Other Products Used:
  • Cardstock: Glitter (Recollections), White (Hammermill)
  • Patterned Paper: Happy Haunting (Doodlebug)
  • Dies: Nesting Circles (WRMK), Mini Slimline & Nested Card Creator (Spellbinders), Fistail Foundations (MFT)
  • Ink: Memento Tuxedo Black 
  • Misc.: Confetti Stars, White Blizzard Nuvo Drops, SU Black Dimensionals, White Gel Pen, Black Micron Pen


Tuesday, October 19, 2021

Boo!

 Hi everyone!
I hope you are having a wonderful day so far!
It has been so warm in my area but the weather is starting to turn a bit cooler and it is finally starting to feel a bit like Fall. Yay!! Has it been unseasonably warm in your area as well?

I wanted to pop in real quick and share another Halloween card that I made using some fun little ghosts.
Here is a look at my card:


I love these little ghosts from Gerda Steiner and thought it would be cute to try and create a little scene where one ghost is "dressed up" for Halloween and pranking his little friend. My card was really pretty simple and since they are ghosts, involved very little coloring  so it was a bit on the faster side of things from start to finish. I started out by layering my cardbase with some fun patterned papers from Doodlebug. I stamped my ghosts onto a square piece of white cardstock, colored them with my Copic markers and popped it onto my card front with foam tape.  I added a bit of shimmer by diecutting a purple glitter frame and adhering it on top of my white square. I stamped my greeting and used a word bubble die to cut it out, popping it up with more foam tape. I completed my card by adding a fun little orange bow, some confetti stars and purple Nuvo drops. How fun! These little ghosts just make me smile lol!

**Copic Colors Used**
--Ghosts: B0000, B000, R000, R00--
--Hat: V12, V15, N5, N9--

I would like to join along with the following challenges:
&


Thank you so much for stopping by today and taking a look at my latest creation!
I really appreciate it!
I hope you have a great crafty day!

Products Used:
  • Cardstock: White (Hammermill), Glitter & Black (Recollections)
  • Patterned Paper: Pumpkin Party (Doodlebug)
  • Stamps: Ghosts (Gerda Steiner)
  • Dies: Fun Size Scallop Stitched Bow Die (My Creative Time), Stitched Square Scallop Frame (MFT), Word Bubble Dies (Jaded Blossom)
  • Inks: Memento Tuxedo Black
  • Misc.: Foam Tape, Cruched Grape Nuvo Drops, Clear Wink of Stella.


Sunday, October 17, 2021

Halloween Wishes Treat Box

 Hi crafty friends!
I hope you have been able to enjoy your weekend so far. 
I was able to get a tiny bit of crafting done and decided to make a treat box.
I love making treat boxes, they satisfy my need to craft and don't seem to take a long time to create. Perfect for when I am short on time :) 

Here is a look at my box:


This was so incredibly easy! I used the Octagon Treat Box from Jaded Blossom and cut it out with some Fake Tan cardstock from Lawn Fawn. I used the inlay diecutting technique for the eyes, nose and mouth using some black glitter cardstock. I cut the hat out from some patterned paper from Doodlebug using a die from Spellbinders and attached it to my pumpkin with a small line of liquid glue. I completed my box with some black doodles & a tiny pink square patch on the hat and my sentiment on the bottom.


I would like to play along with the following challenges:

&

Thank you so much for stopping by my blog today and taking a look at my latest creation!
I really appreciate it!
I hope you have a great crafty day!

Products Used:
  • Cardstock: Fake Tan (Lawn Fawn), Glitter (Recollections)
  • Patterned Paper: Happy Haunting (Doodlebug)
  • Dies: Itty Bitty Strips (My Favorite Things), Let's Be Frank (Spellbinders), Octagon Treat Box (Jaded Blossom)
  • Ink: Carved Pumpkin Distress
  • Sentiment: Reverse Spooky Salutations (Simon Says Stamp)
  • Misc.: Black Micron Pen, Foam Tape


Friday, October 15, 2021

Hocus Pocus

Hi crafty friends!
I hope you are having a fabulous day!
I'm so excited today to be a guest designer for Digi Doodle Studios!

Digi Doodle Studios is a digi stamp company that has some of the cutest images!! They even have a monthly challenge blog that you can find HERE.  There is so much versatility with how big or small you want your image to be with digital stamps, not to mention the storage space saved in my shrinking craft room lol!

Here is a look at the card that I created to share with you today:


I really wanted the focus of my card to be on that adorable image, called Priscilla Caster, so I kept my card pretty simple! I printed her out onto a piece of Hammermill cardstock and colored her in with my Copic markers. Once I had her colored, I used a stitched rectangle die to cut her out and inked around the perimeter with some Wilted Violet and Black Soot Distress inks. I added her to a piece of black cardstock and popped it up onto my card base with foam tape. I added some black doodle lines around my card with a black Micron pen and popped up my sentiment with more foam tape. I completed my card by adding a few die cut stars,  yellow Nuvo drops and some white gel pen accents.

Copic Colors Used:
--Skin: E000, E00, E21, R20, R56--
--Hair: E31, E35, E39--
--Hats: N2, N3, N5, 100, Y15, Y11, V12, V15--
--Pumpkins: YR12, YR14, YR18, E09, E55--
--Shoes/Cape: 100, N2, N3, N5--
--Dress: V17, V15, V12, YG01, YG03--
--Tights: V12, V15, C0--
--Broom: E55, E59, YR04, YR02--
Cat/Bats: W3, W5, W7--

I would also love to join along with the following challenges:

Thank you so much for stopping by and taking a look at my latest creation!
I really appreciate it!
I hope you have a great crafty day!

Products Used:
  • Cardstock: White (hammermill), Black (Recollections)
  • Inks: Black Soot & Wilted Violet Distress Inks
  • Image: Priscilla Caster (Digi Doodle Studios)
  • Dies: Itty Bitty Strips (My Favorite Things), Stitched Rectangular Frame Dies & More (My Creative Time), Stitched Journaling Card (Lawn Fawn)
  • Misc.: Foam Tape, Reverse Spooky Salutations (Simon Says Stamp), Micron Pen, White Gel Pen, Clear Wink Of Stella, Yellow Nuvo


Tuesday, October 12, 2021

Hello Fall

 Hi friends!

I hope are having a fabulous day!
Today starts a new challenge over at the
  Addicted To Stamps & More Challenge Blog and it is...


Make Your Mark simply means we want to see your coloring. You can use pens, pencils, markers, chalks, inks, etc. Easy right?
 Here is a look at what I created:


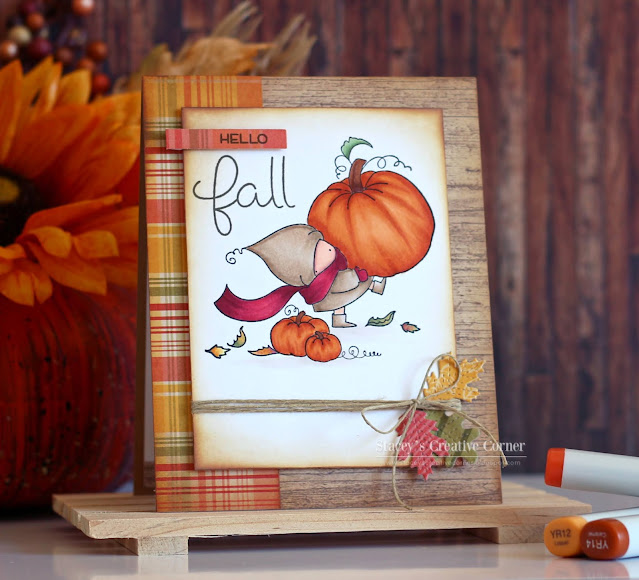
I am in Fall mode (it is my favorite season after all lol) so I decided to make another Fall themed card. This card was actually quite simple. I started by stamping that adorable little image from Stamping Bella onto a piece of white hammermill cardstock and coloring her with my Copic Markers. I inked around the perimeter of my image panel with some Vintage Photo Distress Ink before stamping "Fall"  above her with brown ink and adding some brown twine below her, tying it off in a bow. I popped up my image panel with some foam tape onto my card base that I covered with some patterned paper. I stamped "Hello" onto a piece of patterned paper, placed it above the "Fall" and tucked a few little die cut leaves under the bow to complete my card. Told ya it was simple :) 

Copic Colors Used:
--Skin: E000, E00, E21, E04--
--Clothes: E40, E42, E43, R37, R39, R56, R89--
--Pumpkins: YR12, YR14, YR18, E23, E25--
--Leaves: G21, G94, Y11, YR21, YR24--

I would also like to play along with the following challenges:


I hope you will stop by the Addicted To Stamps & More challenge blog to see the fabulous cards the team made as well as joining us and playing along! I would love to see what you create!


Thank you so much for stopping by today and taking a look at our latest creation!
I really appreciate it so very much!
I hope you have a great crafty day!

Crafty Hugs,

Products Used:
  • Cardstock: White (Hammermill)
  • Patterned Paper: Autumn Leaves (DCWV)
  • Stamps: Image: Bundle Girl at the Pumpkin Patch (Stamping Bella), Sentiment: Scripty Autumn Sentiment (Lawn Fawn)
  • Dies: Itty Bitty Strips (My Favorite Things), Small Stitched Leaves (Lawn Fawn)
  • Inks: Memento Tuxedo Black, Vintage Photo Distress, Potting Soil Archival
  • Misc.: Twine, Copic Sketch Markers, Foam Tape


Thursday, October 7, 2021

Delightfully Wicked

 Hi crafty friends!

I hope you are all having a fabulous day!

Today I am sharing a Halloween card that I created using a cute new stamp set from


I kept this card pretty simple so that I could keep the focus on that sweet little witch!
I started by creating a white A2 card and lightly inking around the perimeter with some Black Soot Distress Ink. Next I created a panel by cutting some dark gold glitter paper and layering a piece of patterned paper from the Spooky Nights Paper Pad on top and then adhered it to the center of my card base. I stamped Sabrina's Moon with some Memento Tuxedo Black onto a piece of white Hammermill paper and colored her with my Copic markers. I cut her out with my Scan N Cut and popped her up onto my card front with some foam tape. I created some clouds by using some cloud dies from My Creative Time and inked around them with some more Black Soot Distress Ink. I added my sentiment onto the larger cloud and then placed all three of them on my card with some more foam tape. So super simple but I absolutely love it!!

Copic Colors Used:
--Skin: E000, E00, E21, R20, R37--
--Hair: E31, E33, E35--
--Moon: Y21, Y23, Y00--
--Cat: C1, C3, C4--
--Broom: E50, E53, E57--
--Outfit: V12, V15, N0, N3, N5--

I would also like to play along with the following challenges:

&


Thank you so much for stopping by my blog today and taking a look at my latest creation!
I really appreciate it!
I hope you have a great crafty day!

Ink N Splatter Products Used:
Other Products Used:
  • Cardstock: White (Hammermill & Georgia Pacific), Glitter (Recollections)
  • Dies: Stitched Cartoon Cloud Dies (My Creative Time)
  • Inks: Memento Tuxedo Black & Black Soot Distress Ink
  • Misc.: Foam Tape, Glossy Accents, Copic Sketch Markers