Thursday, December 22, 2022

Happy New Year Mini Slimline Card

Hi everyone and happy Thursday!

Today I am sharing a card that I made with the one of the new images released this month from 


I used the new image called Sparkle for my project.
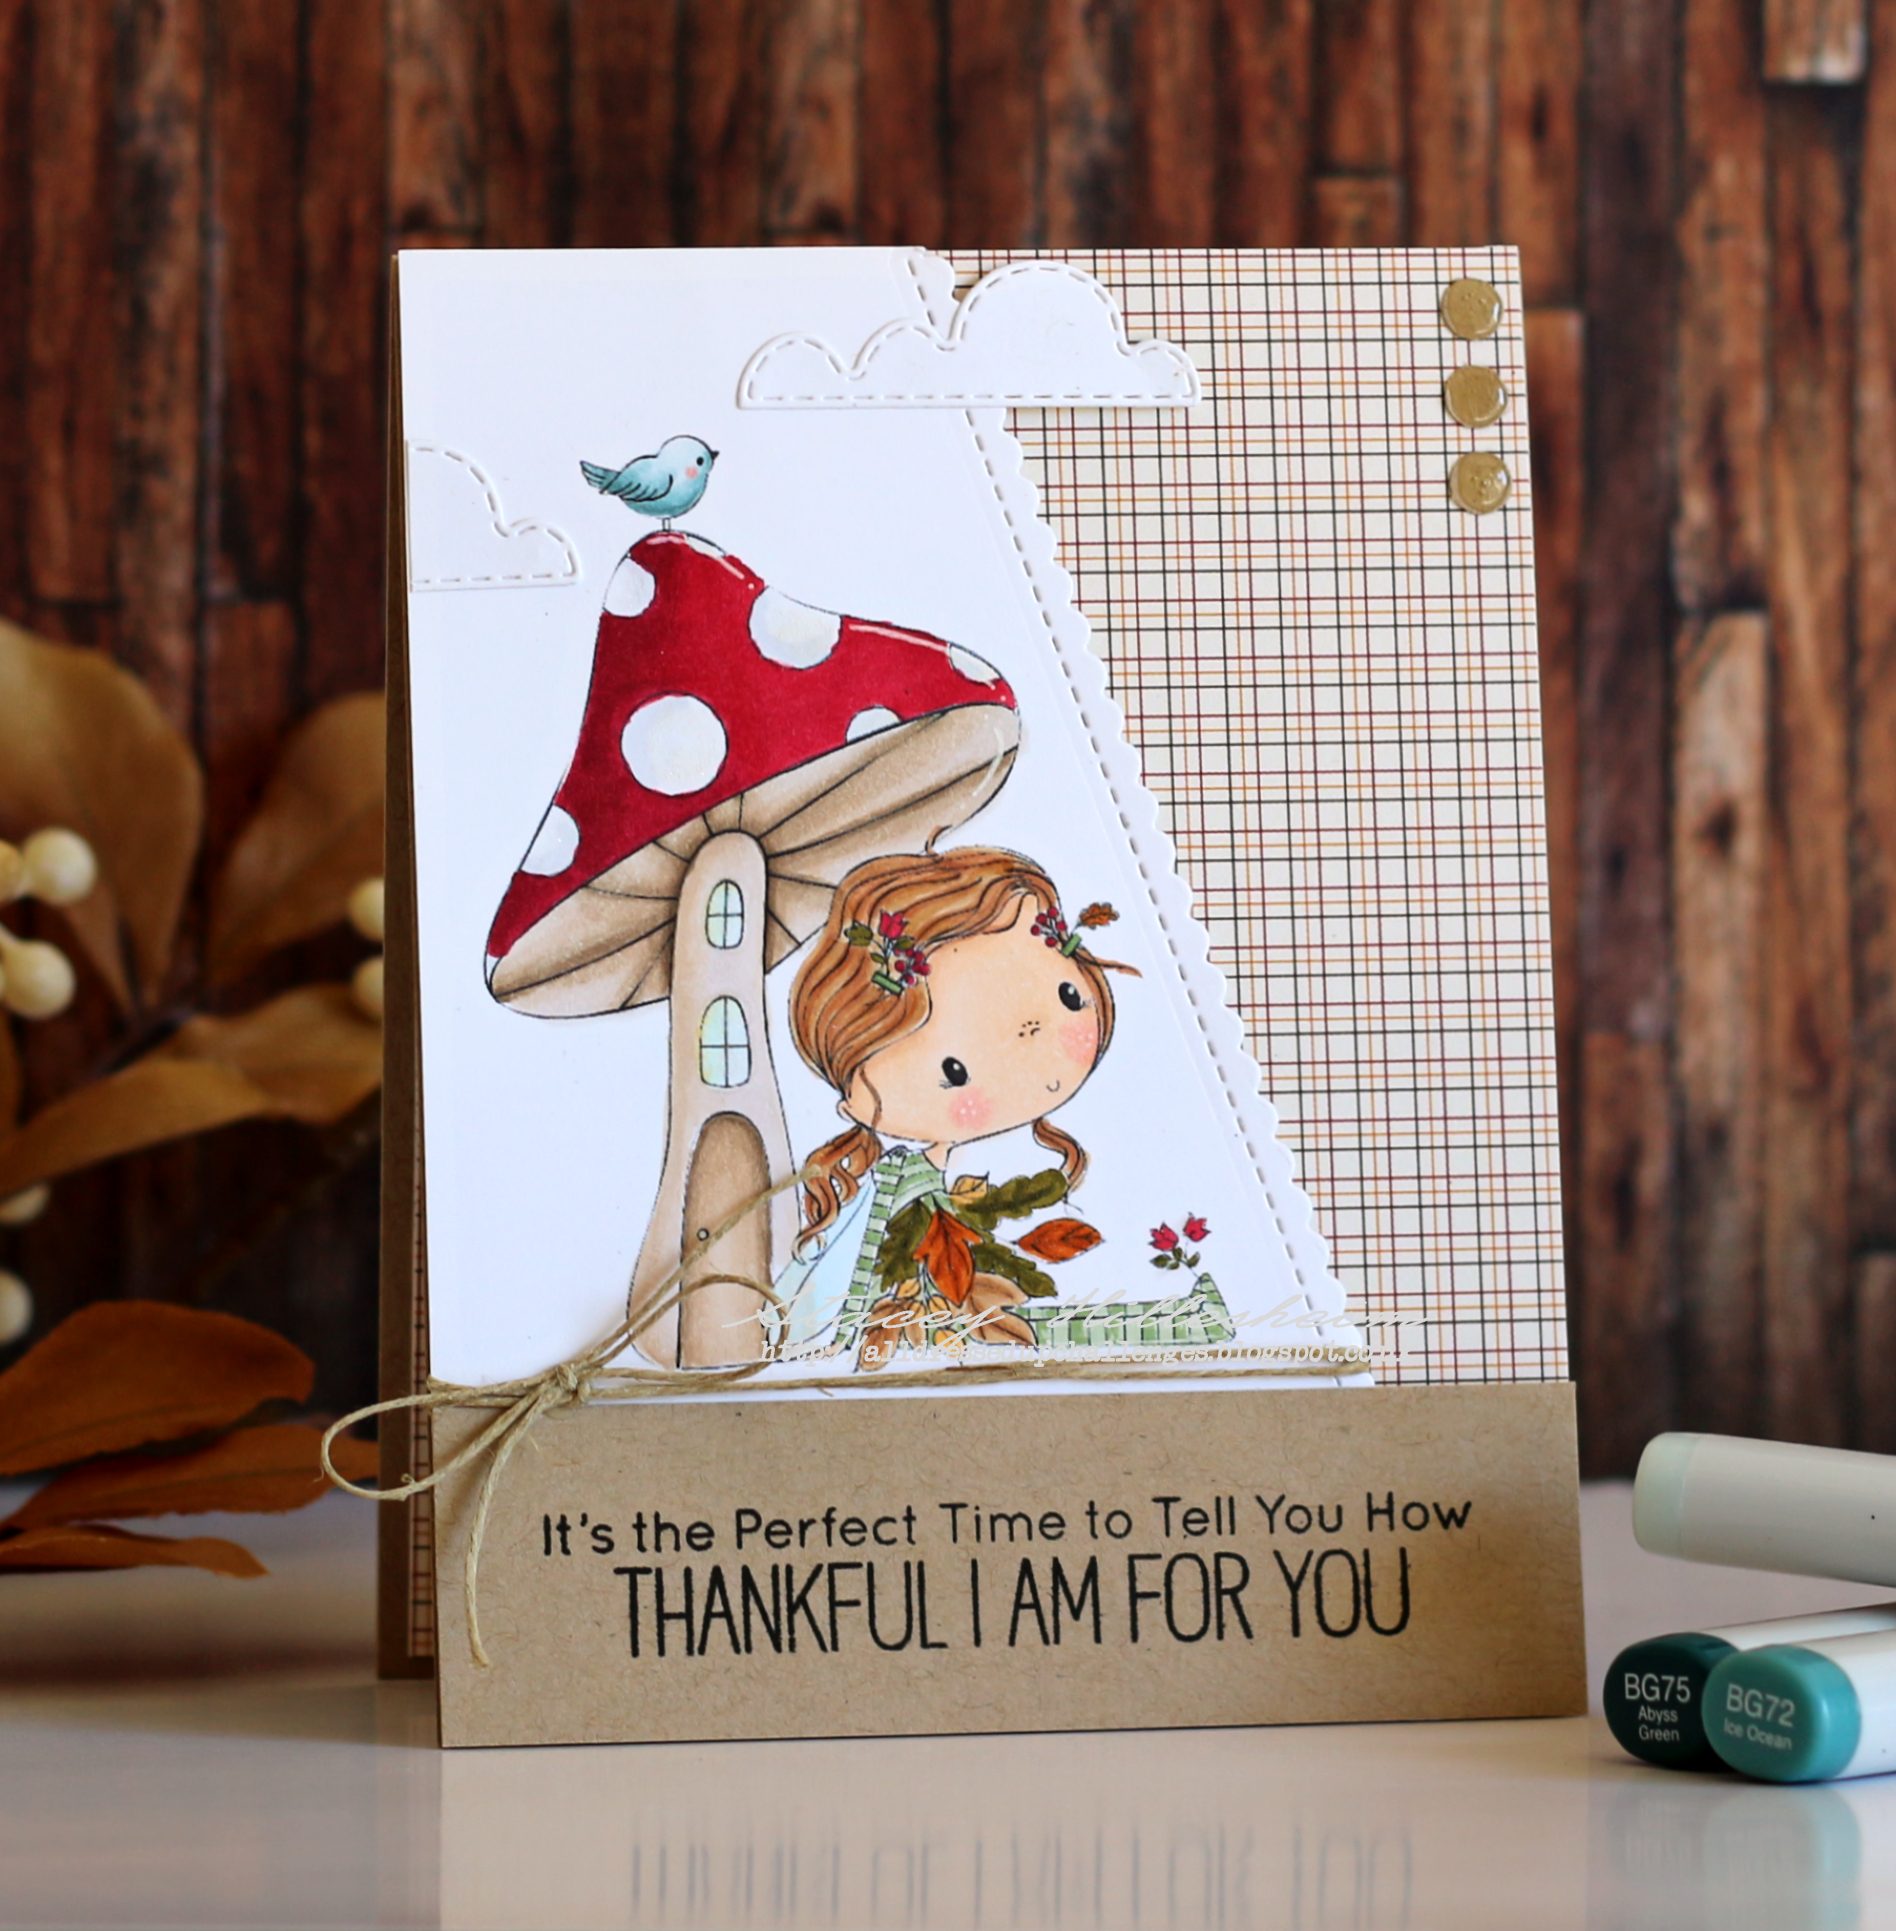
I think this little fairy is the cutest thing ever!! You could use this image for so many different occasions, including a birthday celebration but I decided to make a New Year's themed card since we are so very close to 2023!
This was pretty simple to make. I decided to make a mini slimline card & covered my card base with some gold glitter cardstock. I printed out Sparkle and colored her in with my Copic markers, I trimmed my card down and added my sentiment to the bottom and some gold ribbon to the top. I popped up my image layer with some foam tape and embellished with some gold sequins, a few Nuvo drops and some accents to the little printed sparkles with a gold gel pen.  

Copic Colors Used:
**Skin: E50, E51, R20**
**Hair: E31, E34**
**Dress: RV91, RV95, Y21, Y23, Y26, Y28**
**Wings: BG000, BV0000**
**Glass: BG0000, BG000**

Thank you so much for stopping by my blog today and taking a look at my latest creation!
I really appreciate it!
I hope you have a great crafty day!

Products used:
  • Cardstock: White (Hammermill), Gold Glitter (Recollections)
  • Image: Sparkle (All Dress Up Stamp)
  • Sentiment Stamp: Card Sentiments (My Creative Time)
  • Ink: Black Versafine
  • Misc.: Copic Markers, Clear Embossing Powder, Gold Gel Pen, Clear Wink Of Stella, Sequins, Gold Ribbon, Corner Rounder


Thursday, December 15, 2022

Merriest Christmas!

Hi crafty friends and happy Thursday!
I hope you are having a fabulous weekend :) 
I am so excited to be back crafting again!
For those that don't know, I had Carpal Tunnel surgery and needed to take a little break while I recovered. There are things that I still can't do but am happy to be able to at least craft and color again, just takes me a little longer with breaks here and there lol!   

Today starts a new challenge over at the All Dressed Up Challenge Blog and they are always anything goes as long as you use a All Dressed Up image.

Here is a look at the card that I created to share with you today:  


I love this image called Snowy Days from All Dressed Up. I printed it out onto some white cardstock and colored it in with my Copic markers. Once I had it colored, I die cut it out using a Scalloped Frame die from My Favorite Things. I decided to print out the image again so that I could fussy cut the mitten and stocking and pop them up with some foam tape for a little dimension. I added my greeting to the top corner & tied some twine around the bottom with some bells before popping my image panel up onto a white card base with foam tape. I added some snowflake sequin pieces as well as some white Nuvo drops to complete my card. 

Copic Markers Used:
--Snowman: BG0000, YR12, YR14, YR18, E44, E47--
--Snow: BG0000--
--Hat: C3, C4, C6, 110--
--Birds: C6, B21, B24, R20--
--Scarf: R27, R29, R56--
--Mitten/Stocking: R27, R29, R59, YG67--

Thanks you so much for stopping by and taking a look at my latest card!
I appreciate it so much!
Don't forget to stop by the All Dressed Up Challenge Blog and take a look at the inspiration from the team! I hope you will color up an ADU image and join us! I would love to see what you create!
I hope you have a great crafty day!
Products Used:
  • Digital Image: Snowy Days (All Dressed Up Stamps)
  • Cardstock: White (Hammermill)
  • Dies: Blueprints 27 (My Favorite Things)
  • Sentiment Stamp: Mini Merry Messages (My Favorite Things)
  • Misc.: Red Twine, Bells, White Nuvo Drops, Snowflake Sequins


Saturday, October 22, 2022

Thankful for You

Hi everyone and happy Saturday!

Today I am sharing a card that I made with the one of the new images released this month from 


 I used the new image titled Toad Stall for my card. I think this is the sweetest image but I say that about all of Wendy's images lol! I just love them all!
I printed my image out onto a piece of white Hammermill cardstock, colored it in with my Copic markers & used a border die to create a little scalloped edge at an angle. I stamped my sentiment onto a piece of Kraft cardstock, adhered that to the bottom of my white image panel, wrapped some twine around and popped it all up with foam tape onto my plaid cardbase. I added a couple of stitched clouds and some small circles that I covered with glossy accents to complete my card.  

Copic Colors Used:
--Skin: E50, E51, E21--
--Hair: E31, E33--
--Mushroom: E40, E41, E42, E43, E44, C00, C1, R37, R39, B0000--
--Leaves/Outfit: R37, YR27, YG97, YR21, E31, YG61, YG63--
--Bird: BG70, BG72, BG75--

Thank you so much for stopping by my blog today and taking a look at my latest creation!
I really appreciate it!
I hope you have a great crafty day!
Products Used:
  • cardstock: Kraft (Pen Gear), White (Hammermill)
  • patterned paper: Celebrate Autumn (Echo Park)
  • Dies: Stitched Scallop Basic Edges (MFT)
  • Digital Stamp: Toad Stall (All Dressed Up Stamps)
  • Sentiment Stamp: Fall Friends (MFT)
  • Misc.: Circle Punch, Foam Tape, White Gel Pen, Twine, Glossy Accents, Copic Sketch Markers


Saturday, October 15, 2022

Merry Christmas Bunting

Hi crafty friends and happy Saturday!
I hope you are having a fabulous weekend :) 

Today starts a new challenge over at the All Dressed Up Challenge Blog and they are always anything goes as long as you use a All Dressed Up image.

Here is a look at the card that I created to share with you today: 


I really need to get started on some Christmas cards and this cutie called "Christmas Bunting" was perfect for a simple card to get one knocked out fairly quick. I started by creating my card base from some white cardstock and layering some red and white houndstooth patterned paper on top. I printed out my image and colored her with my Copic markers. After she was colored, I used a Zig Zag Stitched die to cut her out and layered some green circles at the bottom the create a scallop edge. I added some Grosgrain ribbon and added my image panel to the front of my card with foam tape. I added some little green enamel dots in opposite corners and my card was complete! So simple!

Copic Markers Used:
--Skin: E50, E51, E21, E04, R00, R20--
--Hair: E31, E33, E35--
--Shirt: R27, R39, R59, C0--
--Banner: G24, G28--
--Stars: Y28, Y26, Y23--

Thanks you so much for stopping by and taking a look at my latest card!
I appreciate it so much!
Don't forget to stop by the All Dressed Up Challenge Blog and take a look at the inspiration from the team! I hope you will color up an ADU image and join us! I would love to see what you create!
I hope you have a great crafty day!


Products Used:
  • Cardstock: White (hammermill)
  • Patterned Paper: Welcome Christmas (Pebbles)
  • Dies: Zig Zag Stitched Rectangle (MFT)
  • Image: Christmas Bunting (All Dressed Up Stamps)
  • Misc.: Circle Punch, Ribbon, Foam Tape, Enamel Dots


Thursday, September 29, 2022

Happy Halloween

Hi everyone!

I hope your day is off to a fabulous start!
Today I have a mini slimline to share with you that I made using some adorable stamps from


 I started by creating my mini slimline base from some gray cardstock & added a purple scallop layer on top. Next was the fun part, the building of my scene! I stamped my bunny and then masked her off before stamping the bat and mouse. I added a mask to them as well and then using the Cloudy Day Stencil, I inked up a sky of purple clouds and some metallic watercolor splatters. Once I had the sky done, I added a thin layer of green along the bottom with some green ink. I removed the masks and colored my images from the Sweet & Spooky stamp set with my Copic markers. I added a moon that I die cut out with a circle die and then used a dot frame to cut out my image panel. I added some grass with a couple of different green Copics before popping it up onto my card front with some foam tape. I added a few more stars with my white gel pen and stamped my greeting using the Ghostly Haunts stamp set and added it to my card with more foam tape. So cute!

Copic Colors Used:
--Bat: R39, R59, C0, C1, C2, C6, YG03, R00, R000--
--Bunny: W0, W1, W3, W5, R20, R01, R00, YG05, YG03, 100, N5, N3--
--Mouse: R59, R39, C6, C5, C4, C3--
--Pumpkins/Candy: YR16, YR14, YR12, E44, B63, Y23, YR21, BG13, RV14, YG61--
--Grass: YG61, YG63, E43--

Thank you so much for stopping by my blog today and taking a look at my latest creation!
I really appreciate it!
I hope you have a great crafty day!

Ink N Splatter Products:
Other Products Used:
  • Cardstock: White (Hammermill), Gray & Purple (Recollections)
  • Inks: Memento Tuxedo Black, Milled Lavender, Peeled Paint, Tea Dye, Squeezed Lemonade Distress
  • Dies: Circles (WRMK), Mini Slimline (Spellbinders), Fishtail Foundations (MFT)
  • Misc.: Foam Tape, Starry Colors Watercolor, White Gel Pen


Monday, September 26, 2022

Pumpkin Pickin'

 Hi everyone!

I hope your Monday is off to a wonderful start!
I'm back today with my final post as a guest designer for Jaded Blossom!

Here is a look at what I created to share with you today:


I adore this little scarecrow and thought it would be so cute to put onto a little treat box. 
I started by creating my box using the Milk Carton Die and some Kraft cardstock. I layered some light aqua patterned paper on all the sides. I used some green patterned paper and the Border Dies 2 to create my little hills, added my sentiment from the Scarecrow Kisses stamp set and attached my hills to the front of my box. I used the Spring Dies 2 to create my cloud and added some little pumpkins that I created using the Fall Banner Dies. I stamped my scarecrow from the Scarecrow Kisses stamp set and colored him with  my Copic markers. Once I had him colored, I fussy cut him out and added him with foam tape. I created a double bow using the Bow Dies to close my box.


I adhered a twist tie to my bow so that the box would be easy to open and close without the bow getting ruined. As it gets closer to giving this little box away, I plan to fill it with some little pumpkin mellowcremes and harvest corn candies. Adorable!

Thanks so much for stopping by today!
I hope you have a great crafty day!
Products Used:
  • Jaded Blossom: Bow Dies, Spring Dies 2, Border Dies 2, Fall Banner Dies, Milk Carton Dies, Scarecrow Kisses
  • Cardstock: Kraft (Pen Gear), White (hammermill)
  • Patterned Paper: Pumpkin Spice (Doodlebug)
  • Ink: Memento Tuxedo Black 
  • Copics: Clothes: BG13, BG11, BG10, E21, E23, YR24. Face/Straw: E51, E50, E21, R20, Y21, Y26 Wood: E25, E23
  • Misc.: Foam Tape, White Gel Pen


Thursday, September 22, 2022

Hello Deer

 Hi everyone and happy Thursday!

Today I am sharing a card that I made with the one of the new images released this month from 


For my card, I used the new image called Deer Hug. Isn't that the sweetest image ever? 
I started by making my card base using some kraft cardstock, covering it with a piece of floral patterned paper and adding a piece of kraft cardstock on top. I printed out my Deer Hug image onto a piece of white hammermill cardstock and colored it with my Copic markers. Once I had it colored. I rounded the bottom corners and used a border punch along the top edge. I added some ribbon and then popped up my image panel with foam tape onto my card front. I used my computer to create my greeting, trimmed it up and added it under my bow. I love how this card turned out!

Copic Colors Used:
--Skin: E50, E51, E21--
--Hair: E42, E43, E44--
--Deer: E40, E42, E43, E49--
--Flowers: V91, V93, RV91, RV93, RV95, BG72, BG70, V95, B32--
--Dress/Wings: V91, V95, V000, B0000
--Shadow: C1, C0, C00--

Thank you so much for stopping by my blog today and taking a look at my latest creation!
I really appreciate it!
I hope you have a great crafty day!
Products Used:
  • Cardstock: White (Hammermill), Kraft (Pen Gear)
  • Patterned Paper: Darling Deerest (The Paper Studio)
  • Stamp: Deer Hug (All Dress Up Stamps)
  • Misc.: Offray Ribbon, Foam Tape, Corner Rounder, Clear Wink Of Stella, White Gel Pen, Floral Lace Border Punch


Halloween Wishes!

 Hi everyone!

I hope your day is off to a great start!

Today I am sharing a fun Halloween card that I created using a super cute image from


This card was so super simple!
I created my cardbase using some black cardstock and layered two different patterned papers on a diagonal on top. To seperate the layers, I cut another piece of patterned paper  & added a spider web border to each side. I printed out Jazzy Jette & Crew onto some white cardstock and colored the image in with my Copic markers. Once I had it colored in, I fussy cut the image and popped it up onto a black oval with foam tape. I added it to my card and popped up my greeting below it. I added some star confetti along with some Nuvo drops to complete my card.
They look like they are ready to go out and have a spooky good time huh?
So incredibly cute!

Copic Markers Used:
--Pumpkins: YR18, YR16, YR14, YR12, Y11, R35, R32, E27, E23--
--Cat: N6, N4, N2, V17, V15, V12, YG05, YG03, R20--
--Bats/Spider: C4, C2, R20--

Thank you so much for stopping by my blog today and taking a look at my latest creation!
I really do appreciate it!
I hope you have a great crafty day!

Products Used:
  • Cardstock: White (Hammermill), Black (Recollections)
  • Patterned Paper: Happy Haunting (Doodlebug)
  • Digital Stamp: Jazzy Jette & Crew (Digi Doodle Stamps)
  • Sentiment: Reverse Spooky Salutations (Simon Says Stamp)
  • Dies: Oblong Doily Frames (Daice), Fishtail Foundations (MFT)
  • Misc.: Confetti Stars, Yellow Nuvo, Black Nuvo, Spider Web Border Punch, White Gel Pen, Gold Gel Pen, Copic Sketch Markers


Friday, September 16, 2022

Sweet & Spooky

 Hi everyone!

I hope your day is off to a fabulous start!
Today I have a fun little treat box to share with you that I made using older products from my stash as well as some brand new stamps that are getting released today from Ink N Splatter!


I started by creating my box using a die from Jaded Blossom and some black cardstock. I cut out a zig zag circle using some patterned paper from Ink N Splatter, Spooky Nights 6x6. I layered a piece of light black graph paper on top and then popped it onto my box with foam tape. I stamped that adorable image from the new stamp set from Ink N Splatter called Sweet & Spooky with some black memento ink and colored it with my Copic markers. Once I had it colored, I used the coordinating die to cut it out and popped it up onto my circle with more foam tape. I stamped my greeting with black Memento ink onto a scrap piece of the graph paper and added that to the top half of my box. I used more paper from the Spooky Nights 6x6 and a bow die to create that fun bow and added some confetti stars to complete my box.


Isn't it so cute? I love those little kitty cats!

Copic Colors Used:
--Cat 1: C3, C2, C1, R20, R00, C6, C5, C3, V15, V12, Y28--
--Cat 2: YR27, YR24, YR21, YR30, Y21, R20, R00--
--Cat 3: C2, C3, C5, C6, R20, R00--
--Spider: C3, C5--
--Pumpkin: YR12, YR14, YR18, G82, G94, R32--

Thank you so much for stopping by my blog today and taking a look at my latest creation!
I really appreciate it!
I hope you have a great crafty day!

Ink N Splatter Products Used:
Other Products Used:
  • Cardstock: Black (Recollections), White (Hammermill)
  • Patterned Paper: Floral Graph (Doodlebug)
  • Dies: Gable Box Die & Bow Dies (Jaded Blossom), Stitched Circle & Zig Zag Circle (Pink & Main)
  • Misc.: White Gel Pen, Foam Tape, Confetti Stars


Monday, September 12, 2022

Trick Or Treat!

 Hi everyone!
I hope your day is off to a wonderful start!
I'm excited to be back today as a guest designer for Jaded Blossom!

I know I am not the only Jaded Blossom fan that LOVES the cuteness and possibilities you can get from the Gnome Dies that they have! When I was thinking of what to make for today, I knew the Gnome Dies were just what I wanted for this adorable little Trick Or Treat bag.


How fun!
I started by using the Goody Bag Die and some black cardstock to create my little bag. I added some gray and black patterned paper, set the bag aside & got to work on my little Gnome.
I used the Gnome Dies to create his little body and the Gnome Dies: Fall Add Ons to create his hat & then added him to the front of the bag. To create the lollipop, I used a peppermint enamel dot and added it to a strip of white cardstock. For the sign, I stamped my greeting from the Halloween Poop 2 stamp set onto a piece of green patterned paper and added that to a strip of white cardstock that I lightly inked with some distress inks. I added a little orange bow to my sign and completed my bag with some bats from the Halloween Banner Dies.


So cute right??

Thanks so much for stopping by today!
I really appreciate it!
I hope you have a great crafty day!

Products Used:
  • Jaded Blossom: Gnome Dies, Gnome Dies: Fall Add Ons, Halloween Banner Dies, Goody Bag Die, Halloween Poop 2
  • Cardstock: Black (Recollections), Peach (Paper Accents)
  • Patterned Paper: Floral Graph & Swiss Dots (Doodlebug)
  • Copics: C00, C0, C2
  • Misc.: Foam Tape, Peppermint Twist Shape Sprinkles, Crochet Thread


Thursday, September 8, 2022

Trick Or Treat

 Hi everyone!

I hope your day is off to a great start!

Today I am sharing a Halloween themed card that I created using a new image from


This little cutie is ready to go and get some candy lol!
I printed Princess Paislee onto a piece of white Hammermill cardstock and colored her with my Copic markers. I used a stitched die to cut her out and placed her on top of a piece of gray cardstock. I created my cardbase from some more of the gray cardstock and added some patterned papers from Doodlebug Designs on top. I popped up my image panel with foam tape and added my greeting. I completed my card with some confetti stars along with some clear Wink of Stella shimmer.

Copic Colors Used:
--Skin: E50, E51, E21, R20, R00--
--Hair: E31, E34, E37--
--Pumpkin: YR12, YR14, E27, YR07, V01, BG11--
--Crown/Wand" Y11, Y23, Y26--
--Dress: RV10, RV00, RV000, C0, C2--
--Roses: RV52, RV32, G20, G43--

Thank you so much for stopping by my blog today!
I appreciate it so much!
I hope you have a great crafty day!

Products Used:
  • Cardstock: Gray (Recollections), White (Hammermill)
  • Patterned Paper: Swiss Dot Rainbow & Booville (Doodlebug)
  • Image: Princess Paislee (Digi Doodle Studios)
  • Dies: Stitched Rectangular Frame Dies (MCT)
  • Misc.: Foam Tape, Clear Wink Of Stella, Glossy accents, Confetti Stars

Sunday, September 4, 2022

Gnome Doubt....

Hi everyone!!
I hope you are all having a fabulous Sunday!
I'm happy to announce that I will be a guest designer for Jaded Blossom during the month of September! Yay!!

A new challenge with an Anything Goes theme started today over at the Jaded Blossom Blog!!
Of course, you do need to use some of your JB products to participate.
You can read all the rules for the challenge over at their blog.


Here is a look at what I created to share with you:


One of my favorite JB products is the fun Candy Bar Slider Die and I really wanted to pair it up with a cute little gnome. Making it is super simple, here's how I did it. I started by using the Candy Bar Slider Die and some white cardstock to create my box. I layered a piece of bright green patterned paper on top, centering it the best that I could. I built my little girl gnome by using the Girl Gnome Dies as well as the Gnome Dies: Spring Add Ons. I also used the Bow Dies to add a tiny little bow to her hat. I stamped my sentiment from the Whimsical Gnomes stamp set and used the Mini Tag Dies 3 to cut it out. I placed my greeting onto my box and added my gnome right above it with some liquid glue. I thought she need a balloon so I cut one out using the Balloon Dies and popped it up with some foam tape. I finished my project with some streamers from the Banner Dies as well as some sequins and Nuvo drops.


So cute and quite a bit of dimension!!!


Inside holds a yummy chocolate bar!!!


Be sure to check out the Jaded Blossom blog to see what the DT made, they never disappoint! 
I hope you will play along with us, I would love to see what you make!

Thanks so much for stopping by today!
I really appreciate it!
I hope you have a great crafty day!

Jaded Blossom Products Used:
Other Products Used:
  • Cardstock: White (Georgia Pacific), Peach (Paper Accents)
  • Patterned Paper: Cute & Crafty, Hey Cupcake & Floral Graph (Doodlebug)
  • Misc.: Foam Tape, Sequins, White Nuvo Drops


Monday, August 22, 2022

Hello There!

Hi everyone and happy Monday!
I hope you had a fabulous weekend!

Today I am sharing a card that I made with the one of the new images released this month from 


For my card, I used the new image titled Unicorn Ring.
I love this image and wanted to keep the focus on her so I kept my card fairly simple. I started with a white card base and added a strip of blue patterned paper to one side. I wanted to add a bit more color so I added a small strip of polka dotted paper as well. I colored that adorable image, Unicorn Ring, with my Copic markers and then fussy cut her out. I popped her up onto my card with foam tape and added a bit of twine and my sentiment on a little tag. I rounded one corner and added some enamel dots to complete my card. 

Copic Markers Used:
--Skin: E50, E51, E21, R20, R00--
--Hair: E21, E23, E25--
--Bows/Suit: Y11, Y15--
--Crab: R24, R14--
--Float: C00, C0, R81, B00, Y11, YG01--

Thank you so much for stopping by my blog today and taking a look at my latest creation!
I really appreciate it!
I hope you have a great crafty day!


Products Used:
  • Image: Unicorn Ring (All Dressed Up Stamps)
  • Cardstock: White (Hammermill)
  • Patterned Paper: Seaside Summer (Doodlebug)
  • Sentiment: Teeny Tag Greetings (My Creative Time)
  • Dies: Mini Tag Dies 2 (Jaded Blossom)
  • Misc.: Yellow Baker's Twine, Foam Tape, Enamel Dots, Clear WInk Of Stella


Friday, August 19, 2022

Ahh...Fall!

 Hi everyone!

I hope your day is off to a fabulous start!
Today I have a fun card to share with you that I made using some brand new products that are getting released today from Ink N Splatter!

August is all about some cute critters that love Fall just as much as I do lol!

Here is a look at the card that I created:


This was so super fun to put together!
I started by creating my card base from some Kraft cardstock. I cut a piece of plaid paper from the Autumn Plaids 6x6 Paper Pad and roughed up the perimeter a bit. I added some twine and adhered my plaid panel to the front of my card. I die cut a decorative oval piece twice, once from Kraft & once from cream, and layered them together, stamped my greeting and added it to the card front. Now the fun part! I stamped my images from the two new stamp sets, Fall Woodsy Critters & Happy Fall Foxes and colored them with my Copic markers. I used the coordinating dies to cut them out and created my little scene. I finished my card by adding some copper Nuvo drops and a twine bow. 
Isn't that little raccoon the cutest? He is so proud of that pumpkin! lol!

Copic Colors Used:
--Raccoon: N7, N5, N3, N2, N1, N0, R20, R00--
--Pumpkins: YR14, YR18, YR23, YR27, E25--
--Leaves: R39, R37, G94, YG61, E04, E31, E33, YR12, YR14, Y32--
--Log: E31, E33, E37--

Thank you so much for stopping by my blog today and taking a look at my latest creation!
I hope you have a great crafty day!

Ink N Splatter Products Used:
Other Products Used:
  • Cardstock: White (Hammermill), Cream (Recollections), Kraft (Pen Gear)
  • Dies: Oblong Doily Frames (Darice)
  • Misc.: Copic Sketch Markers, Cooper Penny Nuvo Drops, Twine, Foam Tape


Thursday, August 18, 2022

You're My Favorite Song!

Hi everyone!
I hope your day is off to a great start!

Today I am sharing a fun card that I created using some new images from


How cute are these little kiddos?
Each kid is a separate image but I knew I wanted to pair them together to make a fun card to give to my hubby. So super simple! Here's how I did it. I opened up my Word program and inserted each image and got them as close as I could. I grouped them together and then sized them to where I wanted them. I typed out my sentiment above them using a font on my computer and printed it out onto some white cardstock. I colored them with my Copic markers and rounded the corners. I used some fun patterned papers from Doodlebug for all my layers and added some music notes that I die cut out from black cardstock. I finished my card with a little enamel heart and some glossy accents. 

Copic Markers Used:
**Freddy**
--Skin: E50, E51, E21, R20, R00--
--Hair: E21, E23, E25--
--Shirt: BG53, BG57, C00, C0--
--Shorts: C4, C2--
--Shoes: C2, C4, C6--
--Walkman/headphones: C2, C3, C4--

**Chanille**
--Skin: E50, E51, E53, R20, R00--
--Hair: E21, E23, E25, E27--
--Dress: 100, Y00, Y11, Y13, Y15--
--Shoes: C2, C4, C6, C8, 100--
--Walkman/headphones: R81, R83, R85, C2, C3--

I would also like to play along with the following challenges:
&

Thank you so much for stopping by my blog today!
I appreciate it so much!
I hope you have a great crafty day!

Products Used:
  • Cardstock: White (Hammermill), Black (Recollections)
  • Patterned Paper: Love Notes (Doodlebug)
  • Images: Freddy & Chanille (Digi Doodle Studios)
  • Sentiment: Computer Generated using Carley Font
  • Dies: HB2U (Stamp Annie Thing)
  • Misc.: Enamel Heart, Glossy accents, Foam Tape, Corner Rounder


Monday, August 15, 2022

Have A Magical Day!

Hi crafty friends and happy Monday!
I hope you had a fabulous weekend :) 

Today starts a new challenge over at the All Dressed Up Challenge Blog and they are always anything goes as long as you use a All Dressed Up image.

Here is a look at the card that I created to share with you today: 


I adore this image called, Magical Woodland, and knew I wanted to color her up as soon as I saw her. 
I printed her out onto a piece of white Hammermill Digital Copy Paper and used my Copic Markers to color her in. I cut her out using a stitched rectangle die and used my Copics to draw some grass sprigs. I used a cloud stencil and some leftover ink on one of my blending brushes to lightly add some clouds in the background before adding my sentiment. I adhered my image to a piece of floral paper and added it to my card front. I die cut a scallop into some red patterned paper and added that below my image before finishing my card with some sheer ribbon.
I think this turned out so very cute!

Copic Markers Used:
--Skin: E50, E51, E21, R20, R00--
--Hair: E31, E34, E37--
--Mushrooms: R24, R27, R29, R39, E44, E43, E41, E40, C00, C0--
--Flowers: Y18, Y13--
--Outfit: B32, B52, B34--
--Wings: B0000, B000--
--Grass: BG96, G94, G82--

Thanks you so much for stopping by and taking a look at my latest card!
I appreciate it so much!
Don't forget to stop by the All Dressed Up Challenge Blog and take a look at the inspiration from the team! I hope you will color up an ADU image and join us! I would love to see what you create!
I hope you have a great crafty day!

Products Used:
  • Cardstock: White (Hammermill)
  • Patterned Paper: A Slice Of Summer (Echo Park)
  • Sentiment Stamp: Fairy Dance (Hello Bluebird)
  • Image Digital Stamp: Magical Woodland (All Dressed Up)
  • Dies: Stitched Retangular Frames (MCT), Border Dies (Jaded Blossom)
  • Misc.: White Gel Pen, Sheer Ribbon, Mini Cloud Edges Stencil (MFT), Clear Wink Of Stella

Related Posts Plugin for WordPress, Blogger...

Would You Like Posts Delivered To Your Email?

Get new posts by email:

I Proudly Design For...

Jaded Blossom

Follow this blog with Bloglovin'

Follow on Bloglovin Follow on Bloglovin

Search This Blog

Blog Archive

My Blog List

Challenge Blogs I Love

Labels

2 Cute Ink (4) 3 Birds On Parade (1) 365 Cards (5) 3D Items (364) A Child's Year (5) AAA Birthday (4) Accent Essentials (5) Action Wobbles (18) Addicted To Stamps & More (14) All Dressed Up Stamps (18) All Mixed Up (3) All Occasion Cake Art (3) Altered Item (60) An Inky Situation (3) Anniversary/Wedding (10) Announcement (3) Artiste (13) Autumn (58) Avery Elle (9) Baby (21) Baby Steps (4) Banner (5) Best Wishes (5) Big Picture Classes (1) Birthday (238) Birthday Bash (9) Birthday Sundaes (9) Bits & Pieces (1) Bitten By The Bug2 (36) Blog Hops (53) Bloom (2) Box (2) Boys Will Be Boys (3) Breast Cancer Awareness (3) Bugaboo Stamps (1) C.C. Designs (13) Camp Create (21) CANDi (22) Candy (286) Car Decals (2) Card Folds (22) Card Harmony (10) Carousel (1) Cartridge Toss-Up (7) Celebrate With Flourish (3) Celebrations (5) Center Step Card (10) Christmas (225) Christmas Card Challenges (14) Christmas Cheer (7) Clean and Simple (113) Clearly Besotted (4) Colored Pencils (1) Congrats (19) Cooking With Cricut (34) Copic (7) Copics (635) CPS (18) Craft It Up & Link It Up! (8) Craftwork Cards (22) Crafty Creations (1) CreateACritter (27) CreateACritter2 (4) CreateAFriend (1) Cri-Kits (2) Cricut (404) Cricut 360 (13) Cricut Alphabet (5) Cricut Cardz Challenge (4) Cricut Essentials (1) Criss Cross Card (2) CTMH (21) Cupcake Inspirations (6) Cut Club (9) Cut It Up Challenges (23) Cuttlebug (144) Darcie's (3) DCWV (26) Design Team (2) Designer's Calendar (1) Di's Digital Stamps (12) Diamond Fold Card (1) Die Cuttin Divas (12) Dies R Us (12) Digi Doodle Studios (32) Digi Doodles (1) Digital Stamps (57) Don Juan (1) Doodlebug (57) DoodleCharms (15) Doodletype (1) Dr.PhilScraps (22) Easel Card (8) Easter (63) Elegant Edges (16) Embossing (1) Encouragement (84) Everyday Pop-Up Cards (4) Fall (38) Fantabulous Cricut Challenge Blog (8) Father's Day (8) First Friday Challenge (1) Flaunt It Fridays (5) Flower Shoppe (4) Foil (2) For You (3) Forever Young (6) Four Legged Friends (1) Fourth of July (16) Frantic Stamper (1) Frappachino Jars (5) French Manor (1) Freshly Made Sketches (1) Friendship (85) From My Kitchen (1) Galentine (1) Gate Fold (3) George and Basic Shapes (14) Gerda Steiner (21) Get Well (24) Gift Bag (60) Gift Card (37) Gnomes (1) Graduation (13) Graphically Speaking (3) Guest Designer (24) Gypsy (13) Gypsy Wanderings (3) Halloween (137) Hannah Montana (2) Happy Hauntings (4) Harry Potter (3) Heffy Doodle (1) Hello (255) Hello Bluebird (10) Hello Kitty Greetings (6) Holiday Card Workshop (5) Home Decor (14) Honey Bee Stamps (3) Hoot 'N' Holler (1) If You Give A Crafter A Cookie (11) Independence Day (2) Indie Art (1) Ink Blending (3) Ink N Splatter (30) Inking It Up Crazy (4) Inspiration Wednesday (4) Interactive (6) Invitation (1) Jaded Blossom (388) Jitterbuggin' (1) Journaling Spots (1) Joy's Life Stamps (122) Jubilee (2) Just Because Cards (9) Just For Fun (60) KaDoodle Bug (56) Kat Scrappiness (1) Kate's ABC's (1) Krafty Girls (17) La-La Land Crafts (14) Lacy Labels (12) Lawn Fawn (90) Lawn Fawnatics (14) Layout (29) Let's Capture These Sketches (1) Life's A Beach (5) Life's A Party (7) Live Simply (1) Locker Talk (4) Love (133) Love My Tapes (10) Love You A Latte (2) LoveBug Creations (51) Lovely Floral (2) Lyrical Letters (9) M.A.G. Challenge (1) Made In Minutes (4) Mama Elephant (14) Masculine (31) MCT Challenge (5) Memory Box (1) MemoryDex (6) Meow (1) Mer-May (5) MFT Sketch Challenge (17) Minc (3) Mini Album (5) Mini Monsters (6) Miss Kate's Cuttables (3) Miss You (1) Mo's Digital Pencil (1) Mojo Monday (35) Mother's Day (14) MPS Challenge (8) My Craft Space (1) My Creative Time (337) My Favorite Things (175) My Scrap Chick (8) Neat & Tangled (1) New Arrival (4) New Year (1) Nifty Fifties (3) Note Card (92) Nursery Rhymes (1) Once Upon A Princess (1) Online Card Class (16) Pack Your Bags (3) Paisley (2) Paper Doll Dress Up (10) Paper Nest Dolls (7) Paper Play Sketches (11) Paper Playtime (15) Paper Sweeties (2) Paper Therapy (24) Paperie Ink (1) Party Favors (3) Patriotic (6) Pause Dream Enjoy (22) PDE Linky Party (23) Peachy Keen Stamps (58) Penny Black (4) Perfect Sentiments (1) Photo Inspiration (1) Pink & Main (145) Pink & Main Challenge (11) Pink Gem Designs (17) Pinterest Inspired (1) Plantin Schoolbook (9) Pooh and Friends (2) Pooh Font (3) Pretty Cute Stamps (2) Pretty Paper Pretty Ribbons (2) Print & Cut (1) Project Life (7) Punch Board (7) Puns (41) RAM stamps (1) Rock Princess (6) S Fold (2) Scan N Cut (14) Scenes (1) Scrapbook.com (5) Scrapping The Little Things (7) Scrappy Moms (61) Scrappy Moms Release (21) Seize The Birthday (15) Sentimentals (5) Shabby Chic (1) Shaker Card (31) Shaped Cards (45) Shopping Our Stash (36) Silhouette (146) Silhouette Challenges (5) Simon Says Stamp (5) Simon Says Stamp Monday Challenge (7) Simon Says Wednesday Challenge (37) Simply Charmed (9) Simply Sweet (1) sketch (4) Sketch N Scrap (27) Sketches:Creatively Yours (6) Slimline (19) Smiley Cards (3) Sophisticated (2) Sorry (1) Spellbinders (15) Splitcoast Stampers (1) Spongebob Squarepants (1) Sports Mania (2) Spring (26) Spring Cottage (2) Spring Holiday Cards (1) SSS Wednesday Challenge (2) St. Patrick's Day (14) Stamp Anniething (86) Stamp/Die of the Month (2) Stampin' Up! (43) Stamping Bella (10) Stand and Salute (6) StarJamLines (1) Stencils (2) Stick It Down (7) Storybook (12) Straight from the Nest (8) Stretch Your Dies (5) Summer (58) Summer Celebrations (1) Sunny Day Crafting (6) Sunny Studio (5) SVG Attic (1) SVGCuts (15) SVGCuttingFiles (55) Swaps (5) Sweet November (1) Sweet Shop (1) Sweet Tooth Boxes (2) Sweet Treats (10) Sweethearts (8) Sympathy (3) Tacky Tuesday (6) Tags (27) Tags Bags Boxes and More (6) Tags Bags Boxes and More 2 (6) Taylored Expressions (3) Teacher Appreciation (1) Tear Drop (2) Teddy Bear Parade (7) Tent Topper (5) Terrific Tuesday Challenges (10) Thank You (72) Thanksgiving (24) The First Few Years (1) The Four Seasons Challenge (4) The Greeting Farm (11) The Paper Shelter (2) The Paper Variety (3) The Perfect Sentiment (11) The Rabbit Hole Designs (1) The Sweet Shop (1) The Sweet Stop (9) Thinking of You (95) Thrifty Thursday (5) Throwback Thursday (5) Tiddly Inks (2) Tie The Knot (2) Too Cute By Jessica (1) Trendy Twine (38) Trinity Stamps (3) Try Me Tuesday (4) Try Stampin On Tuesday (8) Tuesday Morning Sketches (5) Tutorial (1) Twinkle Toes (3) Unity Stamp Co. (4) Use It Tuesday (13) Valentine's Day (93) Valentine's Sentiments (1) Varsity Letter (1) Victorian Romance (1) Vinyl Projects (2) Wacky Wednesday (1) Waffle Flower (2) Washi (6) Watercolor (16) Welcome Home (1) What A Treat Wednesday (1) Whatever Wednesday (2) Whimsy Stamps (1) Wild Card (31) Winter (29) Winter Frolic (3) Winter Woodland (4) Wrap It Up (5) Your Next Stamp (5) Zig Clean Color (6)

Honorable Gnome

I was Spotted!

Camp Create 2016

Total Pageviews

>

Info

Occasionally I will be posting projects that use products that I have been given as a Design Team Member for a certain team. I will never endorse anything that I do not strongly believe in.

Copyright Info:

Please note that all of my work is original unless otherwise stated. It is for your own personal enjoyment only. Please do not copy for profit, publication, design contest or teams, or pass off as your own. Thank you and Enjoy!