Pages

Friday, January 27, 2023

Love You!

Hi crafty friends!
I hope you are having a fabulous Friday and have lots of fun crafty plans for this upcoming weekend :) 
I wanted to pop in and share my latest Valentine card that I made with you guys. 


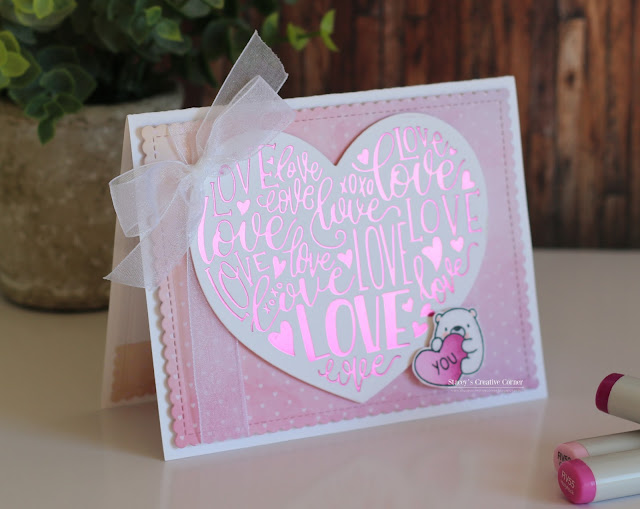
I started by die cutting a scallop rectangle from some patterned paper and adding a sheer white ribbon bow. I popped it up onto a white card base with some foam tape and started creating my heart. I used a foil plate from Trinity stamps and foiled my heart with some bright pink foil. Once it was foiled, I popped it onto my card front with more foam tape. I really liked it but thought it was missing something so I used a little bitty bear to up the cuteness factor a bit lol! I colored him with some Copic markers and stamped YOU inside his little heart before adding him the the card with more foam tape. So cute!!
This picture does not do this card justice at all. It is so shimmery with the bright pink foil.


I wanted to try and capture some of the shimmer.


I would also like to play along with the following challenges:
 ("The single most important thing I've ever done with my life is to fall in love with you." 
By Beth Pearson - This Is Us)
&
(I used Die Cut, Heart, Patterned Paper)

Thank you so much for stopping by my blog today and taking a look at my latest creation!
I appreciate it so much!
I hope you have a great crafty day!

Supplies Used:
  • Cardstock: White (Hammermill)
  • Patterned Paper: Sweethearts Day (Recollections)
  • Ink: Tuxedo Black Memento
  • Stamps: Bitty Bears (MFT), Love You (Lawn Fawn)
  • Dies: Love Heart (Trinity Stamps), Blueprints 27 (MFT)
  • Copics: C0, C1, C2, R00, RV66, RV55, RV52
  • Misc.: Bright Pink Foil (Spellbinders), Foam Tape, Sheer Ribbon


Wednesday, January 25, 2023

You Gnome I Love You

Hi crafty friends!
I hope you are all having a wonderful day so far!
I'm so happy to announce that I have been asked to be a part of the 
Her images are so incredibly cute and I'm thrilled to get to work with them on a regular basis!!

Here is a look at what I created using the Heart Gnome digital stamp.


Cute right?
I created my card by first making an A2 cardbase from some white cardstock and layering a scallop rectangle on top. I printed out my Heart Gnome onto some white hammermill cardstock and colored him in with my Copic markers. Once I had him colored, I used my Scan N Cut to cut him out. I layered some white and pink patterned paper to my card front before adding him with foam tape. I added some thread to my sentiment and also popped that up with foam tape. I completed my card with some enamel hearts and some white Nuvo drops.

Copic Colors:
--Skin: E50, E51, E21--
--Beard: C0, C1, C3--
--Hat: C0, C1, C3, R81, R83, R85--
--Shoes: C2, C4, C6, C8, 110--
--Frog: YG61, YG63, YG67, R20--
--Garland & Hearts: R81, R83, R27, RV00

I would also like to play along with the following challenge:


Thank you so much for stopping by and taking a look at my latest creation!
I really appreciate it!
I hope you have a great crafty day!


Products Used:
  • Cardstock: White (Hammermill)
  • Patterned Papers: Yours Truly (Pebbles), Be Mine (Recollections)
  • Stamp: Heart Gnome (Pink Gem Designs)
  • Dies: Blueprints 27 (MFT)
  • Misc.: Enamel Hearts, White Nuvo Drops, Pink Crochet Thread, Foam Tape


Monday, January 23, 2023

You Are My Heart

Hi crafty friends!
I hope you are having a wonderful day so far!
Today starts a new challenge over at the Cupcake Inspirations Challenge blog.


The theme for #561 is polka dots!
This challenge is being sponsored by Polka Doodles

I also had the pleasure of getting to work with one of their images.
The image I was given to use is called Too Cute Turtle Love and here is a look at the card that I created:


This was so super simple to make. I printed out that adorable Too Cute Turtle Love image onto some white Hammermill paper and colored her in with my Copic markers. Once I had her colored, I fussy cut her out and set her aside while I worked on my card. I used a heart border punch to add some hearts along the edge of a piece of white cardstock and added some kraft cardstock on top.  I cut a piece of pink & white polka dotted patterned paper, added that to my Kraft and then adhered it all to a Kraft A2 cardbase.  I added my sentiment and popped up my turtle with foam tape to my card front. I completed my card by adding some enamel hearts, a fun little bow for her head & rounding one of the bottom corners.

Copic Colors Used:
--Turtle: YG61, G43, R20, E40, E41, E42, E43, E44--
--Rock: W1, W3, W5--
--Flowers: C00, RV52, RV32, YG61--

I hope you will stop by the Cupcake Inspirations Challenge Blog and take a look at what the rest of the team created and play along with us! I would love to see what you create and how the cupcakes inspired you!

Thank you so much for stopping by my blog today and taking a look at my latest creation!
I appreciate it so very much!
I hope you have a great crafty day!

Supplies Used:
  • Cardstock: Kraft (Pen Gear), White (Hammermill)
  • Patterned paper: Christmas Magic (Doodlebug)
  • Digital Image: Too Cute Turtle Love (Polka Doodles)
  • Sentiment: Bitty Hugs & Kisses (MFT)
  • Misc.: Lace Heart Border Punch, Enamel Hearts, Foam Tape, Crochet Thread, White Gel Pen, Copic Sketch markers

Wednesday, January 18, 2023

Friends Warm The Coldest of Days

Hi crafty friends and happy Wednesday!
Today I am popping in real quick to share a card that I made using some stamps that are a bit older but never out of the package. I'm trying to make it my goal to actually use more of what I have this year and to maybe buy less? hahaha! Hey, I said try!


To create my card, I started with a white A2 cardbase and added a white scallop frame with foam tape on top. I added some patterned paper and then started working on my scene. I created my little scene using some stamps from C.C. Designs and some dies from Lawn Fawn (hills) and MFT (tag). Once I had everything arranged like I wanted, I popped up my tag with more foam tape onto the front of my card. I added some sparkly twine, some snowflake sequins and some white Nuvo drops for my finishing touches. 
Aren't they so cute?? 

Copic Colors Used:
--Snowmen: B0000, B000, R00, YR12, E23, E21--
--Hat: R81, C00, C0, C1--

I would like to enter my card into the following challenges:

&


Thank you so much for stopping by my blog today and taking a look at my latest creation!
I appreciate it so much!
I hope you have a great crafty day!

Supplies Used:
  • Cardstock: White (Hammermill)
  • Patterned Paper: Candy Cane Lane (Doodlebug)
  • Stamps: Build A Snowman (CC Designs)
  • Dies: Build A Snowman (CC Designs), Surprise Stitched Tag & Blueprints 27 (MFT), Stitched Hillside Borders (Lawn Fawn)
  • Ink: Memento Tuxedo Black
  • Misc.: Foam Tape, Twine, Snowflake Confetti, White Nuvo Drops, Copic Sketch Markers


Sunday, January 15, 2023

Better Together

 Hi crafty friends!
I hope your day is going splendidly so far 💕

Today I popping in to share a card that I made for the new challenge that started over at the
They are always anything goes as long as you use a All Dressed Up image.

I wanted to create a little Valentine card so I picked the
Love Is image to color and create with this month.


Aren't they sweet?
I thought it would be fun to try and mimic a Polaroid style photo. I printed out my image and colored it in with my Copic markers. I also added some very light clouds in the background but they are so light that my camera isn't really picking them up :( Once I had my image colored, I cut it out to create a square. I took a dark gray marker to go along the perimeter so that I stood out a bit once it was added to the white "frame". I stamped my greeting, tied some twine and popped it up onto my card base with some foam tape. I finished my card by adding some little hearts that I punched out with some heart punches. 

Copic Markers Used:

--Girl--
*Skin: E50, E51, E21, R20
*Hair: E21, E25
*Outfit: R81, R83, R85, R20, C00, C000

--Boy--
*Skin: E51, E11, E33, R00
*Outfit: R37, R39, R89, E41, E43, C5, C3

--Tree/Sky--
*E31, E33, E35, E37, YG61, G24, Y18, B0000

Thanks you so much for stopping by and taking a look at my latest card!
I appreciate it so much!
Don't forget to stop by the All Dressed Up Challenge Blog and take a look at the inspiration from the team! I hope you will color up an ADU image and join us! I would love to see what you create!
I hope you have a great crafty day!

Products used:
  • Cardstock: White (hammermill)
  • Patterned Paper: Valentine's Day (Recollections)
  • Image: Love Is (All Dressed Up)
  • Sentiment: Bitty hugs & Kisses (My Favorite Things)
  • Misc.: Trendy Twine, White Gel Pen, Foam Tape, Heart Punch, Cloud Stencil


Monday, January 9, 2023

Snow Much Fun with Cupcake Inspirations

 Hi crafty friends!!
Happy 2023!!
I honestly can't believe we are a week into a new year!
One great thing about the start of this new year is that I am happy to announce that I am a new design team member for Cupcake Inspirations Challenges!
I have loved the Cupcake Inspirations challenge blog for quite awhile now and am thrilled to be a Sweetie! 🧁 

Here is a look at the inspiration cupcake for the first challenge of 2023 (CIC #560)


and here is what I was inspired to make:


I had so much fun making this card!
I created an A2 card base from some white card stock and covered it with a piece of tiny polka dotted patterned paper. I stamped out my images from the Ready Set Snow stamp set from MFT using some Memento Tuxedo Black ink and colored them in with my Copic markers. Once I had them colored, I used my Scan N Cut to cut them out & set them aside. I used a scallop rectangle die to cut a piece of blue patterned paper & a piece of white cardstock. I cut some hills out of the white scallop rectangle that I cut out, stamped my greeting and layered my hills onto my blue background. I then added my images, tucking the houses and trees behind the hills and popping the snowboarders up with foam tape. I splattered some acrylic paint to create some snow and wrapped some sheer ribbon around the top before popping my image panel up with foam tape to my card front. I think this turned out so incredibly cute!!

Copic Colors Used:
--Polar Bear: C6, C1, C0, C00, R00, BG45, BG53, B00, B000--
--Penguin: N5, N3, N2, N0, R20, YR12, R85, R81, B000--
--Trees: YG17, YG03, E23--
--Houses: E49, E23, E21--

I would also like to enter my card into the following challenges:
&
(my new was the stamp set & paper pad)

I hope you will stop by the Cupcake Inspirations Challenge Blog and take a look at what the rest of the team created and play along with us! I would love to see what you create and how the cupcakes inspired you!

Thank you so much for stopping by my blog today and taking a look at my latest creation!
I appreciate it so very much!
I hope you have a great crafty day!

Products Used:
  • Cardstock: white (hammermill)
  • Patterned Paper: Candy Cane Lane (Doodlebug)
  • Stamps: Ready, Set, Snow (MFT)
  • Dies: Stitched Hillside Border (Lawn Fawn), Blueprints 27 (MFT)
  • Misc.: Foam tape, White acrylic paint, glossy accents, sheer ribbon