Pages

Saturday, September 30, 2023

Hello!

 Hi everyone!

I hope you are having a fabulous day so far! I wanted to share a super cute mini slimline card that I created using a couple of different adorable stamps from Gerda Steiner Designs.


For my card, I used the Coffee Hedgehog 2x3 along with the Hedgehog with Sign 2x3 clear stamps.
These stamps are only 2x3 but between the two sets, you get 2 cute hedgehogs, 1 coffee cup, 2 hearts and 4 sentiments! Great value and so so so cute!!!

Here is a look at the card that I created:


I started my card by creating my mini slimline from some Kraft cardstock. I die cut a scallop rectangle from some fall patterned paper and layered that onto my cardbase. I added a strip of teal cardstock to the bottom of my card for a little visual interest. Next was the fun part. I used my Misti stamping tool and stamped the hedgehog from the Hedgehog with Sign stamp set in the center, and then the Coffee Hedgehog on each side. I colored them with my Copic markers and then stamped my greeting into the center of the sign. I added some twine, tied it off with a bow & popped up my image panel with foam tape onto a piece of Kraft cardstock before adding it to my card. I stamped the coffee cups, fussy cut them out and added them with more foam tape. I finished my card with a bit of glossy accents to the hearts on the cups and this super cute card was complete! I just adore these little hedgehogs!

Copic Colors Used:
--Hedgehogs: E40, E41, E31, E34, E35, E37, R20, R00--
--Coffee's: C0, E31, E34, BG72, R56--
--Burgundy Scarf: R56, R59--
--Gold Scarf: YR21, YR24, YR27--
--Teal Scarf: BG72, BG75--
--Sign and ground shadows: W0, W1--

Thank you so much for stopping by today!
I appreciate it so much!
I hope you have a great crafty day!


You can find me on Instagram: @staceyscreativecorner

Products used:
  • Cardstock: Kraft (Pen Gear), White (Hammermill), Teal (DCWV)
  • Patterned Paper: Target Dollar Spot
  • Stamps: Coffee Hedgehog & Hedgehog with Sign (Gerda Steiner Designs)
  • Dies: Mini Slimline Envelope & Nested Card Creator (Spellbinders)
  • Misc.: Hemp Twine, White Gel Pen, Foam Tape, Glossy accents


Saturday, September 23, 2023

Hello Friend


 Hi everyone!
 Today I am sharing a card that I created using super cute stamp set called Hello Friend Tortoise from Gerda Steiner Designs.
There are 2 cute images in the 3x4 Hello Friend Tortoise stamp set, along with 3 sentiments


Isn't this turtle the cutest? I thought he would be perfect on a shaped card (one of my favorite types of cards to make). This card was actually pretty easy to make also. I started by die cutting 2 scallop circles and adhering them at the top. I added a stitched circle layer that I die cut from some plaid paper to the front and then started creating my scene. I cut another stitched circle, this time from white cardstock, and stenciled some puffy clouds onto it. I added my sentiment & some grass that I cut from some green patterned paper, popping up the front layer of grass with some foam tape. Next, I stamped my turtle using some Memento tuxedo black ink and colored him with my Copic markers. Once I had him colored in, I fussy cut him out and popped him up with more foam tape. I fussy cut the butterfly and added him close to my sentiment with more foam tape. I completed my card with some die cut flowers and a die cut bow. I think this is so cute and I love having cards on hand to send just to say Hello.

Copic Colors Used:
--Turtle: YG61, G43, YG63, R20, E40, E41, E42, E43, E44--
--Butterflies: E35, E44, Y21, Y23--

Thank you so much for stopping by today!
I appreciate it so much!
I hope you have a great crafty day!

You can find me on Instagram: @staceyscreativecorner
Products Used:
  • Cardstock: White (Hammermill), Noble Fir (Lawn Fawn)
  • Patterned Paper: Freehand Graph & Dot (Bella Blvd), Plaids (Recollections)
  • Stamp: Hello Friend Tortoise (Gerda Steiner Designs)
  • Dies: Stitched Circle Dies, Scallop Circle Dies, Spring Does, Bow Dies (Jaded Blossom), Pop Up Wiper Components (MFT)
  • Ink: Mowed Lawn Distress, Memento Tuxedo Black, Broken China Distress
  • Misc.: Mini Cloud Edges Stencil (MFT), Foam Tape, White Gel Pen. Copic Sketch Markers


Friday, September 15, 2023

Too Cute Too Spook!

Hi crafty friends!
I hope you are all doing well!

Today I am sharing a fun little treat bag from Pink Gem Designs. 


How cute is this Halloween Owl Gift Bag?!?!
Talk about easy! This is a digital download. You simply print it out twice, cut it out and assemble. All the hard work is pretty much done for you. 

I actually printed it out three times so that I could fussy cut the pumpkin and hat and pop them up with foam tape for some extra dimension. I also added a couple of bats that I die cut out from some black glitter cardstock. I finished off my little treat bag with a tag (included with the treat box), popped it up onto a black glitter die cut circle and tied it to my bag with some orange and white twine. 


These would be perfect to mass produce for co-workers or classrooms.

Thank you so much for stopping by my blog today and taking a look at my latest creation!
I appreciate it so much!
I hope you have a great crafty day!

You can find me on Instagram: @staceyscreativecorner

Products Used:


Friday, September 8, 2023

Joy Christmas Tags

 Hi crafty friends!

I hope you are all doing well!
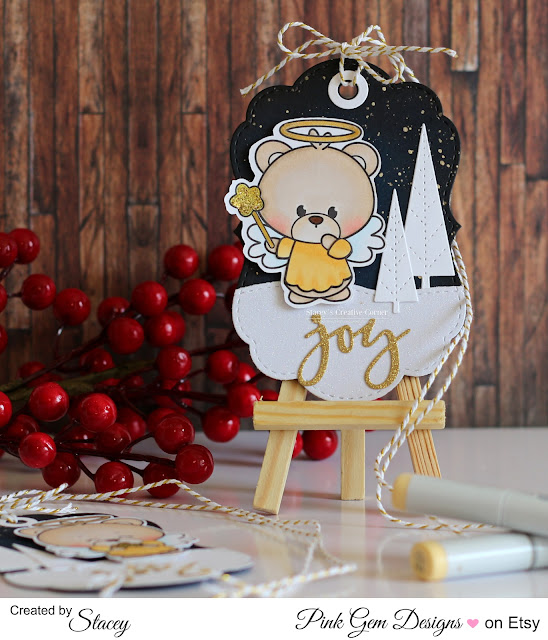
Today I wanted to stop in and share a couple of Christmas tags that I made using some adorable images from Pink Gem Designs.


Aren't these cute?  Creating them was pretty fun too!
I started by die cutting my tag shape from some Navy Blue cardstock. I took a paintbrush and splattered some gold metallic watercolor onto it to act as my starry sky. I die cut some white glitter cardstock using the same tag shape, and then die cut them again using a snow banks die to create my snowy hill. I printed out the Christmas Bears from Pink Gem Designs and colored them with my Copic markers. I cut them out using my Scan N Cut and then popped them up onto my tag with some foam tape. I added some gold stickles to the stars for some extra sparkle. I finished my scene with some stitched trees and the word "JOY". Since I'm not sure which packages these will be going on just yet, I kept my gold and white twine extra long to make it easier when the time comes. 


I added a "TO:" and "FROM:" to the back of each tag.


Copic Colors Used:
--Bears: E40, E41, E43, E59, R20, R00--
--Wings: BG000, BG0000--
--Outfit: Y21, Y23--

Thank you so much for stopping by my blog today and taking a look at my latest creation!
I appreciate it so much!
I hope you have a great crafty day!

You can find me on Instagram: @staceyscreativecorner

Products Used:
  • Cardstock: Nightshift Blue (MFT), White & Gold Glitter (Pen Gear), White (Hammermill)
  • Image: Christmas Bears (Pink Gem Designs)
  • TO/FROM Sentiment: Jolly Elves (LaLa Land Crafts)
  • Dies: Nested Frames large, Joy Die, Stitched Trees, Snow Banks (LaLa Land Crafts)
  • Misc.: Black Soot Distress Ink, Gansai Tambi Starry Colors Watercolor Palette, Foam Tape, Gold Stickles, Gold & White Twine, Copic Sketch Markers