Pages

Wednesday, July 31, 2024

Welcome Baby!

Hi everyone and happy Wednesday!

Today is my day to post over at the Jaded Blossom blog 
and I have a pretty card to share with you today to welcome a new baby.


Some friends recently had a beautiful baby girl and this is the card that I made to send to them to welcome their newest addition.

I started by creating a white A2 top folding card base and layering a scallop rectangle on top that I cut out using the Scallop Rectangle Dies 2. I used the Rectangle Dies 2 to cut out the floral piece, adding that to my white scallop. I repeated the process with the Scallop Rectangle Dies 2 and Rectangle Dies 2 (using a different patterned paper) and layering those on top.  I placed my card into my Misti and stamped my sentiment from the New Baby Stamp Set using Onyx Black Versafine Ink. I die cut a vellum oval using the Stitched Oval Dies, popped it up with foam tape, covering the tape with that sweet little onesie that I created using the Baby Dies and the heart from the Banner Dies. I completed my card with a white satin bow at the top.

Thank so much for stopping by today and taking a look at my latest creation!
I really appreciate it!
I hope you have a great crafty day!
Jaded Blossom Products:
Other Products Used:
  • Cardstock: White (Hammermill), Vellum
  • Patterned Paper: All About A Girl (Echo Park)
  • Ink: Onyx Black Versafine
  • Misc.: Foam Tape, Satin Ribbon, Clear Wink Of Stella


Friday, July 19, 2024

Christmas Wishes!

Hi everyone!
I hope you are having a wonderful day so far!

I'm still working on some Christmas cards for Christmas In July and wanted to pop in real quick and share the one that I made with the The Greeting Farm Christmas In July Challenge that is currently going on over at their FB Fan Page.


I created my white top folding card base and layered a piece of red patterned paper on top. I die cut a white scallop frame and added that on top. I used the scallop frame to cut out some striped patterned paper and trimmed a piece from the negative so that I could inlay it into the scallops on the white frame. I stamped the Holiday Anya 7 with Memento Tuxedo Black Ink and colored her with my Copic markers. Once I had her colored, I stamped her again onto some pink patterned paper, fussy cut the hat and skirt and added it to my image. I added my sentiment and a stitched oval before popping her up with foam tape onto the front of my card. I finished my card with a couple of stitched hearts, clay bits and white Nuvo drops. So super cute!

Copic Colors Used:
Skin: E50, E51, E21, E04, R00, R20
Hair: E31, E33, E35
Gingerbread: E40, E42, E43, E44
Stars: Y13, Y15
Holly: YG03, YG05, R27

I would also like to enter my card into the following challenges:
 (Wink Of Stella is on the stars as well as glossy accents on the berries and gingerbread for shine)
&


Thanks so much for stopping by my blog today and taking a look at my latest creation!
I really appreciate it!
I hope you have a great crafty day!
Jaded Blossom Products:
  • Gingerbread Wishes (Revamped)
  • Banner Dies
  • Stitched Oval Dies
  • Rectangle Dies 2
  • Rectangle Internal Scallops
The Greeting Farm Products:
  • Holiday Anya 7
Other Products:
  • Cardstock: White (Hammermill)
  • Patterned Paper: Christmas Magic (Doodlebug Designs)
  • Misc.: White Nuvo Drops, Glossy Accents, Clay Bits, Clear Wink Of Stella, Foam Tape, Copic Sketch Markers


Wednesday, July 17, 2024

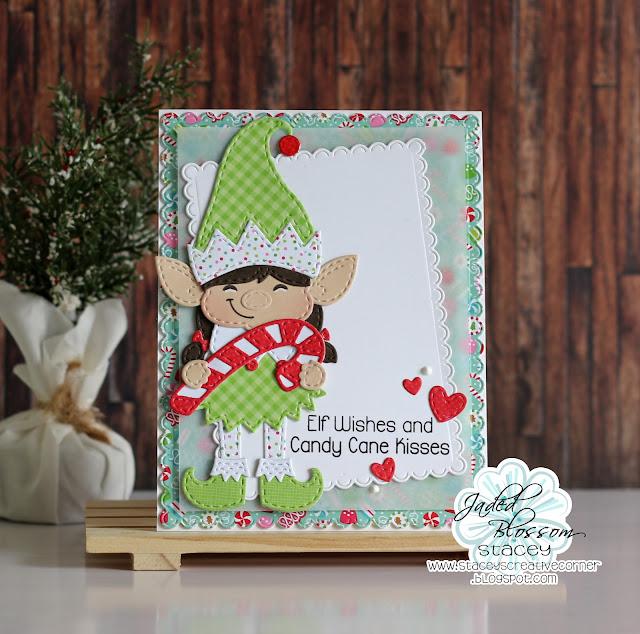
Elf Wishes!

 Hi everyone and happy Wednesday!

Today is my day to post over at the Jaded Blossom blog 
and I have a super cute Christmas card to share with you today.


I just love these new little faces that Jaded Blossom recently released!
I created my card by creating my card base from white cardstock and covered it with a piece of patterned paper that I cut out using the Scallop Rectangle Dies 2. I used the Scallop Rectangle Dies 2 again to cut out a piece of white cardstock, adhering it at an angle to a piece of vellum and stamped my sentiment using the Elf Wishes Stamp set with some Versafine Ink. I popped it up onto the front of my card with foam tape for just a tiny bit of dimension. I try to keep my holiday cards as flat as possible to make it easier for mailing but one layer of foam tape shouldn't be too bad :)  Next was the super fun part! I built my little Elf using the Girl Gnome Dies, Gnome Dies: Girl Gnome Face Add Ons, Gnome Dies: Christmas Add Ons 1, Gnome Dies: Christmas Add Ons 2 and the Gnome Faces stamp set. I added her to my card and added some little hearts from the Embellishment Clusters Die along with a couple of white Nuvo drops to finish my card. 

Thank so much for stopping by today and taking a look at my latest creation!
I really appreciate it!
I hope you have a great crafty day!


Jaded Blossom Products Used:
Other Products Used:

  • Cardstock: White & Dark Brown (Recollections), Skin Tones (P13), Vellum
  • Patterned Paper: Gingham-Linen & Milk and Cookies (Doodlebug)
  • Misc.: Onyx Black Versafine, White Nuvo Drops, Wink Of Stella, Glossy Accents, White Gel Pen, Foam Tape

Sunday, July 7, 2024

Bee Happy!

 Hi everyone & happy July!!

Today starts a new challenge over at the Jaded Blossom blog!!
This month is... ANYTHING GOES!!
 We would love to see your projects that use some of those awesome

Challenge Guidelines: 
1) Project must be new for this challenge, no back linking
2) Project must have a Jaded Blossom stamp, die, or stencil somewhere on it. 
3) Only one entry per person

Here is a look at the card that I created for the challenge:


I love all things Bees and Gnomes so why not combine them?? haha!

I started my card by die cutting some patterned paper using the Card Mat Dies and adhering it to my white card base. I die cut two hexagons using the Stitched Hexagons Die, once from Vellum and again in a honeycomb patterned paper. I adhered my two hexagons together and cut off one edge before adhering it to my card front. I built that adorable little gnomie dressed up like a little bee keeper using the following dies: Girl Gnome Die, Gnome Dies: Girl Gnome Face Add Ons, Gnome Dies: Hair Add Ons, Gnome Dies: Spring Add Ons, Gnome Faces Stamp and using the Gnome Dies for the flower. Once I had her built, I added a little blush to her check using some Copic markers and adhered her to the center of the hexagon. I created my sentiment by stamping the HAPPY from the Happy Hello Add Ons 2 using some Versafine Ink and using the coordinating Happy Hello Add Ons 2 Outline Dies and popping it up with foam adhesive. I used the Buzzing With My Gnomies stamp set to do a little selective stamping. I carefully stamped just the word Bee onto some black cardstock and heat embossed it with white embossing powder, trimming it down and adding it to the top of my card. I added some hearts using the Embellishment Cluster Die and the Banner Dies, along with a few white Nuvo drops, to complete my card. So super cute!

Be sure to check out the Jaded Blossom blog to see what the rest of the DT made, they never disappoint! 
I hope you will play along, I would love to see what you make!

Thanks so much for stopping by today!
I really appreciate it!
I hope you have a great crafty day!
Jaded Blossom Products Used:
Other Products Used:
  • Cardstock: White (Park Lane), Black & Brown (Recollections), Kraft (Pen Gear), Vellum
  • Patterned Paper: Bee Happy & Happy As can Bee (Echo Park)
  • Ink: Onyx Black Versafine, White Nuvo Drops, Foam Tape, Eye For An Eye Shape Sprinkles, White Embossing Powder, Copics: R20 & R00


Thursday, July 4, 2024

Jaded Blossom's July Mini Release Day 2!!

Hey Everyone!
 It's time for Jaded Blossom's July 2024 Celebration Sale & Mini Release!

Jaded Blossom has released some fun new items! 

Here is a look at what I created using some of the new items...


Here is how I made today's card....I covered an A2 top folding card with some coffee themed patterned paper. I used the Coffee Slider Die to create my big coffee and tied some twine around the coffee sleeve before popping it up onto my card with foam adhesive. I built my little gnome using the Gnome Dies, Gnome Dies: Face Add Ons (NEW), Gnome Faces Stamp (NEW) and the Gnome Dies: Girl Gnome Face Add Ons (NEW) and adhered him to my card front. I stamped my sentiment using the Gnome Addict Stamp (NEW), cut it out using the coordinating Gnome Addict Outline Dies (NEW) and popped it up with some more foam adhesive. I completed my card by adding some hearts, from the Embellishment Cluster Die, and a couple of white Nuvo Drops. 
I'm having so much fun with these gnomes! Aren't they adorable??


Don't forget we also have our July Celebration Sa
le starting TODAY!


Your purchase earns you tickets! 


 Also the return of the Golden Ticket


Our design team has made some wonderful projects using the new items! Make sure to check them all out. Links below..  


Thank you so much for stopping by today and taking a look at my latest creation!
I really appreciate it!
I hope you have a great crafty day!

Jaded Blossom Products Used:
Other Products Used:
  • Cardstock: Kraft (Pen Gear), White (Park Lane). Dark Brown (Recollections), Skin Tones (P13)
  • Patterned Paper: Coffee (Echo Park)
  • Ink: Onyx Black Versafine & White (Hero Arts)
  • Misc.: White Nuvo Drops, Foam Adhesive, Twine, White Gel Pen, Black Micron Pen


Wednesday, July 3, 2024

Jaded Blossom's July Mini Release Day 1!

Hey Everyone!
 It's time for Jaded Blossom's July 2024 Celebration Sale & Mini Release!

Jaded Blossom has released some fun new items! 

Here is a look at what I created using some of the new items.. 


Here's how I made my card....I created a white A2 top folding card and added some patterned paper on top, leaving a small border of the card base showing. I stamped my sentiment from the Tropical Vibes stamp set into the top right corner before starting to build my scene. I added some waves and sand, cut using the Tropical Dies, as well as a Large Palm Tree. I let the tree top hang off of my card a bit and tucked the bottom of the trunk in between the sand and water layers. I built my little girl gnome by using the Girl Gnome Die & the Gnome Dies: Girl Gnome Face Add Ons (NEW). I gave her a little coconut drink and a flower on her hat by using the Gnome Dies: Tiki Add Ons. I built my chair using the Beach Chair Die (NEW)), glued it to my card and added my little gnome on top. I finished my card by adding a little vellum cloud that I cut out using the Spring Dies 2 along with some seashells cut out using the Gnome Dies: Mermaid Add Ons. 
Super cute right? 
I love that these fun little gnomes now have the option for faces!!


Don't forget we also have our July Celebration Sale starting TODAY!


Your purchase earns you tickets! 


 Also the return of the Golden Ticket


Our design team has made some wonderful projects using the new items! Make sure to check them all out. Links below..  


Thank you so much for stopping by today and taking a look at my latest creation!
I appreciate it so much!
I hope you have a great crafty day!
Jaded Blossom Products Used:
Other Products Used:
  • Cardstock: White (Park Lane), Caribbean Sea (MFT), Sticky Note (Lawn Fawn), Brown & Kraft (Recollections), Skin Tones (P13)
  • Patterned Paper: Fairy Garden & Swiss Dot Rainbow Petite Prints (Doodlebug)
  • Misc.: Eye For An Eye Sprinkles (Doodlebug), White Gel Pen, Foam Tape, Copics: R20, R00