Pages

Monday, August 26, 2024

Bewitched!

Hi everyone!
I hope you are having a wonderful day so far!

I wanted to pop in real quick and share the card that I made for The Greeting Farm Spooky or Masculine Challenge that is currently going on over at their FB Fan Page.


I love all things Halloween so I decided to go with the Spooky prompt for my card. 
I started by creating a white cardbase and covered it with some night sky patterned paper. I cut another piece of patterned paper, stamped my sentiment along the bottom and adhered it to the bottom of my card. I trimmed down a piece of polka dotted patterned paper, at an angle, backed it with some silver glitter cardstock and added that to my card to give the 2 patterned papers a bit of separation. I stamped one of the witches from the Hocus Pocus stamp set and colored her with my Copic markers. Once she was colored, I cut her out using my Scan N Cut. I popped her up onto a white oval with foam tape, and  then added the oval onto my card front with more foam tape. I completed my card by adding some Vellum Clouds, Silver Glitter Stars, White Nuvo Drops and a bit of doodling around the perimeter. 


I love it!!

Copic Colors used:
--Skin: E50, E51, E21, E04, R00, R20--
--Hair: E42, E43, E44--
--Boots/Hat: C0, C2, C3, C4, C5, C6, C8, 100, YR02, YR04, YG01, YG03, YG05, V12, V15, V17, Y15--
--Broom: E33, E35, Y23, Y26, YR02, YR04--

I would also like to play along with the challenges at:
&

Thanks so much for stopping by my blog today and taking a look at my latest creation!
I really appreciate it!
I hope you have a great crafty day!


Products Used:
  • Cardstock: White (Hammermill), Vellum & Glitter (Recollections)
  • Patterned Paper: Halloween Parade & Happy Haunting (Doodlebug Design)
  • Stamps: Hocus Pocus (The Greeting Farm)
  • Dies: Stitched Oval Dies, Embellishment Clusters Die & Spring Dies 2 (Jaded Blossom)
  • Ink: Memento Tuxedo Black
  • Misc.: Foam Tape, White Nuvo Drops, Black Micron Pen, Copic Sketch Markers


Wednesday, August 21, 2024

Happy Birthday

Hi everyone and happy Wednesday!

Today is my day to post over at the Jaded Blossom blog
and I have a super cute birthday card to share with you. 


Here is how I made my card:
I started by creating my A2 card base from white cardstock and adding some balloon patterned paper that I cut out using the Card Mat Dies on top. I die cut a white frame using the Photo Frame Die and backed it with some bright striped patterned paper. I stamped my sentiment from the Fancy Birthday Stamp set and added my frame to the front of my card. I built my birthday girl using the following dies: Girl Gnome Dies, Gnome Dies: Girl Gnome Face Add Ons, Gnome Faces and the Gnome Dies: Birthday Add Ons. I tucked her behind the bottom of the frame, keeping her hat in front of the frame, and then added her hands with the balloon and cupcake to the front with foam tape for more dimension. I added some hearts that I cut out using the Banner Dies and Embellishment Clusters Die along with a couple of enamel dots. I completed my card with some white gel pen doodles.

This was a fun one!
The bright colors of the Doodlebug Designs paper paired with that sweet little birthday girl created from Jaded Blossom dies...what is not to love! 

Thank you so much for stopping by my blog today and taking a look at my latest creation!
I really appreciate it!
I hope you have a great crafty day!


Jaded Blossom Products Used:
Other Products Used:
  • Cardstock: White (Hammermill), Skin Tones (P13)
  • Patterned Paper: Hey Cupcake & Dot-Strip Rainbow Petite (Doodlebug Designs)
  • Misc.: Foam Tape, Stickles, Enamel Dots, White Gel Pen, Clear Sparkle Noir, Versafine Black Ink


Thursday, August 15, 2024

Jaded Blossom's August Release Blog Hop!!

Hey Everyone! 
If you're here from Lee-Ann's Blog you're in the right place, if you're just passing through start at the beginning because you don't want to miss a thing.  I will also have the complete line up at the bottom.

Here is what I made to share with you today:


With colder weather around the corner, cold and flu season will be here before we know it! I thought it would be a good idea to make a little box to have on hand that I can add some little get well supplies into.
 I think this turned out so cute! 
Here's how I made it: I started by cutting out my Handled Gift Box from white cardstock and layering some light blue patterned paper on top. Next, I built my little Nurse by using the following: Girl Gnome Dies, Gnome Dies: Girl Gnome Face Add Ons, Gnome Faces, Gnome Dies: Hair Add Ons & Gnome Dies: Medical Add Ons. Once I had her built, I adhered her to my box. I used the Gnome Dies: Medical Add Ons to create the little box of tissues & pill bottle along with a few little "germies" created using the Medical Embellishment Clusters Die. I stamped my sentiment using the Scrub Life stamp set and cut it out using the coordinating Scrub Life Outline Dies and popped that up with some foam tape. I created my bow using the Bow Dies and added an enamel heart to the center. I added some little enamel pills from Doodlebug Designs next to my little pill bottle to complete my box. 


I added a little Velcro dot to the inside to hold the box shut. 


Look at that sweet little face! Cuteness overload!
This would be perfect to hold some little pocket tissues and cough/throat drops, along with a little get well soon note on the inside.


Regular Price for the Release Package is $125.99

FREEBIE OFFER: Medical Supplies Stencil
1) Free with orders $50 or more (before tax/shipping)
2) Order MUST contain at least 1 new release item
3) Freebie offer is Thursday and Friday Only, while supplies last


BLOG CANDY

1 Lucky Winner will get to pick a stamp set of their choice!
Just leave a comment on all the blogs along the hop!
The more blogs you comment on the more chances you have to win!

Now on to the HOP....
The next stop is Jamie

Just in case you get lost here is the Entire Line Up:


Thank you so much for stopping by today and all week!

I hope you enjoyed my projects!

Happy hopping and happy shopping!!
Wishing you have a great crafty day!


Jaded Blossom Products Used:
Other Products Used:
  • Cardstock: White (Hammermill), Brown (Recollections), Cilantro (lawn Fawn), Skin Tones (P13)
  • Patterned Paper: Happy Healing (Doodlebug)
  • Ink: Onyx Black Versafine
  • Misc.: Foam Tape, Enamel Heart/Happy Pills


Wednesday, August 14, 2024

Jaded Blossom's August Release: Day 3!

 Hi crafty friends!!

Welcome to day 3 of the August 2024 release for Jaded Blossom!!

Today we are giving you a peek at 1 New Die as well as the Stencil Freebie!!!

  We have our Gotta Have it Now Package for $115.99
August 2024 Release will include:

1 - 4 x 6 Stamp Set
4 - New Dies
1 - New Outline Die
1 - New Stencil
1 - Stencil Freebie 

Ala Carte Items available on Thursday 12 am PST 

This Package is only available while supplies last!
*Freebie Stencil- Only Free Thursday and Friday with a $50+ purchase or While Supplies Last. Must also purchase at least one item from the new release*

Regular price for the release package is $125.99


Here is a look at the card that I created to share with you today:


This was a super easy card to put together and I love how it turned out!

I started by creating my card base from some blue cardstock. Next, I used some blue ink along with the Medical Supplies Stencil to create my background onto a piece of white card stock. Once it was dry, I used the Card Mat Dies to cut it out and adhered it to my cardbase. I used the Heart Dies 1 to cut out a heart, popping it up with a thin layer of foam tape and adding the Nurse cap from the Gnome Dies: Medical Add Ons to the center. I used the Medical Embellishment Cluster to add a little sparkle to my cap by die cutting a tiny silver glitter cross and adhering that to the center of the red cross. I stamped my sentiment from the Scrub Life stamp set  and used the Mini Tag Dies 3 to cut it out, added some of the glitter paper behind and then popped up my sentiment with foam tape. I finished my card with a few hearts that I cut out using the Embellishment Clusters Die.


Here is a closer look at the products being showcased today:


Thanks so much for stopping by today!
I really appreciate it!
Don't forget to stop by tomorrow for the Blog Hop!
I hope you have a great crafty day!

Jaded Blossom Products Used:
Other Products Used:
  • Cardstock: Something Blue (MFT), White (Hammermill), Red & Silver Glitter (Recollections)
  • Ink: Something Blue (MFT)
  • Misc.: Foam Tape


Tuesday, August 13, 2024

Jaded Blossom's August Release: Day 2!

 Hi crafty friends!

Welcome to Day 2 of the August Release for Jaded Blossom!

Today we are giving you a peek of 2 new die sets & 1 new stencil  that will be released in the Jaded Blossom store this Thursday but if you can't wait...

  We have our Gotta Have it Now Package for $115.99
August 2024 Release will include:

1 - 4 x 6 Stamp Set
4 - New Dies
1 - New Outline Die
1 - New Stencil
1 - Stencil Freebie 

Ala Carte Items available on Thursday 12 am PST 

This Package is only available while supplies last!
*Freebie Stencil- Only Free Thursday and Friday with a $50+ purchase or While Supplies Last. Must also purchase at least one item from the new release*

Regular price for the release package is $125.99


Here is a look at the card that I created to share with you today:


October will be here before we know it so I decided to make a Breast Cancer Awareness card to send as a friendly reminder to a friend to get her annual check. 

I created my card by making a white A2 top folding card base and using the Scallop Rectangle Frame Dies 2 to cut out a white layer to add on top. I die cut some Breast Cancer Awareness patterned paper out using the Rectangle Dies 2 and adhering that to my white scallop layer. I used the NEW Photo Frame Die to cut out my pink polka dotted frame. I built my little girl gnome using the Girl Gnome Dies, Gnome Dies: Girl Gnome Face Add Ons and the Gnome Faces and added her to my frame, making sure to bring her head forward. Kind of like she is peeking out of the frame a bit. I added a piece of white cardstock to the back of the frame and used some foam tape to behind her hat to give just a bit more dimension before adding it to the front of my card. Once I had my frame with my gnome adhered, I used the NEW Gnome Dies: Awareness Ribbon Add On to die cut the ribbon from some pink glitter paper, added her little hands and attached it to my gnome. I stamped my sentiment from the Fight For A Cure stamp set with black ink and die cut it out using the Mini Tag Dies 2 and popped it up with more foam tape, cutting off the overhang to make it flush with the card. I completed my card with a few hearts that I cut out using the Banner Dies and Embellishment Cluster Die.


So sparkly!!

Here is a closer look at the sets being showcased today:


Thanks so much for stopping by today and taking a look at what I created!
I really appreciate it!
See you tomorrow for a look at Day 3!!
I hope you have a great crafty day!!
Jaded Blossom Products Used:
Other Products Used:
  • Cardstock: White (Hammermill), Skin Tones (P13), Brown & Pink Glitter (Recollections)
  • Patterned Paper: Breast Cancer (Mambi)
  • Ink: Versafine Onyx Black
  • Misc.: Foam tape


Monday, August 12, 2024

Jaded Blossom August Release: Day 1!

Hi crafty friends!
Welcome to Day 1 of the August Release for Jaded Blossom!

Today we are giving you a peek of 1 new die set, 1 new stamp set & 1 new outline die set that will be released in the Jaded Blossom store this Thursday but if you can't wait...

  We have our Gotta Have it Now Package for $115.99
August 2024 Release will include:

1 - 4 x 6 Stamp Set
4 - New Dies
1 - New Outline Die
1 - New Stencil
1 - Stencil Freebie 

Ala Carte Items available on Thursday 12 am PST 

This Package is only available while supplies last!
*Freebie Stencil- Only Free Thursday and Friday with a $50+ purchase or While Supplies Last. Must also purchase at least one item from the new release*

Regular price for the release package is $125.99


 Here is a look at the card that I created to share with you today:


I created an A2 top folding card using some white cardstock and layered a piece of graph patterned paper on top that I cut out using the Card Mat Dies. I cut another piece of patterned paper from the Card Mat Dies, trimmed it down and added a scallop to the top by using the Border Dies. I added some doodling around the perimeter with a black Micron pen and added a tag that I built using the Luggage Tag Dies, also adding doodling to that. I created my little Nurse using the Girl Gnome Dies, Gnome Dies: Girl Gnome Face Add Ons, Gnome Dies: Hair Add Ons, Gnome Faces and the NEW Gnome Dies: Medical Add Ons. Once I had her built, I added a little blush to her cheeks and glued her to my card front. I stamped my sentiment using the NEW Scrub Life stamp set and cut it out with the NEW Scrub Life Outline Dies. I popped it up with foam tape and added a few enamel hearts and dots. I completed my card with some twine that I threaded through my tag and tied off with a big bow. 


I love the dimension that I achieve by simply popping up just a few pieces of the gnome with some foam adhesive! So cute!

Here is a closer look at the products being showcased today:


Thanks so much for stopping by today!
I really appreciate it!
Don't forget to stop by tomorrow to see what I made for Day 2!
I hope you have a great crafty day!


Jaded Blossom Products Used:
Other Products Used:
  • Cardstock: White (Hammermill), Skin Tones (P13), Brown/Black (Recollections)
  • Patterned Paper; Happy Healing (Doodlebug)
  • Misc.: Versafine Onyx Black Ink, Foam Tape, White Gel Pen, Happy Healing Sprinkles, Heart Attack Sprinkles, White Twine, Black Micron Pen


Sunday, August 4, 2024

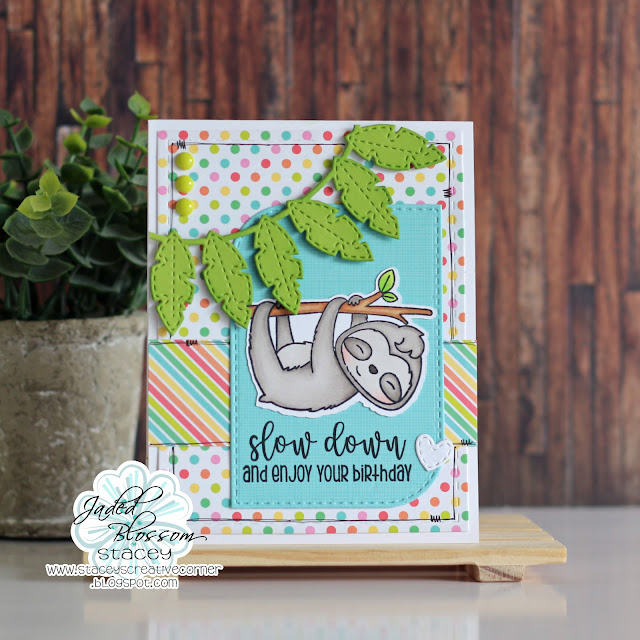
Slow Down...

Hi everyone & happy August!!

Today starts a new challenge over at the Jaded Blossom blog!!
This month is... Birthday!!
 We would love to see your projects that use some of those awesome

Challenge Guidelines: 
1) Project must be new for this challenge, no back linking
2) Project must have a Jaded Blossom stamp, die, or stencil somewhere on it. 
3) Only one entry per person

Here is a look at the card that I created for the challenge:


I adore this little sloth and haven't used him in quite awhile, so it was time for 
me to dust him off and get him inky lol!

I created my card by first creating an A2 top folding card base using white cardstock and then covering it with a piece of polka dotted patterned paper that I cut out using the Card Mat Dies. I added a strip of striped paper (say that 3 times fast lol) and then doodled along the perimeter of both patterned papers with a black micron pen. I stamped the sloth from the Take It Slow stamp set, did some simple coloring using my Copics and cut it out using my Scan N Cut. I used the Stylized Rectangle Dies to cut out a piece of blue patterned paper, stamped my sentiment and added my sloth. I die cut some leaves using the Build A Booth: Tiki Add Ons and popped them up with some foam tape. I finished my card by adding a little heart from the Embellishment Clusters Die and some lime green enamel dots.
 So super cute!

Be sure to check out the Jaded Blossom blog to see what the rest of the DT made, they never disappoint! 
I hope you will play along, I would love to see what you make!

Thanks so much for stopping by today!
I really appreciate it!
I hope you have a great crafty day!


Jaded Blossom Products Used:
Other Products Used:
  • Cardstock: White (Hammermill), Cilantro (Lawn Fawn)
  • Patterned Paper: Seaside Summer & Gingham-Linen Rainbow (Doodlebug)
  • Copics: W0, W1, W3, R00, R000, E31, E33, E35, YG01, YG03, YG05
  • Misc.: Foam Tape, Memento Tuxedo Black Ink, Foam Tape, Enamel Dots, Micron Pen