Pages

Wednesday, September 25, 2024

Witchy Wishes!

 Hi everyone and happy Wednesday!

Today is my day to post over at the Jaded Blossom blog
and I have a fun candy bar holder to share with you. 


This was so super simple to make!
I started by creating my candy bar holder using some black cardstock the the Candy Bar Slider Die.
I used the stitched layering piece that comes with the Candy Bar Slider to cut out a piece of pink polka dot patterned paper and glued that to the front. I die cut a white oval using the Stitched Oval Dies and popped that up with some foam adhesive. I built my fun little witch by using the Girl Gnome Die & the Gnome Dies: Halloween Add Ons 2. Once I had her built, I added her to my white oval piece. I stamped my sentiment using the Bewitchy stamp set, inked around the edges and glued it to a double bow that I created using the Bow Dies. I adhered that to the top of my box and then added some puffy star and dot stickers to finish my project.


I added a chocolate bar to the inside.


Isn't it cute? I love how it turned out and so fun to gift!
 These make fabulous little gifts to hand out to your hairstylists, postal workers, nail techs, etc!

Thank you so much for stopping by my blog today and taking a look at my latest creation!
I really appreciate it!
I hope you have a great crafty day!


Jaded Blossom Products Used:
Other Products Used:
  • Cardstock: Black & Glitter (Recollections), White (Hammermill), Kraft (Pen Gear), Pear Pizzazz (SU!)
  • Patterned Paper: Hey Pumpkin & Gingham-Linen Rainbow (Doodlebug Design)
  • Misc.: Hey Pumpkin Puffy Icons, Foam Tape


Thursday, September 12, 2024

Jaded Blossom's September Release Blog Hop!!

 Hey Everyone!  Welcome to Jaded Blossom's September Stamp Release Blog Hop.  

If you're here from Cynthia's Blog you're in the right place! If you're just passing through, be sure to start at the beginning because you don't want to miss a thing.  I will also have the complete line up at the bottom.

Here is what I made:

I thought it would be fun to make a little treat box filled with some candy to give to someone. 


I started by creating my box by using the Octagon Treat Box and some black cardstock. I cut the Octagon Treat Box layering piece from a piece of pink cardstock and inked up some clouds using the Cloud Stencil and a tiny bit of black ink. I used the Rickety Fence Die and cut it from black cardstock, adding it to my pink layer and cutting off the excess overhang. I used to Border Dies 2 to create a little hill from green cardstock and added a few pumpkins that I cut out using the Build A Booth: Halloween Add Ons. I built my bear by using the Gnome Friends: Bear Die & Gnome Dies: Halloween Costume Add Ons 2 and added her to my box front. I completed my box by adding some bats from the Halloween Banner Dies and stars from the Embellishment Clusters Die.


Gummy Bears were the perfect treat to put inside!


I really don't know who I am giving this to, but in case I decide to mail this to someone, I made a little card to accompany it. I created a 3x3 card out of black cardstock and layered some patterned paper on top. I used the Label Shape Dies 1 and cut out a piece of orange patterned paper, adhering that to the center of my card. I stamped a sentiment using the Ghostly Greetings stamp set and used the Ghostly Greetings Outline Dies to cut it out, popping it up with foam tape. I added some stars from the Embellishment Clusters Die and a bat from the Halloween Banner Dies. I finished my card with a couple of puffy icon stickers and a orange tulle bow. 


I think this is such an adorable little set!

Regular Price for the Release Package is $164.99

FREEBIE OFFER: Grunge Background Stencil
1) Free with orders $50 or more (before tax/shipping)
2) Order MUST contain at least 1 new release item
3) Freebie offer is Thursday and Friday Only, while supplies last


BLOG CANDY

1 Lucky Winner will get to pick a stamp set of their choice!
Just leave a comment on all the blogs along the hop!
The more blogs you comment on the more chances you have to win!

Now on to the HOP....
The next stop is Lee-Ann

Just in case you get lost here is the Entire Line Up:

Stacey (here)
Rosemary

Thank you so much for stopping by today and all week!

I hope you enjoyed my projects!

Happy hopping and happy shopping!!
Wishing you a great crafty day!

Jaded Blossom Products Used:
Other Products Used:
  • Cardstock: Black, Glitter, Pink, Brown (Recollections), White (Hammermill)
  • Patterned Paper: Hey Pumpkin & Gingham-Linen Rainbow (Doodlebug Design)
  • Inks: Versafine Onyx Black, Black Soot Distress
  • Misc.: Foam Tape, Glossy Accents, Eye For An Eye Shape Sprinkles, Puffy Icon Hey Pumpkin Stickers

Wednesday, September 11, 2024

Jaded Blossom September Release: Day 3!

Hi crafty friends!!

Welcome to day 3 of the September 2024 release for Jaded Blossom!!

Today we are giving you a peek at 2 New Dies as well as the Stencil Freebie!!!

  We have our Gotta Have it Now Package for $149.99
September 2024 Release will include:

4 - 4 x 6 Stamp Sets
4 - New Dies
2 - New Outline Die
1 - Stencil Freebie 

Ala Carte Items available on Thursday 12 am PST 

This Package is only available while supplies last!
*Freebie Stencil- Only Free Thursday and Friday with a $50+ purchase or While Supplies Last. Must also purchase at least one item from the new release*

Regular price for the release package is $164.99


Here is a look at the card that I created to share with you today:


I started my card by covering a white A2 cardbase with some patterned paper from Doodlebug Design. Next, I used the Stylized Rectangle Dies to cut out a piece of black patterned paper and added that to my card front. I used the Stylized Rectangle Dies again to cut out a piece of green cardstock and then created a couple of small hills by using the Border Dies 2. I added the larger hill to my card front and then adhered the fence that I cut out using the NEW Rickety Fence die on top. I added my second hill and tucked some pumpkins that I cut out using the Build A Booth: Halloween Add Ons & the Fall Dies behind it. I used the Jack O Lantern from the NEW Street Lamp Die and placed him in front of the smaller two pumpkins. I created my ghost by using the NEW Gnome Friends: Ghost Die, NEW Ghost Faces and the Build A Booth: Halloween Add Ons and popped it up onto my card using foam tape. I added some bats from the Halloween Banner Dies as well as a few stars from the Embellishment Clusters Die. I stamped my sentiment using the NEW Ghostly Greetings and cut it out using the NEW Ghostly Greetings Outline Dies. I added a few white Nuvo drops to the sky to finish my card. 


I love how this one turned out!

Here is a closer look at the sets being showcased today:


Thanks so much for stopping by today!
I really appreciate it!
Don't forget to stop by tomorrow for the Blog Hop!
I hope you have a great crafty day!

Jaded Blossom Products Used:
Other Products Used:
  • Cardstock: White (Hammermill), Kraft (Pen Gear), Black and Silver (Recollections)
  • Patterned Paper: Gingham-Linen Rainbow & Hey Pumpkin (Doodlebug)
  • Misc.: Versafine Black Ink, Walnut Stain Distress Ink, Foam Tape, E79 Copic (Pumpkin Stems)


Tuesday, September 10, 2024

Jaded Blossom September Release: Day 2!

Hi crafty friends!

Welcome to Day 2 of the September Release for Jaded Blossom!

Today we are giving you a peek of 1 new die sets, 2 stamps & 1 new outline die that will be released in the Jaded Blossom store this Thursday but if you can't wait...

  We have our Gotta Have it Now Package for $149.99
September 2024 Release will include:

4 - 4 x 6 Stamp Sets
4 - New Dies
2 - New Outline Die
1 - Stencil Freebie 

Ala Carte Items available on Thursday 12 am PST 

This Package is only available while supplies last!
*Freebie Stencil- Only Free Thursday and Friday with a $50+ purchase or While Supplies Last. Must also purchase at least one item from the new release*

Regular price for the release package is $164.99


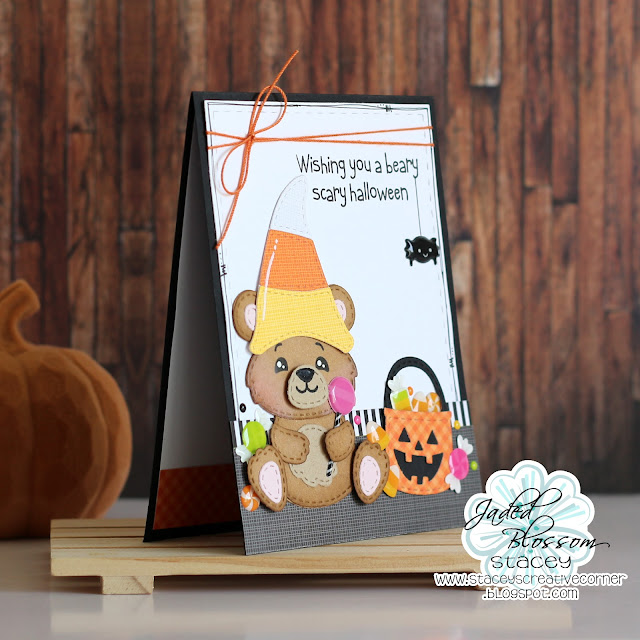
Here is a look at the card that I created to share with you today:


How cute is this little bear?
I created my card by making a top folding A2 cardbase using black cardstock. I die cut a white rectangle using the Card Mat Dies, added some orange thread to the top and adhered it to my card base. I added some strips of patterned paper along the bottom and some doodling around the perimeter. I built my little bear by using the following products: NEW Gnome Friends: Bear Die, NEW Bear Faces and the Gnome Dies: Spooky Add Ons. Once I had my bear built, I added him to my card. I used the Gnome Dies: Halloween Add Ons for the little candy bucket and added some enamel candies and dots to the card. I stamped my sentiment using the NEW Bear Hugs stamp set with some Versafine Ink. I added a little puffy spider sticker and drew a line connecting the spider to the sentiment to finish my card. 


Here is a look at the sets being showcased today:


Thanks so much for stopping by today and taking a look at what I created!
I really appreciate it!
See you tomorrow for a look at Day 3!!
I hope you have a great crafty day!!

Jaded Blossom Products Used:
Other Products Used:
  • Cardstock: White (Hammermill), Black & Brown (Recollections), Kraft (Pen Gear)
  • Patterned Paper: Hey Pumpkin & Gingham-Linen Rainbow (Doodlebug Design)
  • Misc.: Versafine Ink, Black Micron Pen, Foam Tape, White Gel Pen, Orange Crochet Thread, Trick Or Treat Shape Sprinkles & Hey Pumpkin Puffy Icons

Monday, September 9, 2024

Jaded Blossom September Release: Day 1!

Hi crafty friends!
Welcome to Day 1 of the September Release for Jaded Blossom!

Today we are giving you a peek of 1 new die set, 2 new stamp sets & 1 new outline die set that will be released in the Jaded Blossom store this Thursday but if you can't wait...

  We have our Gotta Have it Now Package for $149.99
September 2024 Release will include:

4 - 4 x 6 Stamp Sets
4 - New Dies
2 - New Outline Die
1 - Stencil Freebie 

Ala Carte Items available on Thursday 12 am PST 

This Package is only available while supplies last!
*Freebie Stencil- Only Free Thursday and Friday with a $50+ purchase or While Supplies Last. Must also purchase at least one item from the new release*

Regular price for the release package is $164.99


Here is a look at the card that I created to share with you today:


I used the Card Mat Dies to die cut a piece of patterned paper and then adhered it to the front of a white top folding A2 card base. I used the Card Mat Dies to cut out a piece of orange cardstock, trimmed it down to a smaller strip and added that to my patterned paper. I cut out a white scallop frame using the Rounded Rectangle Internal Scallops and glued it to a piece of black patterned paper and popped it up onto my card front with some foam tape. I used the NEW Gnome Friends: Ghost Die, along with the NEW Ghost Faces, to create my little ghost. I thought she needed a little treat bucket so I made one by using the little Jack O' Lantern from the Fall Banner Dies for the bucket and the handle was created by using the "d" from the Alphabet Dies. I stamped my sentiment from the NEW Ghostly Greetings and used the coordinating dies to cut it out, placing it under my ghost with foam tape. I completed my card by using some stars from the Embellishment Clusters Die, white Nuvo drops and some puffy bat stickers.


So cute!

Here is a closer look at the sets being showcased today:


Thanks so much for stopping by today!
I really appreciate it!
Don't forget to stop by tomorrow to see what I made for Day 2!
I hope you have a great crafty day!

Jaded Blossom Products Used:
Other Products Used:
  • Cardstock: White (Hammermill), Fake Tan (Lawn Fawn), Black (Recollections)
  • Patterned Paper: Hey Pumpkin (Doodlebug Design)
  • Misc.: Hey Pumpkin Puffy Icons (Doodlebug Design), White nuvo Drops, Foam Tape, Versafine Onyx Black Ink

Wednesday, September 4, 2024

Great Catch!

 Hi everyone and happy Wednesday!

Today is my day to post over at the Jaded Blossom blog
and I have a fun little treat box to share with you. 


My hubby is a huge football fan so I thought it would be a fun surprise to make him a box to give to him on a game day. Complete with a Gnome in his favorite team colors and filled with some football themed candy for a little snack.

I created my box by using the Gable Box Die and cutting it out from some Kraft cardstock. I trimmed off one of the handle pieces so that my box would remain open. I made my little football player by using the Gnome Dies & the Gnome Dies: Sport Add Ons 1. I inked around the edges of my white stitched panel, added my football player and glued it to the front of my box. 

I stamped my sentiment from the the Root For The Gnome Team with some Versafine Onyx Black Ink and used the Label Shape Dies 1 to cut it out. I cut out the label again, going around the perimeter with a green Copic, and added it to my sentiment label for a little shadow layer. I added it to my box, covering the hole that acts as the handle. I cut a bow using the Bow Dies and some yellow patterned paper and added that to the top of my box, finishing it off with a football from the Gnome Dies: Sports Add Ons 1 for the center of the bow. 


I think this turned out so cute!

Thank you so much for stopping by my blog today and taking a look at my latest creation!
I really appreciate it!
I hope you have a great crafty day!
Jaded Blossom Products Used:
Other Products Used:
  • Cardstock: Skin Tones (P13), Kraft (Pen Gear), Brown (Recollections)
  • Patterned Paper: Gingham-Linen Rainbow Petite (Doodlebug)
  • Misc.: Foam Tape, Tea Dye Distress ink, Versafine Onyx Black Ink


Sunday, September 1, 2024

Holy Crab!!

Hi everyone & happy happy September!!

Today starts a new challenge over at the Jaded Blossom blog!!
This month is... Anything Goes!!
 We would love to see your projects that use some of those awesome

Challenge Guidelines: 
1) Project must be new for this challenge, no back linking
2) Project must have a Jaded Blossom stamp, die, or stencil somewhere on it. 
3) Only one entry per person

Here is a look at the card that I created for the challenge:


 My hubby's birthday is coming up so I just had to make a fun card to give to him!

This was pretty simple to make. I started by creating my top folding A2 card base from white cardstock. I used the Card Mat Dies to cut out a piece of plaid patterned paper and then used the Stitched Oval Dies to cut out my opening. I used some repositionable adhesive so that I could temporarily add my plaid paper onto my card base. This gave me a guide as to where to place my greeting. I placed my card into my Misti and stamped my greeting from the Ahoy Gnomie stamp set directly onto my card base using some Versafine Black Ink. I removed the plaid paper, added some foam tape and then reattached it to my card front. I used the Large Palm Tree die to create my tree and tucked the trunk at the bottom behind the opening and glued some of the leaves to the outside of the opening at the top. I used the Gnome Dies: Beach Add Ons for my Crab, added some black enamel dots for his eyes and placed him onto my card, centering him at the bottom the best I could. That was it!
 I think my hubby is really going to get a kick out of this! hehe!

Be sure to check out the Jaded Blossom blog to see what the rest of the DT made, they never disappoint! 
I hope you will play along, I would love to see what you make!

Thanks so much for stopping by today!
I really appreciate it!
I hope you have a great crafty day!

Jaded Blossom Products Used:
Other Products Used:
  • Cardstock: White (Hammermill), Kraft (Pen Gear), Red & Brown (Recollections)
  • Patterned Paper: Beach Day (Carta Bella)
  • Misc.: Versafine Black Ink, Eye For An Eye Enamel Dots (Doodlebug), Foam Tape