Friday, February 26, 2016

Make Today Count

Hey everyone! I hope you are having a fabulous Friday and have lots of fun things planned for the upcoming weekend :) 

BlogButton

Today I am back with another fun project that uses some fun dies and stamps from 
Pink & Main


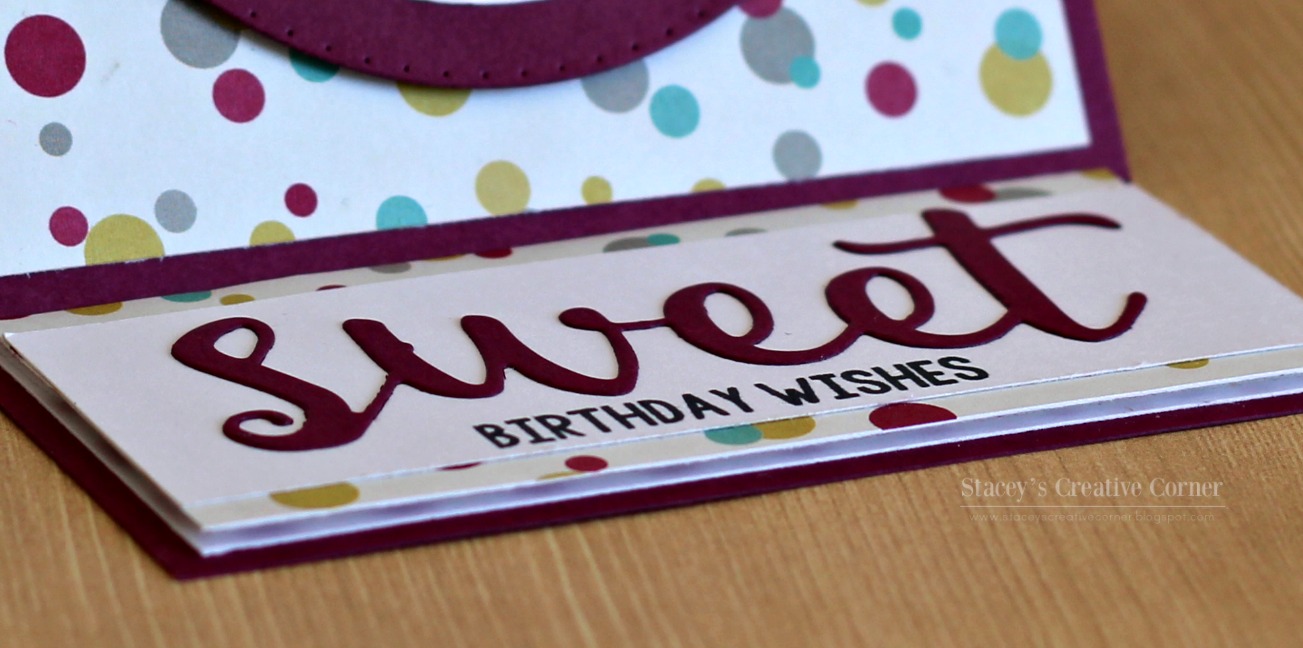
For my card, I used the Hot Air Balloons dies and cut out my balloon 6 times and cut off the basket from each panel. I scored each balloon piece in half and attached them to each other to create a fun 3D balloon. I used the clouds from the Sweet Dreams Baby die set and placed them onto my card front. I used a greeting from the Believe Script stamp set and heat embossed it in white. The balloon part does fold flat so that it will be pretty simple to mail. 


You can see the Pink & Main Blog HERE ,
the Pink & Main Store HERE
and the Pink & Main Creations Gallery on Facebook HERE
 Don't forget about the challenge at the Pink & Main blog also,
we would love to see what you create!

Thanks so much for stopping by!
I appreciate it so much!
I hope you have a great crafty day! 


 photo signaturecopy_zpsa1897fa6.png

Supply List:
Cardstock: Recollections
Patterned Paper: Market (MME)
Dies: Hot Air Balloons & Sweet Dreams Baby (Pink & Main), Stitched Rectangular Frame Dies & More (MCT)
Ink: Walnut Stain Distress (Ranger), VersaMark
Misc.: White Embossing Powder, Sequins, Foam Tape, Clear Wink Of Stella
Wednesday, February 24, 2016

Paper Play Sketches #2

Hi everyone! 
Today I am sharing the new sketch challenge that has started at


This week's Sketch:


My Design Team project based on the above sketch:


I decided to make a birthday card to have on hand for my card stash with that cute little elephant from Wild Rose Studio. I colored her in with my Copics and stamped the balloons a second time and fussy cut them so that I could pop them up with some foam adhesive for added dimension. I matted my image layer onto a piece of turquoise cardstock and used some bright patterned papers from Doodlebug for the rest of my card. My greeting came from the Birthday Wishes stamp set from Pink & Main and I heat embossed it with some white embossing powder. I added a few sequins to finish off my card. 

You can read more about the challenge and link up your project at:
I hope you will join us :) 

Thanks so much for stopping by!
I appreciate it so much!

I hope you have a great crafty day! 
 photo signaturecopy_zpsa1897fa6.png
Supply List:
--Cardstock: White (SSS), Tempting Turquoise (SU!)
--Patterned Paper: Take Note (Doodlebug)
--Stamp: Bunch Of Balloons (Wild Rose Studio), Birthday Wishes (Pink & Main)
--Inks: Versamark & Tuxedo Black Memento
--Copics: BG15, BG49, C1, C2, C3, G14, R11, R20, R29, R39, RV04, RV55, Y06, Y08, YG06, YR04, YR07, W3, W5, W7
--Misc.: Sequins, White Embossing Powder, White Gel Pen, Foam Tape
Sunday, February 21, 2016

Banner Day with Janis!!

It's a Banner Day!

Hi everyone! 
Janis of Pause Dream Enjoy and I have decided that once a month we will each make a banner for our home decor this year. Fun right? I love to make banners!! Today is our first post and we will be showing you the banners we made for February.

Here is the banner that I made for this month:

I decided to make a banner to decorate my newly acquired crafty space. I have been crafting in the corner of our living room for the past few years. Recently I decided, with some encouragement from my husband, to take the dining room. We never really used it anymore since our kids are grown so it worked out. I'm definitely not used to having a space that I can actually decorate so this banner is the perfect addition. My crafty space colors are pink and black with a touch of gray and white. 

Here are some close-ups of my banner:


(Excuse the fence, that is getting replaced this Spring)

I used the Banner punch board for my banner shapes and trimmed them with a bit of lace. I connected them with some white tulle and some buttons that matched my patterned paper. The twine is Pink Midnight from Trendy Twine and matched perfectly! I created the letters with the Alphabet Punch Board (thanks Janis!!) and adhered them with some foam tape. I finished off my banner with some pink paper roses at the bottom of each banner panel. 

Be sure to head over and see Janis to check out the banner she made!

Thanks so much for stopping by my blog today and taking a look at my latest creation!
I really appreciate it!!
I hope you have a great crafty day!

 photo signaturecopy_zpsa1897fa6.png
Supply List:
--Patterned Paper: Recollections
--Punch Boards: Banner & Alphabet Punch Boards by We R Memory Keepers
--Misc.: Buttons (Recollections), Lace, Foam Tape, Pink Midnight Twine (Trendy Twine), Roses (Recollections), Tulle
Saturday, February 20, 2016

Feb. DCWV Stack-a-Holic Challenge

Happy Saturday!!

Today I have a real quick post to share with you a card that I created for the 

Here is the sketch for the Feb. challenge:
(Sketch courtesy of www.just-add-ink.blogspot.com)

Here is the card that I created based on the above sketch:


Awhile back, I made a mini album using the Mariposa Stack from DCWV. I absolutely love all the pretty prints in the Mariposa stack and I held onto all the scraps that I had left over from creating my mini. This sketch was the perfect opportunity to use up some of those. For my large butterfly, I fussy cut it out of one of the patterns and for the smaller butterfly, I used a punch. 

Thanks so much for stopping by my blog today and taking a look at my latest creation!
I really appreciate it!
I hope you have a great crafty day!

 photo signaturecopy_zpsa1897fa6.png
Supply List:
--Cardstock: Kraft (Recollections)
--Patterned Paper: Mariposa (DCWV)
--Stamp: Wetlands (SU!)
--Inks: Vintage Photo and Walnut Stain Distress (Ranger)
--Misc.: Classic Butterfly Punch (Martha Stewart), Foam Tape, Pearls
Friday, February 19, 2016

Sweet Dreams Baby Shaker Card

Hey everyone!! I hope you are having a fabulous Friday! 

BlogButton 

Today I am here to share with you my latest creation using those awesome stamps and dies from Pink & Main!


My daughter's co-worker is expecting their first child pretty soon so I thought I would get a card ready to go for her to give to them. I thought the Sweet Dreams Baby stamp set and coordinating die was the perfect choice to use for my card! After I had the sweet little baby colored in and paper pieced, I used the die to cut him out. I stamped my greeting, also from the Sweet Dreams Baby stamp set, along the bottom and used a circle die so that I could make a window for my shaker. I attached some twine along the bottom and tied a bow with a button.  


I filled my shaker with some star confetti in silver and yellow as well as some clear microbeads.

You can see the Pink & Main Blog HERE ,
the Pink & Main Store HERE
and the Pink & Main Creations Gallery on Facebook HERE
 Don't forget about the challenge at the Pink & Main blog also,
we would love to see what you create!

Thanks so much for stopping by!
I appreciate it so much!
I hope you have a great crafty day! 


 photo signaturecopy_zpsa1897fa6.png
Supply List:
--Cardstock: White (SSS)
--Patterned Paper: My Baby (AC)
--Dies: Sweet Dreams Baby (Pink & Main) & Bunch of Fun Circle Dies (MCT)
--Ink: Tuxedo Black Memento
--Copics: C3, C4, C6, C8, E13, E31, E33, E35, Y02, Y06, Y11
--Misc.: Microbeads, Star Confetti, Trendy Twine, Glossy accents, Clear Wink Of Stella, Button
Wednesday, February 17, 2016

You're Super!

Hey everyone!
I hope you are having a great Wednesday!
I was able to get a card made today for a couple of different challenges.
The current challenge over at 

and


Here is the card I created for both challenges:

For my card I used the Super Boy stamp set from MFT and colored him in with my Copics. Once I had him all colored in, I used the Super Boy die from MFT to cut him out. I used some patterned papers from the Comic Hero's paper pad from Recollections. I have had this paper for quite awhile now so I was happy to be able to use some of it up for this card. This was a pretty simple card to put together, thanks to the sketch, and I adore how it turned out! 

Thanks so much for stopping by my blog and taking a look at my latest creation!
I really appreciate it!
I hope you have a great crafty day!
 photo signaturecopy_zpsa1897fa6.png
Supply List:
--Cardstock: Real Red (SU!), White (SSS)
--Patterned Paper: Comic Heros (Recollections)
--Stamp: Super Boy (MFT)
--Dies: Super Boy (MFT)
--Inks: Tuxedo Black Memento & Onyx Black Versafine
--Copics: B18, B28, B29, E13 E15, E21, E37, E50, E51, E99, R11, R17, R29, R39, Y08, Y15, Y19
--Misc.: Foam Tape, Enamel Dots, 
Monday, February 15, 2016

Card Harmony with Crafty Friends from MFT

Happy Monday!
I hope you had a fabulous weekend!

Today Kimberly and I are back with another Card Harmony post.
Here is a link to my blog post that tells a little bit about what Card Harmony is all about. 
We basically take turns purchasing stamps each month and then we both make a card using the same stamp set to see how alike or different our cards turn out. We add a little twist each month though to make it a little more challenging. 

This month we are using the stamp set from My Favorite Things titled
I just love this sweet little girl crafting!! I think she is adorable!
Our twist this month was to use the stamp image and make a 3D project for each other's craft space.

This is what I created and sent to Kimberly for her space:


I knew I wanted to make her a little post it holder to sit on her desk so I made one from an acrylic frame. I stamped my image onto a piece of white cardstock and colored her in. I cut a strip of patterned paper and placed that along the top and then slid it into the frame. I took a post it pad and stamped some sentiments on each sheet and then adhered that onto the top/front of the frame. To finish it off, I wrapped some ribbon along the top and tied a pretty little bow.


When all the post it's run out, Kimberly can either simply attach another one, use it as a dry erase board or remove the stamped image sheet and use the frame itself for a photo. 

Be sure to check out Kimberly's blog, Kimberly's Crafty Spot to see what she made for me!! 
It is fabulous!! I love it so much!!

Thanks so much for stopping by my blog today and taking a look at my latest creation!!
I really appreciate it!!

I hope you have a great crafty day!!

 photo signaturecopy_zpsa1897fa6.png
Supply List:
--Cardstock: White (SSS)
--Patterned Paper: Kioshi (Basic Grey)
--Ink: Tuxedo Black (Memento)
--Copics: C0, C2, E21, E23, E25, E27, E31, E33, E35, E37, E50, E51, E99, R11, V22, V25
--Stamp: Crafty Friends (My Favorite Things)
--Misc.: White Gel Pen, Ribbon, Post It's, Wink Of Stella Clear
Friday, February 12, 2016

Easter Gift Bag

Hi everyone! I hope your Friday is off to a great start!!

BlogButton


Today I am here to share with you a super sweet little gift bag that showcases some of the fabulous stamps and dies from Pink & Main that would be perfect for some 
Easter goodies.

feb12

I stamped that cute little Easter house, fence and chick from the Easter Street stamp set and colored them in with my Copic markers. I used the coordinating Easter Street dies to cut all of my images out. For my clouds, I used the cloud dies in the Sweet Dreams Baby die set. Once I had everything cut out, I arranged everything onto the front of my bag, which I made with my WRMK gift bag punch board. I used some thin black metal wire for my handle & filled it with some basket filler. My little gift bag is now ready for me to fill it with some fun little goodies for Easter :) 

You can see the Pink & Main Blog HERE ,
the Pink & Main Store HERE
and the Pink & Main Creations Gallery on Facebook HERE
 Don't forget about the challenge at the Pink & Main blog also,
we would love to see what you create!

Thanks so much for stopping by!
I appreciate it so much!
I hope you have a great crafty day! 


 photo signaturecopy_zpsa1897fa6.png
Supply List:
--Cardstock: White (SSS), Blue (AC)
--Stamp: Easter Street (Pink & Main)
--Dies: Easter Street & Sweet Dreams Baby (Pink & Main)
--Ink: Tuxedo Black (Memento)
--Copics: B01, B12, BG000, C1, E23, E25, E27, RV02, RV13, RV21, Y02, Y04, Y06, Y08, YG06, YG09, YR14, V04, V12
--Misc.: Ribbon, Clear Wink Of Stella, Gift Bag Punch Board (WRMK), White Gel Pen, Foam Tape
Wednesday, February 10, 2016

Paper Play Sketches #1

Hi everyone! 
Today I am sharing the new sketch challenge that has started at


This week's Sketch:


My Design Team project based on the above sketch:


I colored that sweet little Sailor Girl from the Ahoy set by The Greeting Farm with my Copics and then used a circle die to cut her out. I also cut out another circle but in blue to adhere behind my stamped image. I picked out a few coordinating papers from the Ahoy There paper pad from Carta Bella and placed them onto my card, following the sketch, and then attached my circles. The circles hung over just a bit but I just trimmed off the edge once it was adhered to my card. I stamped my greeting and used a black pen to draw some sketch lines. I finished off my card with a few enamel dots and called it good :) 

You can read more about the challenge and link up your project at:
I hope you will join us :) 

Thanks so much for stopping by!
I appreciate it so much!
I hope you have a great crafty day! 

 photo signaturecopy_zpsa1897fa6.png
Supply List:
--Cardstock: Blue (Recollections), White (SSS)
--Patterned Paper: Ahoy There (Carta Bella)
--Stamp: OA-Ahoy (Greeting Farm)
--Inks: Tuxedo Black (Memento), Real Red (SU!)
--Copics: B34, B37, B39, C0, C1, C4, C6, C8, E50, E51, E21, R20, R29, R46, R89, Multiliner
--Misc.: White Gel Pen, Enamel Dots, Foam Tape, Glossy Accents, Nesting Circle Dies (WRMK)
Friday, February 5, 2016

Birthday Easel Card

Happy Friday!!
I hope you are all having a marvelous day!

BlogButton   

Today I am back to share a sweet little birthday easel card that uses a couple of different stamp sets along with one of the die words from Pink & Main.

feb5

For my card I used the cupcake from the Sweet On You stamp set and colored it in with my Copic markers. Once I had it all colored, I used some circle dies to cut it out as well as the circle layer behind it. I made my easel card and popped up my image front and center with some foam adhesive. For the inside of the card, I used the Sweet die and adhered that down and then stamped the Birthday Wishes from the Hello Sweet stamp set underneath the die. I finished it off by adding a bit of glossy accents to the heart on the cupcake. 

feb5sweetdie

You can see the Pink & Main Blog HERE ,
the Pink & Main Store HERE
and the Pink & Main Creations Gallery on Facebook HERE
 Don't forget about the challenge at the Pink & Main blog also,
we would love to see what you create!

Thanks so much for stopping by!
I appreciate it so much!
I hope you have a great crafty day! 

 photo signaturecopy_zpsa1897fa6.png
Supply List:
--Cardstock: Rich Razzleberry (SU!), White (SSS)
--Patterned Paper: Here Is Happy (MME)
--Dies: Sweet Dies (Pink & Main) & Bunch Of Fun Circle Dies (MCT)
--Copics: BG13, BG32, E53, RV17, RV69, Y23
--Misc.: Glossy Accents, White Gel Pen
Monday, February 1, 2016

A Simple Love Window Card

Hey everyone!!
Happy February!! I can not believe that it is already February!! It feels like we just had Christmas! I hope I am not the only one that feels like time seems to be flying by :) 

Today marks the start of a new challenge over at 

BlogButton

The theme for the Febraury challenge is... 
Love
You just need to simply create a new project, post it to your blog and enter by adding it to the inlinkz at the Pink & Main Challenge Blog.
Easy Peasy!!

Here is the card that I created for the challenge:

To create my card, I used a heart die from Spellbinders to create a little window in my tap card layer. I adhered some vellum behind the window to create a softer look. I die cut the "LOVE" from the Love Die from Pink & Main out of some white glitter cardstock. The vellum also helped with adhering the word :) I added some black crochet thread and a few sequins and my card was done! This card was so easy and fast to make but I absolutely LOVE the way it turned out :) 

I hope you will create a project and join us for the 
I would love to see what you create!!
You can find all of the rules there (there aren't many) and don't forget that you do not have to use Pink & Main products on your project. 

Thanks so much for stopping by my blog today and taking a look at my latest creation!
I really appreciate it!!
I hope you have a great crafty day!!

 photo signaturecopy_zpsa1897fa6.png
Supply List:
--Cardstock: Pink (Recollections), Vellum, White Glitter (Heidi Swapp)
--Pattern Paper: Polka Dot is from XOXO by AC, Stripe is from Valentine's Day by Recollections
--Dies: Love (Pink & Main), Callsic Scalloped Hearts (Spellbinders)
--Misc.: Foam Tape, Sequins, Crochet Thread
Related Posts Plugin for WordPress, Blogger...