Saturday, April 29, 2017

A Pocket Full Of Get Well Wishes

Hi crafty friends!
I hope you are having a fabulous Saturday!
Today I am back to share a card that I created using some fabulous dies that can be found in the
 Dies R Us Store

With allergy season upon us (it's pretty bad in my area), I thought it would be fitting to have a get well card on hand in case it was needed.

I started out by cutting out some flowers from white cardstock using the 


I colored my flowers with some Copic markers for a little color. 
I wasn't sure how many I would use so I colored them all.


Next I cut out a pocket from some patterned paper using the
Look at that stitching! Wow!


I attached two of the flowers to the back of the pocket.


Now it was time to build my card. I created my A2 card base out of some white cardstock and layered some patterned paper on top. I added a strip of patterned paper and some ribbon a little below the center of my card front. I added a white stitched panel that I cut out using the Stitched Journaling Card Die from Lawn Fawn with some foam tape to my card front and added my pocket with flowers. I finished off my card with my greeting and a fun little bow. 


Here is a look at all the dies that were used on my card today:


Don't forget to come join in the fun at the Dies R Us Challenge Blog.  There's a new challenge theme offered on the 1st and 15th of each month and one lucky randomly drawn winner will receive a gift voucher prize to the Dies R Us Store.  For your convenience, all the important Dies R Us links are provided below.  


click below for:


Thanks so much for stopping by today!
I hope you have a great crafty day!

Supply List:
--Cardstock; Recollections
--Patterned Paper: Color Crush (AC), Come Away With Me (MME)
--Stamp: Fun Pockets (My Creative Time)
--Dies: Stitched Journaling Card (Lawn Fawn), Sketch Floral (Memory Box), Jeans Pocket (Frantic Stamper)
--Copics: G24 & R32
--Ink: Tuxedo Black Memento
--Misc.: Ribbon, Foam Tape, Apron Lace Border punch, Wink Of Stella


Friday, April 28, 2017

Congrats on your new home!

Hey crafty friends!
Happy Friday! I hope you have a lot of fun plans for the weekend!
The weather is "supposed" to be nice in my area so I am hoping to get outside and actually plant some flowers and bring some color to my yard lol! 

I made a card to play along in the Lawn Fawnatics challenge and wanted to share that with you today.          Challenge #3 is all about outstanding occasions. 
I decided to make a new home card. My daughter's best friends are moving by us in just a little over a month now so they are all pretty excited that will be close by each other again. I made this card with them in mind.


I created my card by making my A2 card base out of some Mermaid cardstock. I then cut a smaller piece or Mermaid cardstock and backed it with a piece of polka dot vellum and started building my scene on top. I cut out my houses using the Little Town Border and colored one of the houses in so that it stood out from the others. I created my hill from some Perfectly Plaid Rainbow paper and the Hillside Borders dies and placed it on my houses strip. I heat embossed my greeting with some white embossing powder. I created some white and vellum clouds using the Puffy Cloud Borders dies and added a little butterfly from the Chirpy Chirp Chirp stamp/die set. I popped up my scene panel with some foam tape for a little dimension and then added some clear wink of stella to my little pink house. 

Thanks so much for taking the time time stop by! 
I really appreciate it!!
I hope you have a great crafty day!

Supply List:
--Cardstock; White (Georgia Pacific), Mermaid (Lawn Fawn)
--Patterned paper: Velum (Neenah), Perfectly Plaid Rainbow (Lawn Fawn)
--Stamps: Chirpy Chirp Chirp for the butterfly & Big Scripty Words (Lawn Fawn)
--Dies: Chirpy Chirp Chirp, Little Town Border, Stitched Hillside Borders, Puffy Cloud Borders (Lawn Fawn)
--Ink: Versamark
--Misc.: White Embossing Powder, RV13 Copic, Foam Tape, Clear Wink of Stella, White Gel Pen

Thursday, April 27, 2017

Project Life Cards

Hey crafty friends!
I hope you are having a wonderful week so far!
Today I have some photos to share with you of some project life cards that I made following the sketches at Sketches In Thyme Project Life Style challenge blog. 

Warning: I did all four sketches so this post may be a little photo heavy. :)

I'm a little behind in my Project Life albums.
 This is where I'm stopped in each album:
2015: November
2016: June
2017: March

I started Project Life in 2015. I love doing it but I seem to always get behind in my albums lol! Please tell me I am not the only one that this happens to?? One day I will come out on top and be ahead of the game though!
 (Fingers crossed lol)

Anywho, when I saw the sketches over at the Sketches in Thyme Project Life Style blog, I figured I could make some cards to go with a future layout. I pulled out some patterned papers and some coordinating embellishments and it made the process so quick and easy! Here is a look at each sketch and the card I made. 


My take:


My take:


My take:


Sketch #68

My take:


For all of my cards, I used The Sweetest Thing from My Mind's Eye. I love the colors in this pack. I also had the sticker and chipboard  embellishment packs, so I pulled those out and used those as well. 

Here is a look at all four of my cards together:


My goal for next month is to complete my 2015 album and at least finish March 2017. Hopefully these cards will find their way into a layout very soon! I love that they are ready to go! I hope you like my cards! I had a lot of fun and I'm looking forward to playing along with the Sketches In Thyme PL style blog next month!

Thanks so much for stopping by my blog and taking a look at my latest creation!
I really appreciate it!
I hope you have a great crafty day!

Supply List:
--Patterned Paper; The Sweetest Thing (MME)
--Misc.: Layered Chipboard The Sweetest Thing (MME), Asst. Stickers The Sweetest Thing (MME), Crochet Thread, Sequins, Circle Punch (SU!), Butterfly Punch (Martha Stewart), White Gel Pen, Hole Punch, Glossy accents, Clear Wink Of Stella

Wednesday, April 26, 2017

Birthday Wishes

*This post contains affliate links, which means I will receive a small commission if you make a purchase using any of the links in this post (at NO additional cost to you). Thank you for your support!*

Hello crafty friends!!
I hope you are having a wonderful Wednesday!
 Today I am back with another project that showcases some of those awesome 


My birthday stash is running a little low so as soon as I saw the Wishes stamp set and the Wishes die set, I knew they would be perfect for what I was wanting to do.


To create my card, I made my A2 card base out of some 110lb white cardstock. I knew I wanted a balloon "floating" off of the card so I used one of the Stitched Circle Dies to cut out a circle from some pink patterned paper found in the Shades of Spring stack. I positioned it on my card and then took my scissors and cut off the overhang. To create the balloon tab (not sure what to call it lol), I just free hand cut it from the scraps and placed it under my circle. I added a bit of black crochet thread for my string and added a little bow. For my greeting, I die cut the "Wishes" from the Wishes die set and placed it onto my balloon. Once I had that adhered to where I wanted it, I stamped the "birthday" from the Wishes stamp set with some black ink. I finished off my card with a few sequins and framed it with some black lines and dots. I love how it turned out! It will be super easy to mail as far as postage goes to so that's another plus lol! 

You can see the Pink & Main Blog HERE,
 the Pink & Main Store HERE
and the Pink & Main Creations Gallery on Facebook HERE.

 Thanks so much for stopping by!
I appreciate it so much!
I hope you have a great crafty day!

Supply List:
--Cardstock: Recollections
--Patterned Paper: Shades of Spring (Pink & Main)
--Ink: Tuxedo Black Memento)
--Misc.: Sequins, Micron Black Pen, Black Crochet Thread

Sunday, April 23, 2017

Christmas Card Challenges #11

Hello crafty friends! I hope you are having a wonderful Sunday :) 
Today marks the beginning of another challenge at
Christmas Card Challenges!!


Here is a look at the card that I created based on the above colors:


I created a card base out of some dark blue cardstock and layered some striped patterned paper on top. I used a rectangle die to cut out my white panel and then I matted that onto some more dark blue cardstock. I die cut the ornament from some patterned paper making sure the snowflake was in the center of my ornament die. I added a little bit of bling to the ornament and attached it to my card. I stamped my greeting onto some dark blue cardstock and heat embossed it with silver embossing powder. I finished off the card with a little bling in each corner. 

Be sure to head over to the Christmas Card Challenges blog to see the amazing cards my design team sisters created. I hope you are inspired and decide to join us and play along with the challenge. I would love to see what you create :) 

 Thank you so much for taking the time to stop by and take a look at my latest creation!
I really appreciate it :) 
 I hope you have a great crafty day!
Supply List:
Cardstock: Nightshift Blue (MFT), White (Georgia Pacific)
Patterned Paper: Winter Frost (Recollections)
Stamp: Wonderland (SU!)
Dies: Stitched Rectangular Frame Dies & More (MCT), Fun Stitched Ornaments & More (MCT)
Ink: Versamark
Misc.: Silver Embossing Powder (SU!), Bling, Wink Of Stella

Saturday, April 22, 2017

Banquet Layout

Hey crafty friends!
I hope you are having a wonderful Sunday!
Today I have a layout (yup I said layout!! lol) to share with you that I made using the 

Here is a look at their sketch:

and here is a look at the layout I created:


I started out in paper crafting with scrapbooking. As my kiddos got older though, there were less pictures taken so I started pocket style scrapbooking as a way to fill the layout void I guess lol! I typically only really share my cards online since that is what I create the most of. When I saw the sketch over at Sketch N Scrap, I knew it was perfect for some recent photos of my kiddos. A little back story....my kiddos could not stand each other growing up, they fought all the time lol! Fast forward to now. They work together, they volunteer together, they go out on weekends together. They grew up to be best friends and that makes my heart happy :) These photos were taken before the most recent banquet for their Fire Department. We had a few minutes before we needed to head to the venue so I took the opportunity to snap a few pics of them together. I decided to print them out in black and white since most of the grass was brown (winter time). My daughter's dress was black and gold and my son had gold stripes on his uniform so I decided I would go with some gold glitter cardstock as well as tie in some red for the Fire Dept. of course lol. I've had that metal Maltese Cross in my stash for quite awhile and was so happy to put it to use on this layout! I think it fit perfectly in the center of my photo collage. I finished off my layout with a few red and gold sequins. I'm so happy with how this layout turned out and it felt so good to scrapbook again!! 

Thanks so much for taking the time to stop by my blog and taking a look at my latest creation!
I really appreciate it!!

I hope you have a great crafty day!!

Supply List:
--Cardstock: Black (Bazzill), Gold Glitter (Recollections), Vellum (Recollections), White (Georgia Pacific), Wild Cherry (My Favorite Things)
--Dies: Uppercase Fun Dies (MCT)
--Misc.: Cricut, Sequins, Fireman Medallion (Amanda Bu), Ribbon, WRMK Typecast Typewriter

Color My World Shaker Card

Hi crafty friends!
 I am so excited!  Today is my first post as a design team member for Dies R Us!
Woot Woot!!

I love creating shaker cards so that's what I decided to do for this project. Let me show you a little bit of my process though before I show the card reveal :)

I stamped my jar and lid from the Lawn Fawn How You Bean? stamp set and used my Copics to give them a little color.


Then I positioned some of the Lawn Fawn How You Bean Dies and the Lawn Fawn How You Bean Shaker Add-On Dies and held them in place with a little bit of removable tape and ran them through my Big Kick.


After everything was cut out, I layered my pieces together, including a piece of acetate for my window. I knew the greeting I was going to use so with that in mind, I decided to cut out some hearts from scrap cardstock using the Lawn Fawn How You Bean Shaker Add-On dies and the hearts from the Lawn Fawn Stitched Journaling Card Dies


I added my hearts and some micro beads and closed the back of my shaker so that it could be added to my card. 


I used the greeting from the Lawn Fawn Color My World stamp set and added a few more hearts by the greeting.


Here is a quick look at all the stamps and dies that were used on my card today.


Don't forget to come join in the fun at the Dies R Us Challenge Blog.  There's a new challenge theme offered on the 1st and 15th of each month and one lucky randomly drawn winner will receive a gift voucher prize to the Dies R Us Store.  For your convenience, all the important Dies R Us links are provided below.  


click below for:


Thanks so much for stopping by today and looking at my latest creation!
I really appreciate it!
I hope you have a great crafty day!
Supply List:
--Cardstock; White (Copic), Sugarplum (Lawn Fawn)
--Patterned paper: Perfectly Plaid Rainbow (Lawn Fawn)
--Stamps: How You Bean? & Color My World (Lawn Fawn)
--Dies: How You Bean?, How You Bean Shaker Add-On, Stitched Journaling Card (Lawn Fawn)
--Ink: Tuxedo Black Memento, Color Box Twilight
--Copics: BG10, BG70, C2, C4, C6, C8
--Misc.: Treading Water Border Punch (Fiskars), Crochet Thread, Micro Beads, Wink Of Stella


Thursday, April 20, 2017

If You Give A Crafter A Cookie #67

Hey crafty friends!
 I hope you are having a terrific Thursday!! 
Today starts a new challenge over at the 

We have two sponsors for challenge #65 and they are....
and

Here is a peek at the cookie inspiration photo for this challenge:


I love all those little critters! They are just the cutest!!

I decided to go with the critter theme and group some together to create a fun little birthday card.


I stamped my critters onto some white cardstock and then colored them in using my Copic markers. I added a little chalk to their cheeks, along with some freckles. I layered that on top of a piece of patterned paper, punch a border with a punch and added to my Kraft card base. I finished off the card with some crochet thread, a bow and some white faux stitching. 

I will also be sharing this at

Be sure to stop by the
 If You Give A Crafter A Cookie Blog 
to see all the fabulous creations my Design Team sisters created.
 If you are inspired by the cookie photo, I hope you will create a project and link up :)
 I would love to see what you create!

 Thanks so much for stopping by today!
I really appreciate it!
I hope you have a great crafty day!

Supply List:
--Cardstock; Recollections
--Patterned Paper: Collectable (MME)
--Stamp: Three Amigos & SC0767 (Mama Elephant)
--Ink: Tuxedo Black Memento
--Copics: C0. C1, C2, C4, C6, C8, E19, E99, N0, R11, W3, W5
--Misc.: Crochet Thread, Apron Lace Border Punch, White Gel Pen, Chalk


Wednesday, April 19, 2017

Air Mail

*This post contains affliate links, which means I will receive a small commission if you make a purchase using any of the links in this post (at NO additional cost to you). Thank you for your support!*

Hello crafty friends!!
I hope you are having a wonderful Wednesday!
 Today I am back with another project that showcases some of those awesome 


Have you seen the adorable little birds that are in the new stamp set called Airmail?
I think they are absolutely adorable and couldn't wait to get them inky and play. 


I started out by making a shaped card using the biggest scallop in the Scallop Hexagons Dies. I simply folded a piece of white cardstock in half and ran it through my Big Kick with the top of the die hanging off just a bit. That way it didn't actually cut two scallop hexagons. I hid the fold line by taking the same Scallop Hexagon  and cutting out a piece of plaid paper from the Spring Flings Paper Pad and layering that on top of my card base. I cut out a hexagon from the Nested Hexagons and used an embossing folder for the fun clouds. To make the clouds stand out a little more, I used some distress ink to go around the edges. I stamped out my birds from the Airmail stamp set and colored them in with my Copics. I used the coordinating Airmail dies to cut them out and then I popped them up onto my sky with some foam tape. I added my greeting, also from the Airmail set, with foam tape as well. I finished off my card with a fun little bow. So so so cute!! I love those little birdies!!

You can see the Pink & Main Blog HERE,
 the Pink & Main Store HERE
and the Pink & Main Creations Gallery on Facebook HERE.

 Thanks so much for stopping by!
I appreciate it so much!
I hope you have a great crafty day!
Supply List:
--Cardstock: Copic & Georgia Pacific
--Patterned Paper: Spring Fling (Pink & Main)
--Dies: Nested Hexagons, Scallop Hexagons, Airmail (Pink & Main)
--Ink: Tuxedo Black Memento, Tumbled Glass Distress
--Copics: B01, B04, E23, E27, G09, G14, R20, R21, R22, YR14
--Misc.: Cloudy Sky Embossing Folder (Darice), Foam Tape, Ribbon, White Gel Pen

Monday, April 17, 2017

Hello

Hey crafty friends!
I hope you all had a fabulous Easter!
We had a nice family dinner with lots of yummy food and laughter.
I was able to put a card together last night for a few challenges.
They are:
and 

Here is a look at the card I created for the above challenges:


This card was so super simple to make! I made my card base from some Kraft cardstock and picked out some scrap pieces of patterned paper for everything else. I notched out the ends of the banner pieces and layered them together making sure to overlap just a little. I added some faux stitching all around my card base and the banner pieces with my white gel pen. I pulled out my neglected Pansy flower punch and punched out 2 flowers, layered them on top of each other and curled the ends up for a little dimension. I added some leaves from another neglected punch and attached the flower piece to my card. I finished off the flower with a button center and a crochet thread bow. For my greeting, I die cut the "hello" and placed it along the bottom. Like I said, so simple but I'm really liking it! 

Thanks so much for taking the time to stop by my blog and take a look at my latest creation!
I really appreciate it!!
I hope you have a great crafty day!

Supply List:
--Cardstock: Recollections
--Patterned Paper: Collectable (MME)
--Dies: Hello (Impression Obsession)
--Punches: Pansy (SU!), Rose Leaf (Martha Stewart)
--Misc.: White Gel Pen, Crochet Thread, Button


Friday, April 14, 2017

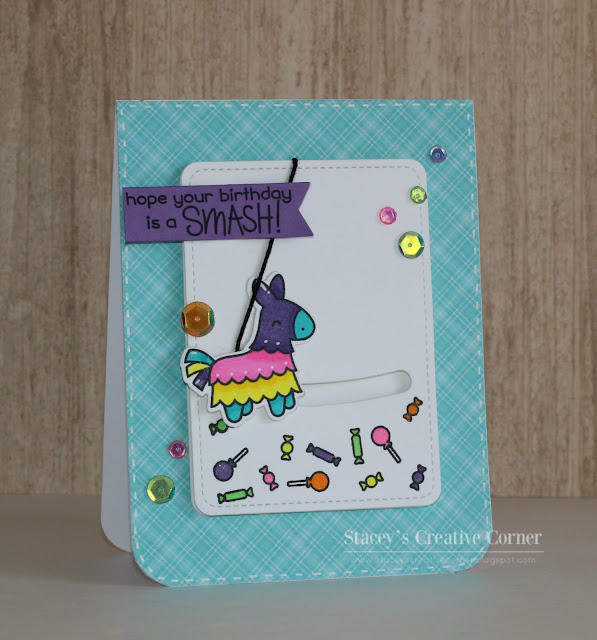
Smashing Birthday!

Hey crafty friends!
I hope you are all having a fantastic Friday so far!
I was able to find a little bit of time to create a card for the current challenge over at 
Challenge #2 is all about Interactive Cards.
My mind automatically went to the fun Pinata from the Year Seven stamp set.


I created my card base and layered some of the blue plaid paper from the Rainbow Perfectly Plaid paper pad. I rounded the bottom two corners and drew some stitching line around the perimeter. I cut out two smaller rectangles from the Stitched Journaling Card die set, set one aside and then used one of the dies from the Slide On Over die set on the other. I colored my pinata with my Copics and added some candy to the bottom half. I added a string (loosely) to the back of my pinata and tucked the top of the string behind the card layer and added my pinata to the channel using a penny. I used some foam tape and placed it on top of the other white layer panel. I added it to my card base and popped up my sentiment so that my string could easily "slide" under. I finished off the card with some wink of stella and some colorful sequins. 


I will also be entering this card into the following challenges:


Thank you so much for taking the time to stop by and take a look at my latest creation!
I really appreciate it!!
I hope you have a great crafty day!!

Supply List:
--Cardstock: White (Recollections), Sugarplum (Lawn Fawn)
--Patterned Paper: Rainbow Perfectly Plaid (Lawn Fawn)
--Stamp: Year Seven (Lawn Fawn)
--Dies: Year Seven, Stitched Journaling Card and Slide On Over (lawn Fawn)
--Ink: Tuxedo Black Memento
--Copics: BG45, RV04, V17, YG06, YR04, Y06, Y08
--Misc.: Sequins, Foam Tape, Crochet Thread, White Gel Pen, Wink Of Stella


Related Posts Plugin for WordPress, Blogger...