Showing posts with label Clean and Simple. Show all posts
Friday, June 19, 2026

You Make My Heart Melt

Hi everyone!
I hope you're having a wonderful day so far!

I wanted to pop in real quick and share a card that I made for my hubby.
We are getting ready to celebrate our 35th wedding anniversary!!
 I am truly blessed to get to live life with him every single day!
Ok, Ok, back to the card lol!


I saw the sketch over at the MFT Card Challenges blog and knew it would be perfect for my card.
I started by creating a white top folding A2 card base and cutting some strips of patterned paper, adhering them at an angle and trimming off the excess. I stamped my images from the Penguins In Paradise stamp set from MFT (one of my favorites!!), colored them with my Copics and fussy cut them out. I stamped my sentiment before adhering my images with foam tape onto my card. I decided he needed some fun trunks, so I stamped the image again, fussy cut his little swim trunks and glued them to my penguin to finish my card. So cute!!

Copic Colors Used:
--Tree: E35, E37, E39, YG03, YG05, YG07, YG09--
--Penguin: C00, C0, C4, C6, C8, R01, YR07--
--Popsicle: E53, Y13, Y15--

I would like to play along with the following challenges:

&

Thank you so much for stopping by my blog today and taking a look at my latest creation!
I really appreciate it!
I hope you have a great crafty day!!

Products Used:
  • Cardstock: White (Hammermill)
  • Patterned Paper: Summer Fun (Doodlebug Designs)
  • Stamp: Penguins In Paradise (MFT)
  • Ink: Memento Tuxedo Black
  • Misc.: Glossy Accents, Foam Tape, Copic Markers

Friday, October 10, 2025

Gingerbread Christmas Cards

Hi everyone!
Happy Friday!! I hope you are having a great day so far!
Today I wanted to pop in and share a couple of simple cards that I made for a couple of different challenges.

The challenges that I would like to enter are:
&

Here is a look at the cards that I created...


Cute right?? I fell in love with this stamp set as soon as I saw it!
First I created my card front using the above sketch as my inspiration on how to lay out everything. I decided to cut some thin strips of white cardstock and glue them on top of my patterned papers so that I could add a little separation. I colored my little gingerbread from the Gingerbread Joy stamp set from Simon Says Stamp with my Copic markers and used the coordinating dies to cut it out. I placed it into the center of my circle and added the sentiment underneath. I added some glitter the the gumdrops on the gingerbread and placed some enamel dots and hearts to finish my card. 


While I had everything out, I decided to make a second card.
I made this one the same way, just used different patterned papers and a different image/sentiment.


I thought that sentiment was absolutely perfect to go along with that image haha!!


So cute!!

Copic Colors Used:
Gingerbread: E40, E41, E42, E43, R20
Cup: B00, BG53, BG57, E23, E25, E29
Candy/Sprinkles/Icing: W0, W1, R81, R24, R27, YG03, YG07

Thank you so much for stopping by today and taking a look at my latest creation!
I appreciate it so much!
I hope you have a great crafty day!
Products Used:
  • Cardstock: White (Hammermill), Vellum
  • Patterned Paper: Christmas Town (Doodlebug Designs)
  • Stamp: Gingerbread Joy (Simon Says Stamp)
  • Dies: Gingerbread Joy (Simon Says Stamp), Nesting Circles (WRMK), Blueprints 27 (MFT)
  • Ink: Memento Tuxedo Black
  • Misc.: Enamel Dots, White Paint Pen, Enamel Hearts, Foam Tape, Glitter, Clear Wink Of Stella, White Nuvo Drops, Black Jelly Roll Pen
Sunday, June 2, 2024

I'm Such A Tool!

 Hi everyone & happy June!!

Today starts a new challenge over at the Jaded Blossom blog!!
This month is MASCULINE!!
 We would love to see your projects that use some of those awesome

Challenge Guidelines: 
1) Project must be new for this challenge, no back linking
2) Project must have a Jaded Blossom stamp, die, or stencil somewhere on it. 
3) Only one entry per person

Here is a look at the card that I created for the challenge:

I thought this sentiment from the Nailed It stamp set was so cute so I knew I wanted to try and make a card that would allow me to opportunity to use it lol!

I started by creating a top folding A2 card from white cardstock. I used the Card Mat Dies to cut out a piece of black cardstock and I layered a piece of gray patterned paper, that I cut out using the Rectangle Dies 2, on top. Once I had them adhered, I used the Stitched Circle Dies to cut out an opening. I added a bit of doodling around the perimeter with a black Micron pen and then popped up my layer onto my cardbase with foam tape. I used the Gnome Dies: Tool Add Ons to create the toolbox and tools and added them to the opening with foam tape so that it was the same depth as my card panel. I stamped my greeting from the Nailed It stamp set and used the coordinating Outline Dies to cut it out. I popped that up with more foam tape and finished my card with a few matte enamel dots.
 I always struggle with Masculine cards but Jaded Blossom dies always help me out and come to the rescue!

Be sure to check out the Jaded Blossom blog to see what the rest of the DT made, they never disappoint! 
I hope you will play along, I would love to see what you make!

Thanks so much for stopping by today!
I really appreciate it!
I hope you have a great crafty day!


Jaded Blossom Supplies Used:
Other Supplies Used:
  • Cardstock: White (Park Lane), Gray, Black & Red (Recollections)
  • Patterned Paper: Hello Sunshine (Lawn Fawn)
  • Misc.: Matte Enamels (Bella Blvd), Micron Pen, Foam Tape


Thursday, October 12, 2023

Spooky Salutations!

 Hi everyone!

Today I'm sharing a quick and simple card that I made using a fun image from 


Isn't that Witchy Cat so cute??
This card was so simple to make! I used a Watercolor Wash Square stencil to create my night sky with some distress inks and white paint splatters. Once it was dry, I used a stitched die to cut out my panel and popped it up onto a white A2 card base. I printed out the Witchy Cat image onto some white cardstock and colored in the images with my Copic markers. Once I had them colored, I fussy cut them out and popped them up with foam tape. I added my sentiment strip and Voila! 
Super easy and super cute!

Copic Colors Used:
--Cat: C2, C3, C4, C6, R00, R20--
--Hat: V12, V15, V17, YG01, YG03, YG05, W7--
--Pumpkin: YR12, YR14, YR18--
--Broom: E31, E33, E35, Y21, Y26, Y28--
--Bat: N3, N5, N7, R20--
--Moon: BG0000, Y000, Y00--

Thank you so much for stopping by my blog today and taking a look at my latest creation!
I appreciate it so much!
I hope you have a great crafty day!

You can find me on Instagram: @staceyscreativecorner

Products used:
  • Cardstock: Hammermill
  • Image: Witchy Cat (Pink Gem Designs)
  • Inks: Black Soot Distress, Blueprint Sketch Distress, Villainous Potion Oxide
  • Dies: Stitched Rectangular Frame Dies (MCT)
  • Misc.: Sentiment Strip (SSS), Copic Sketch Markers, Foam Tape, White Paint, Watercolor Wash Square Stencil (MFT), Vellum


Friday, April 21, 2023

Mom

 Hi crafty friends!!

I hope you are all having a wonderful day!

Today I have a pretty card to share with you that I created for my mom using an image from 


With Mother's Day fast approaching, I wanted to get ahead a bit and get my mom's card made. The Magnolias from Pink Gem Designs were perfect! I started by creating a A2 card base with some white cardstock and layering a white die cut panel on top, popping up with foam tape. I die cut my letters to spell out MOM from more white cardstock and layered some gold glitter cardstock behind, off setting it just a little so that it peeked out from behind the white letters. I added those to my card front, centering it as best as I could. I printed out some of those beautiful Magnolias and colored them with my Copic markers. I used my Scan N Cut to cut them out & heat embossed the centers and buds with some gold embossing powder. I popped them up with more foam tape and my card was done! I think it turned out so beautiful and elegant! 

My picture definitely does not do it justice. It is so sparkly in person.  
Here is a picture that I took using my flash just so you can kinda see the sparkle.


Copic Colors Used:
--Flowers: W0, W1, W3, E84--
--Leaves: YG93, YG95, YG97--

I would also like to play along with the following challenges:
(I did thing 1, 3, & 2)
&


Thank you so much for stopping by and taking a look at my latest creation!
I really appreciate it!
I hope you have a great crafty day!


Products Used:
  • Cardstock: White (Hammermill), Glitter Cardstock (JoAnn)
  • Image: Magnolia (Pink Gem Designs)
  • Dies: Uppercase Fun Dies (My Creative Time), Lovely Card Creator (Spellbinders)
  • Misc.: Copics, Gold Embossing Powder, Foam Tape, Versamark Ink


Tuesday, March 14, 2023

Sending Sunshine

Hi crafty friends!
I hope your day is off to a wonderful start!
Today starts a new sketch challenge over on the

Here is a look at the sketch:

Optional theme: Weather


Here is a look at the card that I created based on the sketch:


Ok, this card was so so so easy!!
I originally was going to go a different direction by using a stamped image, however while flipping through some of my paper packs trying to find some papers, I came across this one from Simple Stories that I have had for quite a long while. The great thing about this paper pad was that, on top of wonderful patterned papers, it had some really fun cut apart cards for pocket scrapbooking. So my original idea was ditched and a new one was born lol! I simply used the cut apart card to create my focal point and paired it with some patterned papers that coordinated. I added some little enamel hearts, crochet thread and some foam tape and my card was done!

It was so incredibly simple that while I had everything out, I decided to make a second card as well.


Thanks so much for stopping by my blog today and taking a look at my latest creation!
I really appreciate it!
I hope you will stop by the Try Stampin' On Tuesday blog and take a look at the projects my teamies made and hopefully play along with us! I would love to see what you create!

I hope you have a great crafty day!


Products Used:
  • Cardstock: White (Hammermill)
  • Patterned Paper: Full Bloom (Simple Stories)
  • Misc.: Foam tape, Crochet Thread, Enamel Hearts, Clear Wink Of Stella, Corner Rounder

Friday, February 17, 2023

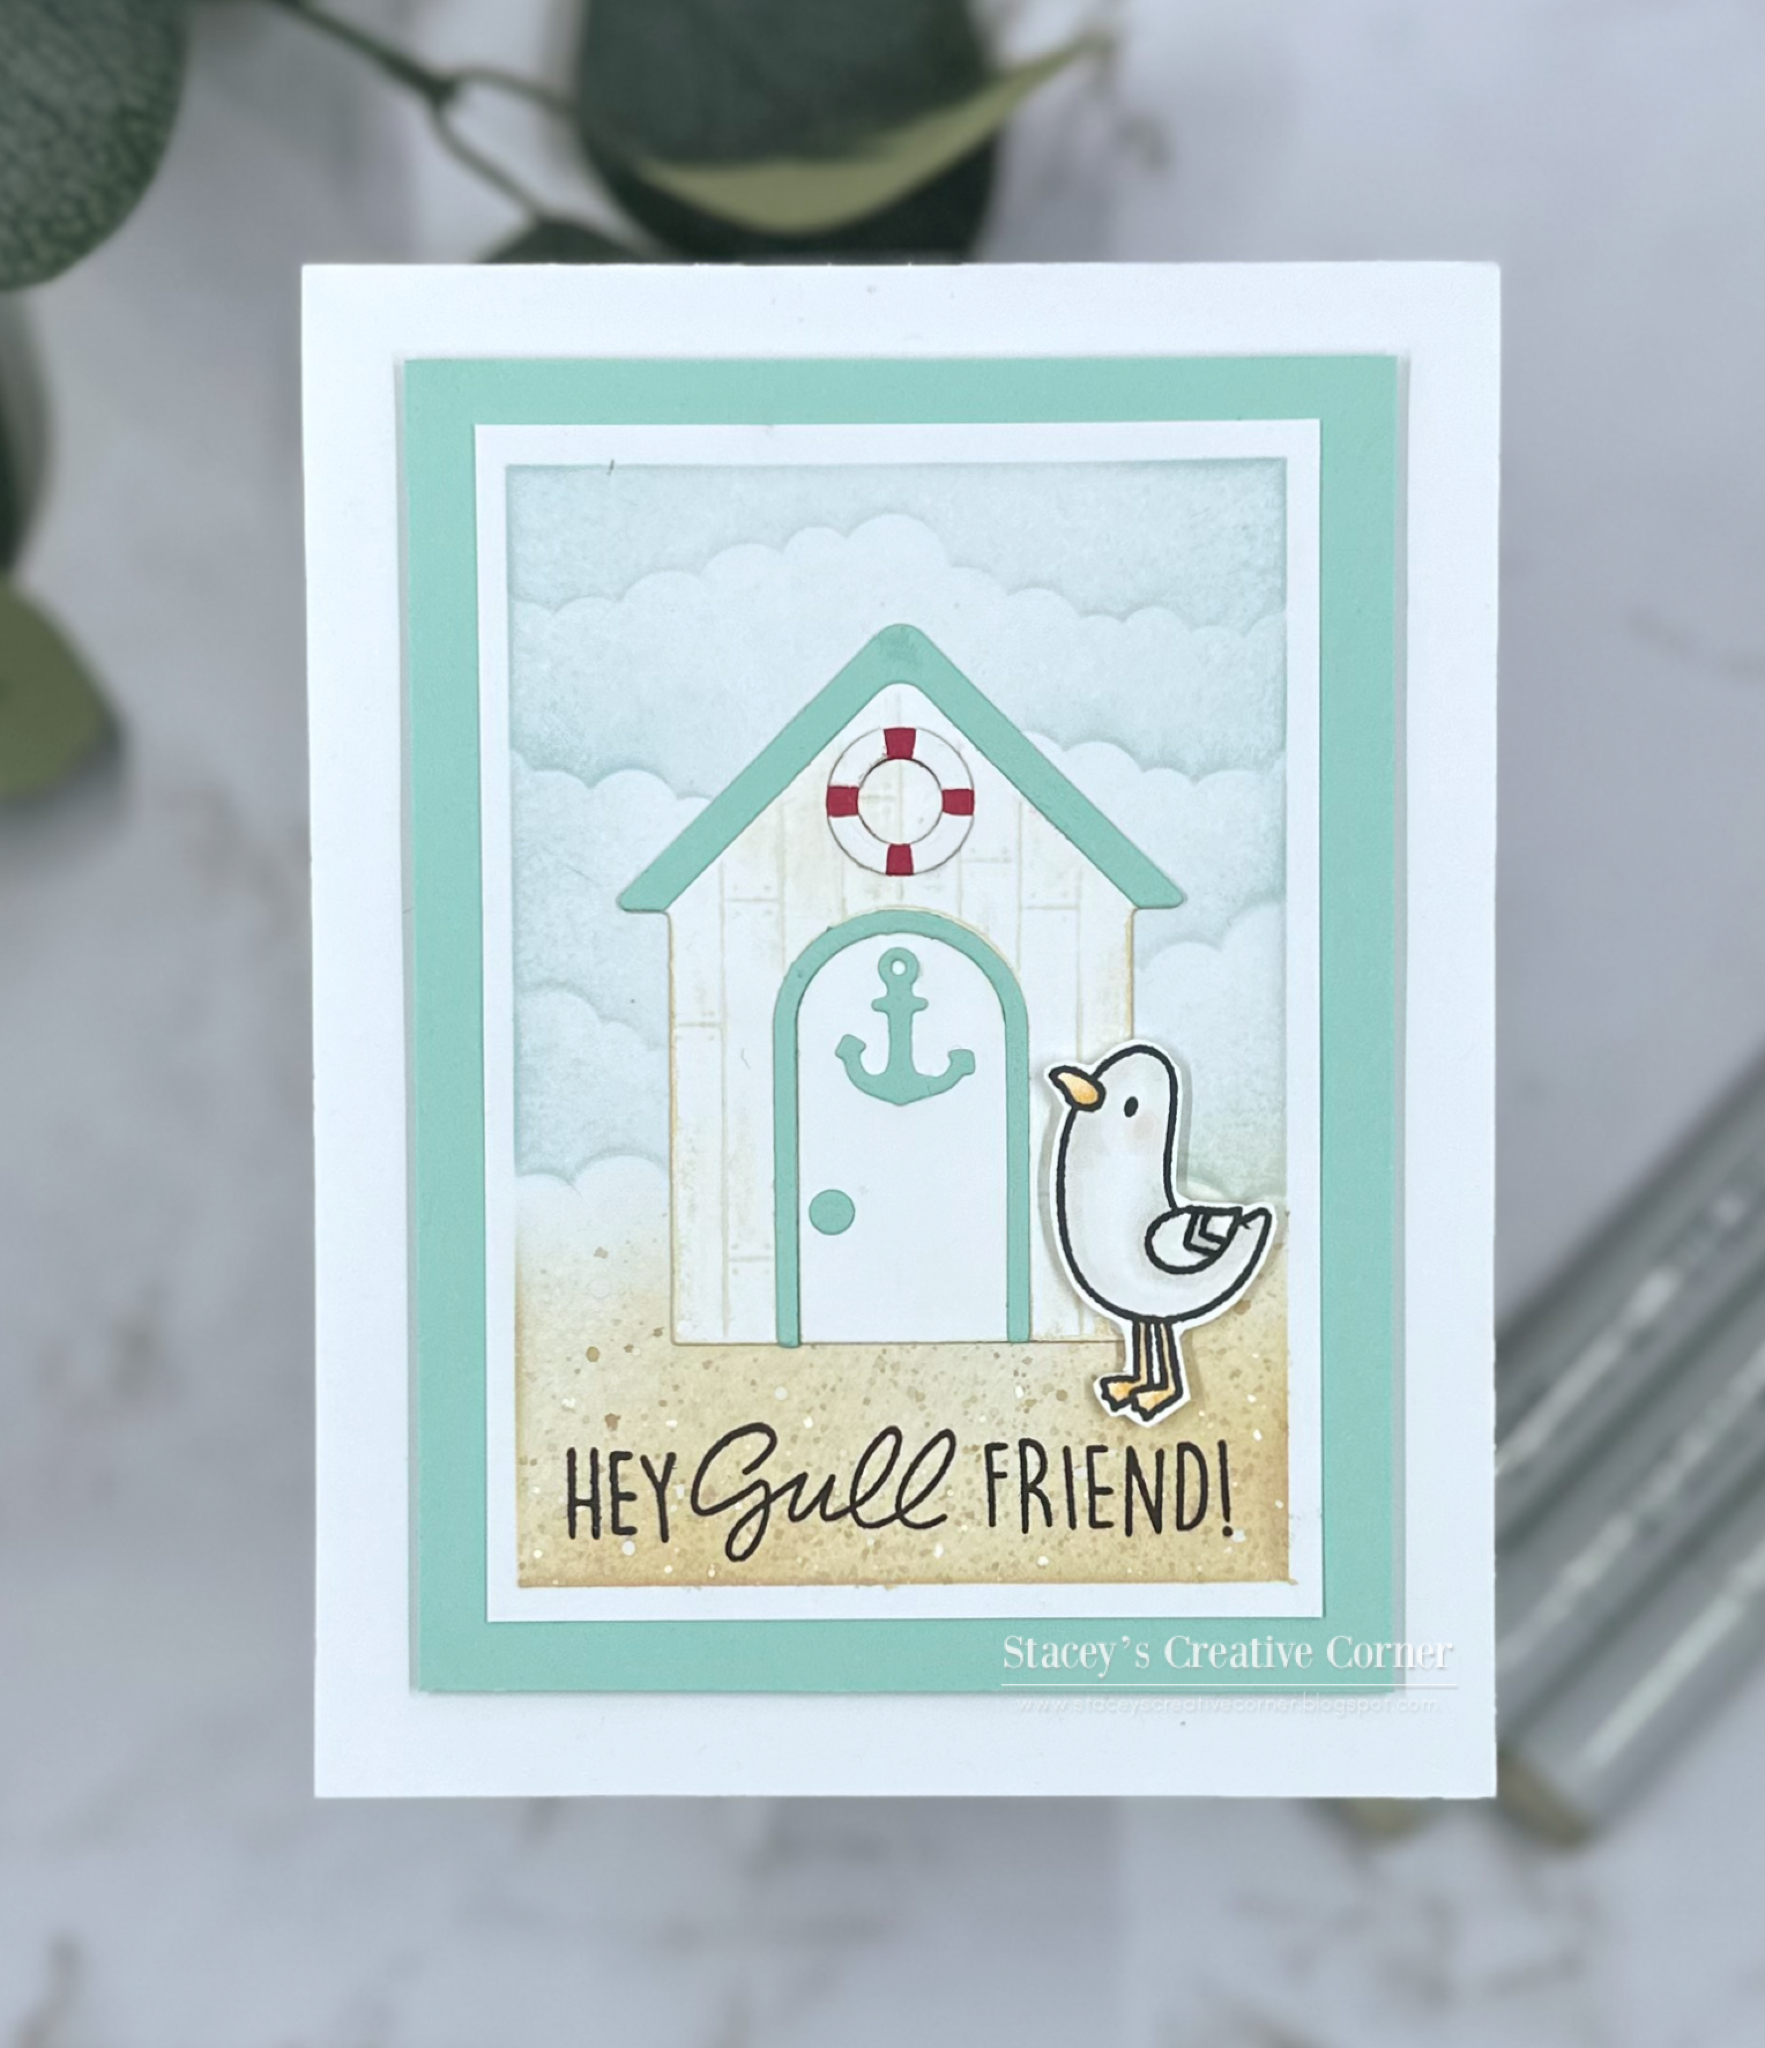
Hey Gull Friend!

Hi crafty friends and happy happy Friday!!
Any fun plans for the weekend? I think we are venturing out and doing a little shopping. 
Yay! Always a fun time, even if it is just mainly window shopping :) 

I wanted to pop in and share a card that I made for the February 2023 Heffy Doodlers Challenge
The challenge is Sending Love. So many possibilities with that one! 
I decided to create a card to send to a friend for no reason other than to let them know they are being thought about and to say Hello. 


I had a lot of fun with this one. I started by creating a little scene with some stencils and distress oxide inks. Once I had that done, I trimmed it down and matted it onto a piece of Pool Party cardstock. I stamped my sentiment in the "sandy" area and then popped up my panel onto a white A2 cardbase. I used the Build A Cabin Die to create my little cabana and placed it onto my card front. I finished my card by doing some simple coloring on one of the birds from the You Go, Gull stamp set, fussy cutting it out and popping it up with more foam tape. So super simple but I absolutely love how it turned out!


Copic Colors Used:
--W), W1, YR20, YR12, R000, R00--

Thank you so much for stopping by my blog today and taking a look at my latest creation!
I appreciate it so much!
I hope you have a great crafty day!
Products Used:
  • Cardstock: White (Hammermill), Raspberry (Lawn Fawn), Pool Party (SU!)
  • Stamp: You Go, Gull (Heffy Doodle)
  • Dies: Build A Cabin Die (Heffy Doodle)
  • Stencils: Micro Cloud Edges & Rectangle Extraordinaire (MFT)
  • Inks: Memento Tuxedo Black, Speckled Egg, Tea Dye & Vintage Photo Distress Oxides
  • Misc.: Foam Tape, White Gel Pen


Saturday, October 15, 2022

Merry Christmas Bunting

Hi crafty friends and happy Saturday!
I hope you are having a fabulous weekend :) 

Today starts a new challenge over at the All Dressed Up Challenge Blog and they are always anything goes as long as you use a All Dressed Up image.

Here is a look at the card that I created to share with you today: 


I really need to get started on some Christmas cards and this cutie called "Christmas Bunting" was perfect for a simple card to get one knocked out fairly quick. I started by creating my card base from some white cardstock and layering some red and white houndstooth patterned paper on top. I printed out my image and colored her with my Copic markers. After she was colored, I used a Zig Zag Stitched die to cut her out and layered some green circles at the bottom the create a scallop edge. I added some Grosgrain ribbon and added my image panel to the front of my card with foam tape. I added some little green enamel dots in opposite corners and my card was complete! So simple!

Copic Markers Used:
--Skin: E50, E51, E21, E04, R00, R20--
--Hair: E31, E33, E35--
--Shirt: R27, R39, R59, C0--
--Banner: G24, G28--
--Stars: Y28, Y26, Y23--

Thanks you so much for stopping by and taking a look at my latest card!
I appreciate it so much!
Don't forget to stop by the All Dressed Up Challenge Blog and take a look at the inspiration from the team! I hope you will color up an ADU image and join us! I would love to see what you create!
I hope you have a great crafty day!


Products Used:
  • Cardstock: White (hammermill)
  • Patterned Paper: Welcome Christmas (Pebbles)
  • Dies: Zig Zag Stitched Rectangle (MFT)
  • Image: Christmas Bunting (All Dressed Up Stamps)
  • Misc.: Circle Punch, Ribbon, Foam Tape, Enamel Dots


Monday, August 22, 2022

Hello There!

Hi everyone and happy Monday!
I hope you had a fabulous weekend!

Today I am sharing a card that I made with the one of the new images released this month from 


For my card, I used the new image titled Unicorn Ring.
I love this image and wanted to keep the focus on her so I kept my card fairly simple. I started with a white card base and added a strip of blue patterned paper to one side. I wanted to add a bit more color so I added a small strip of polka dotted paper as well. I colored that adorable image, Unicorn Ring, with my Copic markers and then fussy cut her out. I popped her up onto my card with foam tape and added a bit of twine and my sentiment on a little tag. I rounded one corner and added some enamel dots to complete my card. 

Copic Markers Used:
--Skin: E50, E51, E21, R20, R00--
--Hair: E21, E23, E25--
--Bows/Suit: Y11, Y15--
--Crab: R24, R14--
--Float: C00, C0, R81, B00, Y11, YG01--

Thank you so much for stopping by my blog today and taking a look at my latest creation!
I really appreciate it!
I hope you have a great crafty day!


Products Used:
  • Image: Unicorn Ring (All Dressed Up Stamps)
  • Cardstock: White (Hammermill)
  • Patterned Paper: Seaside Summer (Doodlebug)
  • Sentiment: Teeny Tag Greetings (My Creative Time)
  • Dies: Mini Tag Dies 2 (Jaded Blossom)
  • Misc.: Yellow Baker's Twine, Foam Tape, Enamel Dots, Clear WInk Of Stella


Monday, August 1, 2022

You Had Me At...

Hi everyone!
Happy June!!

Today starts a new challenge over at the 

The theme for the month of August is...
By/At/Under the Sea


Here is a look at the card that I created:


I decided to use the image called, Vivienne Beach Girl for my card today. 
My card was so incredibly easy to make!
I started with a piece of heavyweight white card stock for my base and rounded just one corner. I cut a piece of patterned paper and added it to a piece of black cardstock before applying it to my card front. I colored Vivienne Beach Girl with my Copic Markers and used my Scan N Cut to cut her out. I popped her up onto my card with foam tape and added my sentiment strips opposite of her. I finished my card with a few sequins and some black crochet thread. 
Doesn't she look so nice and relaxed with her seashell and drink in hand?

Copic Colors Used:
--Skin: E51, E11, E33, R20, R83--
--Shell: E41, E43--
--Hair: E31, E33, E35--
--Drink: Y11, Y13, BG0000, BG000, BG10, BG11, BG13--
--Hat: E41, E42, E55, YR00, YR12, YR15, YR18--
--Dress: YR00, YR01, C00, C0, R22, R43--
--Glasses: C6, C4, C1--
--Drink: Y11, Y13, BG000, BG0000--

Thank you so much for stopping by my blog today!
I appreciate it so much!
I hope you have a great crafty day!
Products Used:
  • Cardstock: White (Hammermill & Recollections), Black (Recollections)
  • Patterned paper: Summer Dreams (Echo Park)
  • Sentiment: Reverse Chill Summer (Simon Says Stamp)
  • Image: Vivienne Beach Girl (Digi Doodle Studios)
  • Die: Itty Bitty Strips (MFT)
  • Misc.: Black Crochet Thread, White Gel Pen, Foam Tape


Thursday, July 7, 2022

You Are Beary Sweet


Hi everyone!
I hope your day is off to a wonderful start!
Have you heard the news? Ink N Splatter is now hosting monthly challenges in their FB group!!
Yay!!
This month is anything goes using Ink N Splatter stamps with the optional theme of a color challenge.


Here is a look at the card that I created:


I was so inspired by the colors and of course, that adorable little bear from the Sweet Honey Bears Stamp Set. I think she is just so sweet! My card was pretty simple to make. I started by creating a card base from some white cardstock. I layered some gingham paper from the Clucker Club 6x6 Paper Pad with some dark and light pink cardstock and adhered it down the middle of my card front. I die cut some pink circles and added a piece of white embossed cardstock on top. I colored that adorable bear with my Copic markers and used the coordinating dies to cut her out. I added her to my die cut circles and popped my circle piece up with foam tape. I stamped my sentiment with some Jet Black Lawn Fawn ink, die cut it out using a fishtail die and layered more pink papers behind it before adding that to my card with foam tape. I decided I wanted a little more dimension, so I colored another bow, fussy cut it out and popped it up using foam tape over her existing bow. I love the extra interest that gave to my card! 

Copic Colors Used
--Bear: E40, E41, E43, E47, R20--
--Outfit: RV06, RV17, RV09, C00--
--Flower: Y21, Y00, YG03, C00, C0--

I would also like to play along with the following challenges:
 (Patterned Paper, Die Cuts, Embossing)


Thank you so much for stopping by and taking a look at my latest card!
I appreciate it so very much!
I hope you have a great crafty day!

Ink N Splatter Products Used:
Other Products Used:
  • Cardstock: White (Hammermill), Pinks (Recollections)
  • Dies: Nesting Circles (WRMK), Fishtail Foundations (MFT)
  • Ink: Jet Black (Lawn Fawn)
  • Misc.: White Gel Pen, Foam Tape, White Gel Pen, Swiss Dots Embossing Folder


Thursday, April 14, 2022

Just Because...

 Hi everyone!
I hope your day is off to a fabulous start!

Today I am sharing simple & adorable card that I made using the new Clubby Dragons stamp set from


How cute is this little dragon? I just love him! 
I started my card by creating an A2 cardbase from white cardstock and covering it with some purple paper that I die cut out using a stitched rectangle. I used another stitched rectangle and cut out a piece of patterned paper from the Painted Crush 6x6 Paper Pack and layered that on top. I colored that sweet little dragon & flowers from the Clubby Dragons stamp set with my COPIC markers and used the coordinating die to cut them out. I die cut a tag and added my sentiment, dragon, flowers and a cloud onto it before attaching it to my card with foam tape. I completed my card with a little twine bow to my tag and a tiny die cut butterfly. So super cute!!

COPIC colors used:
--Dragon: C1, C2, V12, V01, V000, Y000, Y00, Y11--
--Flowers: Y19, Y15, G24, C0, R81--

I would also love to play along in the following challenges:
&


Thank you so much for stopping by my blog today and taking a look at my latest creation!
I hope you have a great crafty day!
Ink N Splatter Products Used:
Other Products Used:
  • Cardstock: White (Hammermill), Purple (Recollections)
  • Ink: Memento Tuxedo Black
  • Dies: Stitched Rectangular Frame Dies & More, Stitched cartoon Cloud Dies, Tag Die Layers (My Creative Time), Fishtail Foundations (MFT), Spring Banner Dies (Jaded Blossom)
  • Misc.: Foam Tape, Clear Wink Of Stella, Twine, White Gel Pen


Thursday, March 17, 2022

Your Kindness Touched My Heart

Hi everyone!
I hope you are having a fabulous day so far!

I have a sweet & simple thank you card to share with you that I created with a new clear stamp from


 Isn't she darling?
I started my card by creating a white A2 cardbase and covering it with some yellow and white checked paper from the Bumble Buzz 6x6 Paper Pack. I die cut a white panel using a stitched rectangle die and then die cut a heart opening using a stitched heart die. I popped up my white panel with some thin foam tape and stamped my sentiment into the center of the heart. I colored Felicia Fab Girl with my Copic markers, used the coordinating die to cut her out & glued her onto my card. I added a bow, some enamel hearts, white Nuvo drops and some black doodles to complete my card.  Like I said, very simple but so sweet!

Copic Markers Used:
**Skin: E50, E51, E21, R20**
**Hair: E33, E35, E37**
**Outfit: Y11, Y13, Y15, C0, C1**
**Shoes: C4, C6, C8**

I would like to play along with the following challenges:
&


Thank you so much for stopping by my blog today and taking a look at my latest creation!
I really appreciate it!
I hope you have a great crafty day!
Ink N Splatter Products Used:
Other Products used:
  • Cardstock: White (Georgia Pacific & Hammermill)
  • Dies: Heart Dies 2 (Jaded Blossom), Stitched Rectangular Frame Dies & More (MCT)
  • Ink: Memento Tuxedo Black
  • Misc.: Copic Markers, Yellow Ribbon, White Nuvo Drops, Enamel Hearts, White Gel Pen, Black Micron Pen, Foam Tape


Thursday, March 3, 2022

You Color My World

Hi everyone!
I hope you are having a fabulous day so far!

I have a sweet & simple card to share with you that I created with a new clear stamp from


Isn't she darling??
I found an "ink splat" in Cricut Design Space that I liked and used the shape tool to slice a heart into the center. I cut it out using some patterned paper from the new Painted Crush 6x6 Paper Pad and added it to a piece of white cardstock that I trimmed down to 3.75"x5". I used a few different ink blending brushes and lightly inked around the edges using the ink that was left on the brushes from previous projects. (I'm terrible about cleaning them). I stamped my greeting, also from the Little Artist Kiki Stamp set, towards the bottom and popped up my panel with foam tape onto a white card base. I colored Little Artist Kiki with my Copic markers, used the Coordinating Die to cut her out and popped her up with more foam tape. I finished my card with some glossy accents on the paint palette and some little colored gems on the paint splatter. So cute!!

Copic Colors Used:
**Skin: E50, E51, E21**
**Pants/Shoes: E41, E42**
**Hair: E42, E55, E23**
**Palette/Brush: E47, E74, E44, E43, E42**
**Shirt/Socks: C00, C0**
**Apron/Hat: V01, RV63, C00, C0**
**Paints: Y11, Y17, R81, V01, BG01**

I would also like to play along with the following challenges:


Thank you so much for stopping by today and taking a look at my latest creation!
I really appreciate it!
I hope you have a great crafty day!

Ink N Splatter Products Used:
Other Products Used:
  • Cardstock: Hammermill & Recollections
  • Ink: Memento Tuxedo Black
  • Misc.: Foam Tape, Glossy accents, Clear Wink Of Stella, Mini Jewels, Cricut


Related Posts Plugin for WordPress, Blogger...

Would You Like Posts Delivered To Your Email?

Get new posts by email:

Follow this blog with Bloglovin'

Follow on Bloglovin Follow on Bloglovin

Search This Blog

Blog Archive

.

My Blog List

Challenge Blogs I Love

Labels

2 Cute Ink (4) 3 Birds On Parade (1) 365 Cards (5) 3D Items (383) A Child's Year (5) AAA Birthday (4) Accent Essentials (5) Action Wobbles (18) Addicted To Stamps & More (14) All Dressed Up Stamps (18) All Mixed Up (3) All Occasion Cake Art (3) Altered Item (60) An Inky Situation (3) Anniversary/Wedding (15) Announcement (3) Artiste (13) Autumn (58) Avery Elle (9) Baby (25) Baby Steps (4) Banner (5) Best Wishes (5) Big Picture Classes (1) Birthday (266) Birthday Bash (9) Birthday Sundaes (9) Bits & Pieces (1) Bitten By The Bug2 (36) Blog Hops (62) Bloom (2) Box (6) Boys Will Be Boys (3) Breast Cancer Awareness (4) Bugaboo Stamps (1) C.C. Designs (13) Camp Create (21) CANDi (22) Candy (303) Car Decals (2) Card Folds (22) Card Harmony (10) Carousel (1) Cartridge Toss-Up (7) Celebrate With Flourish (3) Celebrations (5) Center Step Card (10) Christmas (252) Christmas Card Challenges (14) Christmas Cheer (7) Clean and Simple (116) Clearly Besotted (4) Colored Pencils (1) Congrats (21) Cooking With Cricut (34) Copic (7) Copics (675) CPS (18) Craft It Up & Link It Up! (8) Craftwork Cards (22) Crafty Creations (1) CreateACritter (27) CreateACritter2 (4) CreateAFriend (1) Cri-Kits (2) Cricut (405) Cricut 360 (13) Cricut Alphabet (5) Cricut Cardz Challenge (4) Cricut Essentials (1) Criss Cross Card (2) CTMH (21) Cupcake Inspirations (6) Cut Club (9) Cut It Up Challenges (23) Cuttlebug (144) Darcie's (3) DCWV (26) Design Team (2) Designer's Calendar (1) Di's Digital Stamps (12) Diamond Fold Card (1) Die Cuttin Divas (12) Dies R Us (12) Digi Doodle Studios (48) Digi Doodles (2) Digital Stamps (58) Don Juan (1) Doodlebug (78) DoodleCharms (15) Doodletype (1) Dr.PhilScraps (22) Easel Card (8) Easter (69) Elegant Edges (16) Embossing (2) Encouragement (93) Everyday Pop-Up Cards (4) Fall (39) Fantabulous Cricut Challenge Blog (8) Father's Day (9) First Friday Challenge (1) First Responders (1) Flaunt It Fridays (5) Flower Shoppe (4) Foil (2) For You (3) Forever Young (6) Four Legged Friends (1) Fourth of July (16) Frantic Stamper (1) Frappachino Jars (5) French Manor (1) Freshly Made Sketches (1) Friendship (89) From My Kitchen (1) Galentine (2) Gate Fold (3) George and Basic Shapes (14) Gerda Steiner (24) Get Well (27) Gift Bag (68) Gift Card (44) Gnomes (16) Graduation (13) Graphically Speaking (3) Guest Designer (27) Gypsy (13) Gypsy Wanderings (3) Halloween (151) Hannah Montana (2) Happy Hauntings (4) Harry Potter (5) Heffy Doodle (1) Hello (261) Hello Bluebird (10) Hello Kitty Greetings (6) Holiday Card Workshop (5) Home Decor (14) Honey Bee Stamps (3) Hoot 'N' Holler (1) If You Give A Crafter A Cookie (11) Independence Day (2) Indie Art (1) Ink Blending (5) Ink N Splatter (30) Inking It Up Crazy (4) Inspiration Wednesday (4) Interactive (7) Invitation (1) Jaded Blossom (498) Jitterbuggin' (1) Journaling Spots (1) Joy's Life Stamps (122) Jubilee (2) Just Because Cards (10) Just For Fun (60) KaDoodle Bug (56) Kat Scrappiness (1) Kate's ABC's (1) Krafty Girls (17) La-La Land Crafts (14) Lacy Labels (12) Lawn Fawn (90) Lawn Fawnatics (14) Layout (29) Let's Capture These Sketches (1) Life's A Beach (5) Life's A Party (7) Live Simply (1) Locker Talk (4) Love (136) Love My Tapes (10) Love You A Latte (2) LoveBug Creations (51) Lovely Floral (2) Lyrical Letters (9) M.A.G. Challenge (1) Made In Minutes (4) Mama Elephant (14) Masculine (39) MCT Challenge (5) Memory Box (1) MemoryDex (6) Meow (1) Mer-May (10) MFT Sketch Challenge (19) Minc (3) Mini Album (5) Mini Monsters (6) Miss Kate's Cuttables (3) Miss You (1) Mo's Digital Pencil (1) Mojo Monday (35) Mother's Day (15) MPS Challenge (8) My Craft Space (1) My Creative Time (338) My Favorite Things (175) My Scrap Chick (8) Neat & Tangled (1) New Arrival (4) New Year (1) Nifty Fifties (3) No Occasion Needed (3) Note Card (94) Nursery Rhymes (1) Once Upon A Princess (1) Online Card Class (16) Pack Your Bags (3) Paisley (2) Paper Doll Dress Up (10) Paper Nest Dolls (7) Paper Play Sketches (11) Paper Playtime (15) Paper Sweeties (2) Paper Therapy (24) Paperie Ink (1) Party Favors (3) Patriotic (6) Pause Dream Enjoy (22) PDE Linky Party (23) Peachy Keen Stamps (58) Penny Black (4) Perfect Sentiments (1) Photo Inspiration (1) Pink & Main (149) Pink & Main Challenge (11) Pink Gem Designs (17) Pinterest Inspired (1) Plantin Schoolbook (9) Pooh and Friends (2) Pooh Font (3) Pretty Cute Stamps (2) Pretty Paper Pretty Ribbons (2) Print & Cut (1) Project Life (7) Punch Board (7) Puns (42) RAM stamps (1) Rock Princess (6) S Fold (2) Scan N Cut (14) Scenes (1) Scrapbook.com (7) Scrapping The Little Things (7) Scrappy Moms (61) Scrappy Moms Release (21) Seize The Birthday (17) Sentimentals (5) Shabby Chic (1) Shaker Card (32) Shaped Cards (49) Shopping Our Stash (36) Silhouette (146) Silhouette Challenges (5) Simon Says Stamp (6) Simon Says Stamp Monday Challenge (7) Simon Says Wednesday Challenge (40) Simply Charmed (9) Simply Sweet (1) sketch (8) Sketch N Scrap (28) Sketches:Creatively Yours (6) Slimline (20) Smiley Cards (3) Sophisticated (2) Sorry (1) Spellbinders (16) Splitcoast Stampers (1) Spongebob Squarepants (1) Sports Mania (2) Spring (29) Spring Cottage (2) Spring Holiday Cards (1) SSS Wednesday Challenge (2) St. Patrick's Day (16) Stamp Anniething (86) Stamp/Die of the Month (2) Stampin' Up! (43) Stamping Bella (10) Stand and Salute (6) StarJamLines (1) Stencils (4) Stick It Down (7) Storybook (12) Straight from the Nest (8) Stretch Your Dies (5) Summer (60) Summer Celebrations (1) Sunny Day Crafting (6) Sunny Studio (6) SVG Attic (1) SVGCuts (15) SVGCuttingFiles (55) Swaps (5) Sweet November (1) Sweet Shop (1) Sweet Tooth Boxes (2) Sweet Treats (10) Sweethearts (8) Sympathy (5) Tacky Tuesday (6) Tags (30) Tags Bags Boxes and More (6) Tags Bags Boxes and More 2 (6) Taylored Expressions (3) Teacher Appreciation (1) Tear Drop (2) Teddy Bear Parade (7) Tent Topper (5) Terrific Tuesday Challenges (10) Thank You (78) Thanksgiving (26) The First Few Years (1) The Four Seasons Challenge (4) The Greeting Farm (21) The Paper Shelter (2) The Paper Variety (3) The Perfect Sentiment (11) The Rabbit Hole Designs (1) The Sweet Shop (1) The Sweet Stop (9) Thinking of You (96) Thrifty Thursday (5) Throwback Thursday (5) Tiddly Inks (2) Tie The Knot (2) Too Cute By Jessica (1) Trendy Twine (38) Trinity Stamps (3) Try Me Tuesday (4) Try Stampin On Tuesday (8) Tuesday Morning Sketches (5) Tutorial (1) Twinkle Toes (3) Unity Stamp Co. (6) Use It Tuesday (13) Valentine's Day (102) Valentine's Sentiments (1) Varsity Letter (1) Victorian Romance (1) Vinyl Projects (2) Wacky Wednesday (1) Waffle Flower (2) Washi (6) Watercolor (16) Welcome Home (1) What A Treat Wednesday (1) Whatever Wednesday (2) Whimsy Stamps (1) Wild Card (31) Winter (35) Winter Frolic (3) Winter Woodland (4) Wrap It Up (5) Your Next Stamp (5) Zig Clean Color (6)

Honorable Gnome

I was Spotted!

Total Pageviews

>

Info

Occasionally I will be posting projects that use products that I have been given as a Design Team Member for a certain team. I will never endorse anything that I do not strongly believe in.

Copyright Info:

Please note that all of my work is original unless otherwise stated. It is for your own personal enjoyment only. Please do not copy for profit, publication, design contest or teams, or pass off as your own. Thank you and Enjoy!