Showing posts with label CTMH. Show all posts
Tuesday, June 11, 2013

So Happy Togehter

Hi guys!
Happy Tuesday!
Today I get to show you another project using those awesome CTMH products
It is also my very last post for Dr. Phil Scraps!
Before I show you my project, I would like to give a huge shout out of Thanks to Dr.Phil Scraps for allowing me the pleasure of being on this wonderful team and working alongside so many talented designers!

I look forward to seeing all the fabulous projects the new team comes up with as well as Dr. Phil Scraps himself. 

OK, onto my project:

I decided to make a card that I think would be perfect for a wedding/anniversary card.
For my card base, I made a A2 size card out of some blue cardstock. I then added a black layer, and then a top yellow layer. The great thing about CTMH cardstock is that it has a white core. Perfect to run through your embossing machine and then lightly sand it to give it a whole new look. 
For my main piece/sentiment, I used a sticker from the For Always My Stickease Assortment (X7165C)
I popped it up with some foam adhesive and added a bow to the back before I adhered it to my card. 
Then I layered 3 of the flowers from the For Always My Stickease Assortment (X7165C).
I popped up the flowers with more foam adhesive and added a gem from the 
Sparkles Assortment (Z1753) to my flower center. 
I then added a few more gems from the Sparkles Assortment (Z1753) to my sentiment as well as the upper left hand corner of the card. 


I think the card came out so pretty and I love those gems!

Thanks so much for taking the time to stop by today!
Don't forget to stop by Dr. Phil Scraps for daily inspiration and weekly giveaways!
I hope you have a fabulous week!
Photobucket
CTMH Products Used:
Cardstock from the Pastel Collection (Retired)

Other Products:
Black cardstock (Core'dinations)
Tiny Hearts Embossing Folder (The Paper Studio)
Foam Adhesive
Ribbon (Sweet Petites)
Sanding Block

Friday, May 24, 2013

Buzz & Bumble Layout

Hi everyone!
Happy Friday!
I hope you have some fun plans for the weekend :) 

Today I get to show you another project that I made using the 

On the back of the instruction manual, there is a photo of another layout.
I decided to try my hand at copying that cause I loved it so much.

Here it is:

Isn't it fabulous? I have so many large (8x10) photos that typically just sit in the folder from the photographer since I just don't seem to have enough walls to possibly hang them all. I love that this layout allows me to put an 8x10 on a layout. 

Here is a closeup of some of the stamping elements as well as that gorgeous paper that comes in the kit:

I think this is my favorite collection so far. 

So to recap, with ONE workshop on the go kit, I was able to create TWO 2 page layouts and 1 card.
In case you missed the previous projects, here they are:


AND look at all that I still have left over:

Still so much paper, bling, a wax seal and of course those awesome stamps!
You definitely get your monies worth with the 

Thanks so much for stopping by today!

Don't forget to visit Dr. Phil Scraps for daily inspiration as well as weekly giveaways:)

I hope you have a fabulous crafty day!
Photobucket
*I created this project while on the Dr. Phil Scraps Design Team*

Supplies:
CTMH Products:

Other Products:
Scallop Sentiment Border Punch (Fiskars)
Studio G Ink
Foam Adhesive
Thursday, May 23, 2013

Bee Yourself

Hi everyone!
Happy Thursday!

 Today I would like to show you a card that was made from some of the leftovers from the
Buzz and Bumble Scrapbooking Kit (G1054)

Everything on my card was from the kit. The only extra thing that I needed besides my trimmer was some brown ink.

Look at those gorgeous papers!
Fabulous bling, wooden 3D bee and wax seal too?
Oh my!


Thanks so much for stopping by today!
Don't forget to come back tomorrow! I will have another project to show you using more of the leftovers from the Buzz and Bumble Scrapbooking Kit (G1054)!

Be sure to check out Dr. Phil Scraps for daily inspiration and weekly giveaways!

I hope you have a fabulous crafty day!
Wednesday, May 22, 2013

Friendship Layout

Hi everyone! 
I hope you are having a marvelous Wednesday!

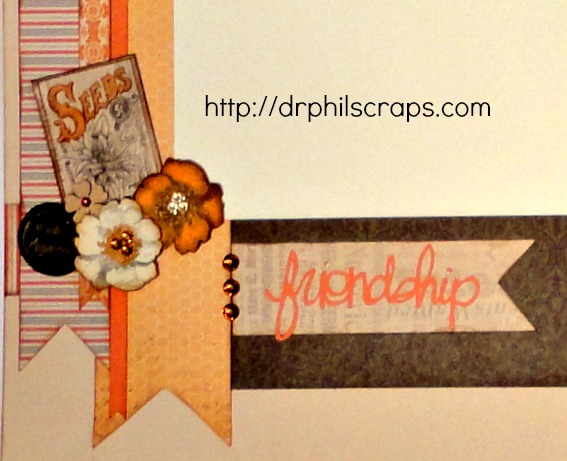
Today I would like to show you a layout made with the 

For my layout, I simply followed the included instructions that come with the kit. 
(you can click on the picture for a larger view)

The great thing about this kit, besides the beautiful papers and embellishments, is the included instructions.
It completely takes all the guess work of putting together a layout. All the measurements are given so you know exactly what size to cut what. Perfect! I often stumble with ideas or get mental blocks so it definitely comes in handy. Of course you don't have to follow the directions, but they are there if needed :) 

Here is a close up on the bottom left corner of my layout. 
The wax seal, wooden flower and bling all come with the kit. 
The larger flowers and the seed packet are stamps (also included in the kit)


Here is a close up of the corner on the right hand size of the page. 
The flight path, Wonderful Beautiful, You Are My Happy & the big flower are included stamps.
The small wooden flowers, wooden bee and bling are also included in the kit. 

Super pretty right? All the papers are beautiful and compliment each other perfectly!

Thanks so much for stopping by today!
Be sure to come back tomorrow to check out another project made with the left overs from the kit.
Don't forget to check out Dr. Phil Scraps for daily inspiration and weekly giveaways!

I hope you have a fabulous crafty day!
Photobucket
*I created this project while on the Dr. Phil Scraps Design Team*

Supplies:
CTMH Products:

Other products:
Foam Adhesive
Studio G Ink
Silhouette for "Friendship"
Saturday, May 11, 2013

Always Be Yourself

Hi guys!
Happy Saturday!
Today I get to show you a fun little card made with those awesome CTMH stamps and the cricut for
 Dr. Phil Scraps.


I think this card is so darling to send to someone, no occasion needed :) 
For my card, I made my A2 sized card base out of purple cardstock. Then I simply stamped a border along one side using the houndstooth pattern from the Distressed Backgrounds (D1544) stamp set. I then cut a black rectangle and a white rectangle and layered them together and adhered to my card base. My dress/dress form was found on the Nifty Fifties Cricut cartridge and was cut out at 3.75". Before I adhered the dress to the dress form, I stamped my dress with the same houndstooth stamp and added a small bit of ribbon along the bottom on the back side. Then I adhered everything together and attached to my card and added a little bow to my dress. For my sentiment, I stamped "Always Be Yourself", which can be found on the Dream Big Stamp Set (D1399) onto some white cardstock and used a circle punch to punch it out and layered it onto a purple and black circle. Popped it up with some foam adhesive and added a few pearls to the exposed corners and Voila! Super cute card!

Here is a close up:

Thanks so much for stopping by today!
Don't forget to head over to Dr. Phil Scraps for daily inspiration and weekly giveaways!
I hope you have a fabulous crafty day!
Photobucket
*I created this project while on the Dr. Phil Scraps Design Team*


Supplies:
CTMH products Used:

Other Products Used:
Cricut Cartridge: Nifty Fifties
Cardstock: Purple (Recollections), White & Black (Georgia Pacific)
Ink: Tuxedo Black (Memento)
Punches: 1" Circle (Fiskars), 1 1/8" circle (Marvy), 1 3/8" circle (SU!), Corner Chomper (We R Memory Keepers)
Misc.: Foam Adhesive, Ribbon (Offray), Pearls (Queen & Co.), Glossy Accents
Saturday, May 4, 2013

Gift Card Purse

Hi guys!
Today I get to show you a fun little project using some of those awesome CTMH products for
Dr. Phil Scraps.

I decided to make a little purse from the Artiste Cricut Cartridge Collection (Z1790) and turn it into a cute way to package up a gift card and some candy.


I cut my purse out of the Artiste Cricut Cartridge (found on page 31 in the handbook) at 3".
I decided it need a little something, so I added some patterned papers from the Chantilly Paper Packet (X7163B). It just took a little strip for the top and bottom edge,so that little touch can easily be done with some of your scraps. Then for my closure, I stamped that beautiful flower from the Just For You (B1398) stamp set. I hand cut it out after I had it stamped and then adhered the top half to the front flap of my purse. 

Here is a close up of that awesome stamp:

To keep my flap closed, I simply adhered a small piece of velcro to the bottom half of the flower.
This stamp is so versatile! You can easily stamp each section of the flower to coordinate with your project perfectly!

Here is a picture showing you the contents of my little gift purse:

What a cute way to present someone with a gift card!

Thanks so much for stopping by today!
I really appreciate it!
I hope you have a fabulous crafty day!
Photobucket
*I created this project while on the Dr. Phil Scraps Design Team*

Supplies Used:
CTMH products:

Other products used:
White Cardstock (Georgia Pacific)
Studio G Inks
Velcro
Ribbon
Foam Adhesive
Monday, April 29, 2013

You Make Life Blissful

Hi everyone!
Happy Monday!!

I hope you all had a wonderful weekend and got some projects done during Dr. Phil Scraps Online Crop :)

Today I get to show you another project for Dr. Phil Scraps!
I am going to show you a card that I made using just some of the basics....cardstock, stickers and a little bit of ribbon. No cricut or stamping.


For my card, I dug into my cardstock and some stickers from the 
I made an A2 size card base and added a white layer and then a black layer.
I used one of the fun borders from the For Always Stickease assortment (X7165C) and adhered that to my top black layer. Then I took that wonderful sentiment and attached some foam adhesive and popped that up to give it some dimension. I also did that with the small red heart. For a finishing touch, I simply tied a little red bow and glued that to the top of my sentiment. Super easy and quick card and can be easily mass produced in no time at all. 

Here is a close up of some of the stickers:

Thanks so much for stopping by today!
Don't forget to stop by Dr. Phil Scraps for daily inspiration as well as weekly giveaways :) 
I hope you have a fabulous week and a great crafty day!
Photobucket
*I created this project while on the Dr. Phil Scraps Design Team*

Supplies:
CTMH Products:

Other products used:
Cardstock: Georgia Pacific
Misc.: Ribbon (Offray), Foam Adhesive
Saturday, April 20, 2013

Our Day Layout

Hi Everyone!
I hope your Saturday is off to a great start!

Today I am here to show you a wedding double page layout using those awesome CTMH products for
Dr. Phil Scraps.


This double page layout will fit one 5x7 picture and two 4x6 pictures. Plus there is a tab for a date and a journaling block. Aren't those papers gorgeous? I used the For Always paper packet (X7165B). Not only are there gorgeous patterns, but there is also solid papers to coordinate. 

I also used some stickers from the For Always My Stickease Assortment (X7165C).
My flowers, title, date tab, bride & groom as well as the journal block and little heart all came from this set.  Here are some close-ups:

I added some foam adhesive (leave the liner on) to the light gray and dark gray roses and then lightly dusted them with baby powder to remove the sticky from the sticker, I then pulled off my liner on my foam adhesive so that I could give a little dimension by popping up a few of the flowers onto the page. 


I love that little bride and groom sticker! So pretty! 
I added a little heart from the sticker sheet onto the journal block for just a little extra pop of color.

Thanks so much for stopping by and taking a look!

Don't forget to check out Dr. Phil Scraps for
 more inspiration!


Have a great crafty day!
Photobucket
*I created this project while on the Dr. Phil Scraps Design Team*

Supplies:
CTMH Products:


Saturday, April 13, 2013

Recipe Box

Hi everyone!
Any crafting plans this weekend? 
Today I get  to show you another fun project using CTMH stamps for Dr. Phil Scraps!

Awhile back I picked up a plain recipe box from my local craft store.
Well, I am a crafter so I can't have anything plain so I decided to alter it with a Rooster theme. :) 


I cut my rooster out of the From My Kitchen cricut cartridge at 3.5". The "recipes" oval on the top of the box was also cut out of the From My Kitchen cricut cartridge at 3.5".
To cover my box, I used some Champagne Cardstock (X5931) and inked all my edges.
See that chicken wire stamp border?? How perfect is that stamp for this project?? That came from the 

There are a total of three border stamps on the Distressed Backgrounds (D1544) set, and they are all fabulous and distressed.

Here is a close up of my stamping so that you can see some of the distressing:

Thanks so much for stopping by and taking a look at my latest creation!
I really appreciate it!

Don't forget to check out Dr. Phil Scraps for daily inspiration and weekly giveaways!

Have a fabulous crafty day!
Photobucket
*I created this project while on the Dr. Phil Scraps Design Team*

Supplies:
CTMH Products:

Other Products Used:
Card Stock: Black (Recollections) & Red, yellow and blue were all from my scrap bin :)
Cricut Cartridge: From My Kitche
Ink: Timber Brown (StazOn), Vintage Photo (Tim Holtz)
Misc.: Ribbon (Dollar Tree), Button, Hemp Cord, White Gelly Roll Pen
Saturday, April 6, 2013

A Note For You


Hi Everyone!
I hope your weekend is off to a great start!

Today I am here to show you another project using those awesome CTMH products for
Dr. Phil Scraps!

Today I am going to show you a super simple card that I made using some stamps from CTMH.


I love having cards on hand that I can send out on a whim, no occasion needed. 
When I saw these music note stamps, I thought they would be perfect for a "note"card.
hehe!

Anyway, onto the details of my card. I used a stamp from the Universal Backgrounds (D1477) set and stamped directly onto my card base. I then cut a 2.5" square out of black card stock and layered it with a 1.75" square of white card stock. After my layers were adhered, I stamped the "A Note For You..." greeting which can be found on the Just For You (B1398) stamp set. I then centered that onto my card base and adhered with some foam adhesive for a little lift. For my flower, I used my Artiste Cricut Cartridge (Z1790) and cut out the flower on page 44 at 2". Once in real dial size and once without real dial size turned on. I then took the coordinating flower stamp that you can find in the Hello Blooms (C1540) stamp set and stamped each flower. I attached them together with a rhinestone brad and then adhered that to my center square with some foam adhesive. To finish off my card, I added some cute and fun black and white polka dot ribbon and a bow.

Here is a close up of the stamping:

I am in love with the distressed look of the background stamp! 
I really like how my card turned out and it was so simple to make that it would be super easy to mass produce, if needed. 

Thanks so much for stopping by and taking a look at my latest creation!
I really appreciate it!

Don't forget to check out Dr. Phil Scraps for daily inspiration and super fun weekly giveaways!

I hope you have a great crafty day!
Photobucket
*I created this project while on the Dr. Phil Scraps Design Team*


Supplies:
Cricut Cartridge: Artiste (Z1790)
Card Stock: Black & Red (Recollections) & White (Georgia Pacific)
Ink: Tuxedo Black (Memento)
Misc.: Foam Adhesive, Ribbon (Offray), Rhinestone brad
Saturday, March 30, 2013

Be*You*Tiful!

Hi there!
I hope your weekend is off to a fabulous start!
Today I have a card to show you that I made using those fabulous CTMH products
for Dr. Phil Scraps!


For my card, I used some of those fabulous papers from the Chantilly Paper Packet (X7163B) and also some of that gorgeous Black & Grey Glitter Paper (Z1829).
I love the sparkle of that glitter paper!

The little flower came from the Happy Thoughts (C1536) set as well as that super cute banner sentiment!
After I stamped my flower, I ran it through my cuttlebug using a die from spellbinders for my scallop rectangle and layered it on top a glitter rectangle, also cut from the same die set. 
I stamped my flower a second time using a different color ink and hand cut just the top out so I could  layer it on top of the green flower. Then I added a little Pink Glitter Gem (Z1807).
For the sentiment banner, I simply stamped it and then cut it out and popped it up with some foam adhesive.

Here is a close up of those great stamps, as well as the glitter paper and gem:


Thanks so much for stopping by today!
Don't forget to head over to Dr. Phil Scraps and become a follower, 
there is always inspiration over there :) 
I hope you have a fabulous weekend and a 
great crafty day!
Photobucket
*I created this project while on the Dr. Phil Scraps Design Team*

Supplies:
CTMH Products:

Other Products Used:
Ribbon (Offray)
Melon Mambo & Old Olive Ink (SU!)
Daisy Scallop Border Punch (EK Success)
Foam Adhesive
Big Scallop Rectangles Small (Spellbinders)

Saturday, March 23, 2013

Home Sweet Home

Hi Everyone!
I hope your weekend is off to a great start!

Today I am here to show you another project using those awesome CTMH products for
Dr. Phil Scraps!

Have you guys seen the new 6x6 canvas display (Z1818)?
They are absolutely perfect to make a little home decor item for your home.

This is what I made:
(easel for photo purposes only and is not included)

I will be putting this in my entry way so it is seen as soon as we walk in the door.

It was really simple to make too!
All I did was cut out "Home Sweet Home"  from my Sophisticated Cricut Cartridge out at 4.75". To adhere it to the canvas, I simply brushed some tacky glue onto the back of my words using a foam brush and adhered. 

Then I decided each corner needed a little something so I decided to make some rolled roses using the Artiste Cricut Cartridge (Z1790)

You can find the roses on page 54 (Accent 2) in the handbook.
My roses were cut from Ruby Cardstock (X5927) at 2.5", 2" & 1.5".  After they were rolled, I sprayed them with a little glimmer spray to give them a little sparkle. After they were dry, I adhered them to the canvas with some tacky glue.

In the opposite corner, I decided to use a punch and punch out some butterflies and use the 
Sparkles Flourishes (Z1812) as their flight pattern. 

I am so happy with how this turned out and it makes an excellent decor item for my home!

Thanks so much for stopping by today and taking a look at my creation!
I really appreciate it!

Don't forget to check out Dr. Phil Scraps for more inspiration!

Have a great crafty day!
Photobucket
*I created this project while on the Dr. Phil Scraps Design Team*

Supplies:
CTMH Products:

Other Products:
Cricut Cartridge: Sophisticated
Cuttlebug: Swiss Dots Embossing Folder
Punch: Monarch Butterfly (Martha Stewart Crafts)
Misc.: Bubblegum Glimmer Spray (Ditto), Tacky Glue
Saturday, March 16, 2013

Family Layout

Hi Everyone!
Happy Saturday!

Today I get to show you another project for Dr. Phil Scraps!
For my project today, I decided to do 
a quick and simple layout using those awesome Chantilly papers from CTMH.


This layout will hold 2 pictures that measure 4x6 and 2 pictures that measure  3.25"x3.25".
Aren't those papers gorgeous?
For my layout I used some papers from the Chantilly Paper Packet (X7163B)
I cut out "FAMILY" using the preloaded cartridge on the Expression 2 called Cricut Alphabet.
Each letter was cut out at 1.25" and then popped up with some foam adhesive.
Since my title was popped up off of the page, I was able to tuck a chipboard flower from the 
behind my "A". I also added a chipboard shaped sentiment on the left hand side of the layout.
I popped it up with some foam adhesive but I only added the adhesive to the bottom half of the chipboard element, that way a photo can still be adhered.

Here is a closeup:

Can you see the little gems on the chipboard as well as along the side of that layout on a few of the flowers?
Those are called Pink Glitter Gems (Z1807) and they are gorgeous!


Thanks so much for stopping by today!
Don't forget to head over to Dr. Phil Scraps and become a follower!
You will not be disappointed with all the wonderful projects that are there to inspire you :)
I hope you have a fabulous weekend !
Have a great crafty day!
Photobucket
*I created this project while on the Dr. Phil Scraps Design Team*

Supplies:
CTMH Products:

Cricut Cartridge:
Cricut Alphabet

Punches: 
Daisy Fan (Martha Stewart Crafts)
Scallop Sentiment (Fiskars)

Misc.:
Foam Adhesive
White Gel Pen (Marvy)
Saturday, March 9, 2013

Think Happy Thoughts!

Hi Everyone!
I hope your weekend is off to a fabulous start!
Today I get to show you another fun project for Dr. Phil Scraps
 using some awesome CTMH products!

Today I am going to show you this fun little container that I decorated.

This cute little container is called the My Creations Kraft Container (Z1833) and comes to you in a solid Kraft color, ready for you to decorate!
I decided to use some of the Chantilly papers (X7163B) to wrap around my canister as well as for the lid.
I then used a frame stamp from the Frame Flair (D1546) and stamped that onto some Colonial White cardstock (1388) using Ruby Ink (Z2170) and cut it out by hand. After it was all cut out, I stamped that wonderful sentiment from the Happy Thoughts stamp set (C1536).

I'm not quite sure what I will be storing in this just yet. I will be using this in my craft room so I am sure I will find something fun to use it for. Maybe ribbon scraps, homemade embellishments, flowers, etc. Tons of possibilites! Those beautiful papers and that happy sentiment is sure to brighten any room!

Here is a picture with the lid off so you can see the top a little better:

Thanks so much for stopping by today!
Don't forget to head over to Dr. Phil Scraps and become a follower!
There are always lots of ideas over there and you won't want to miss any :) 
I hope you have a wonderful crafty day!
Related Posts Plugin for WordPress, Blogger...

Would You Like Posts Delivered To Your Email?

Get new posts by email:

Follow this blog with Bloglovin'

Follow on Bloglovin Follow on Bloglovin

Search This Blog

Blog Archive

.

My Blog List

Challenge Blogs I Love

Labels

2 Cute Ink (4) 3 Birds On Parade (1) 365 Cards (5) 3D Items (383) A Child's Year (5) AAA Birthday (4) Accent Essentials (5) Action Wobbles (18) Addicted To Stamps & More (14) All Dressed Up Stamps (18) All Mixed Up (3) All Occasion Cake Art (3) Altered Item (60) An Inky Situation (3) Anniversary/Wedding (15) Announcement (3) Artiste (13) Autumn (58) Avery Elle (9) Baby (25) Baby Steps (4) Banner (5) Best Wishes (5) Big Picture Classes (1) Birthday (267) Birthday Bash (9) Birthday Sundaes (9) Bits & Pieces (1) Bitten By The Bug2 (36) Blog Hops (62) Bloom (2) Box (6) Boys Will Be Boys (3) Breast Cancer Awareness (4) Bugaboo Stamps (1) C.C. Designs (13) Camp Create (21) CANDi (22) Candy (303) Car Decals (2) Card Folds (22) Card Harmony (10) Carousel (1) Cartridge Toss-Up (7) Celebrate With Flourish (3) Celebrations (5) Center Step Card (10) Christmas (252) Christmas Card Challenges (14) Christmas Cheer (7) Clean and Simple (116) Clearly Besotted (4) Colored Pencils (1) Congrats (21) Cooking With Cricut (34) Copic (7) Copics (675) CPS (18) Craft It Up & Link It Up! (8) Craftwork Cards (22) Crafty Creations (1) CreateACritter (27) CreateACritter2 (4) CreateAFriend (1) Cri-Kits (2) Cricut (405) Cricut 360 (13) Cricut Alphabet (5) Cricut Cardz Challenge (4) Cricut Essentials (1) Criss Cross Card (2) CTMH (21) Cupcake Inspirations (6) Cut Club (9) Cut It Up Challenges (23) Cuttlebug (144) Darcie's (3) DCWV (26) Design Team (2) Designer's Calendar (1) Di's Digital Stamps (12) Diamond Fold Card (1) Die Cuttin Divas (12) Dies R Us (12) Digi Doodle Studios (49) Digi Doodles (2) Digital Stamps (58) Don Juan (1) Doodlebug (78) DoodleCharms (15) Doodletype (1) Dr.PhilScraps (22) Easel Card (8) Easter (69) Elegant Edges (16) Embossing (2) Encouragement (93) Everyday Pop-Up Cards (4) Fall (39) Fantabulous Cricut Challenge Blog (8) Father's Day (9) First Friday Challenge (1) First Responders (1) Flaunt It Fridays (5) Flower Shoppe (4) Foil (2) For You (3) Forever Young (6) Four Legged Friends (1) Fourth of July (16) Frantic Stamper (1) Frappachino Jars (5) French Manor (1) Freshly Made Sketches (1) Friendship (89) From My Kitchen (1) Galentine (2) Gate Fold (3) George and Basic Shapes (14) Gerda Steiner (25) Get Well (27) Gift Bag (68) Gift Card (45) Gnomes (16) Graduation (13) Graphically Speaking (3) Guest Designer (27) Gypsy (13) Gypsy Wanderings (3) Halloween (153) Hannah Montana (2) Happy Hauntings (4) Harry Potter (5) Heffy Doodle (1) Hello (261) Hello Bluebird (10) Hello Kitty Greetings (6) Holiday Card Workshop (5) Home Decor (14) Honey Bee Stamps (3) Hoot 'N' Holler (1) If You Give A Crafter A Cookie (11) Independence Day (2) Indie Art (1) Ink Blending (5) Ink N Splatter (30) Inking It Up Crazy (4) Inspiration Wednesday (4) Interactive (7) Invitation (1) Jaded Blossom (499) Jitterbuggin' (1) Journaling Spots (1) Joy's Life Stamps (122) Jubilee (2) Just Because Cards (10) Just For Fun (60) KaDoodle Bug (56) Kat Scrappiness (1) Kate's ABC's (1) Krafty Girls (17) La-La Land Crafts (14) Lacy Labels (12) Lawn Fawn (90) Lawn Fawnatics (14) Layout (29) Let's Capture These Sketches (1) Life's A Beach (5) Life's A Party (7) Live Simply (1) Locker Talk (4) Love (136) Love My Tapes (10) Love You A Latte (2) LoveBug Creations (51) Lovely Floral (2) Lyrical Letters (9) M.A.G. Challenge (1) Made In Minutes (4) Mama Elephant (14) Masculine (39) MCT Challenge (5) Memory Box (1) MemoryDex (6) Meow (1) Mer-May (10) MFT Sketch Challenge (19) Minc (3) Mini Album (5) Mini Monsters (6) Miss Kate's Cuttables (3) Miss You (1) Mo's Digital Pencil (1) Mojo Monday (35) Mother's Day (15) MPS Challenge (8) My Craft Space (1) My Creative Time (338) My Favorite Things (175) My Scrap Chick (8) Neat & Tangled (1) New Arrival (4) New Year (1) Nifty Fifties (3) No Occasion Needed (3) Note Card (94) Nursery Rhymes (1) Once Upon A Princess (1) Online Card Class (16) Pack Your Bags (3) Paisley (2) Paper Doll Dress Up (10) Paper Nest Dolls (7) Paper Play Sketches (11) Paper Playtime (15) Paper Sweeties (2) Paper Therapy (24) Paperie Ink (1) Party Favors (3) Patriotic (6) Pause Dream Enjoy (22) PDE Linky Party (23) Peachy Keen Stamps (58) Penny Black (4) Perfect Sentiments (1) Photo Inspiration (1) Pink & Main (149) Pink & Main Challenge (11) Pink Gem Designs (17) Pinterest Inspired (1) Plantin Schoolbook (9) Pooh and Friends (2) Pooh Font (3) Pretty Cute Stamps (2) Pretty Paper Pretty Ribbons (2) Print & Cut (1) Project Life (7) Punch Board (7) Puns (42) RAM stamps (1) Rock Princess (6) S Fold (2) Scan N Cut (14) Scenes (1) Scrapbook.com (7) Scrapping The Little Things (7) Scrappy Moms (61) Scrappy Moms Release (21) Seize The Birthday (17) Sentimentals (5) Shabby Chic (1) Shaker Card (32) Shaped Cards (49) Shopping Our Stash (36) Silhouette (146) Silhouette Challenges (5) Simon Says Stamp (6) Simon Says Stamp Monday Challenge (7) Simon Says Wednesday Challenge (40) Simply Charmed (9) Simply Sweet (1) sketch (8) Sketch N Scrap (28) Sketches:Creatively Yours (6) Slimline (20) Smiley Cards (3) Sophisticated (2) Sorry (1) Spellbinders (16) Splitcoast Stampers (1) Spongebob Squarepants (1) Sports Mania (2) Spring (29) Spring Cottage (2) Spring Holiday Cards (1) SSS Wednesday Challenge (2) St. Patrick's Day (16) Stamp Anniething (86) Stamp/Die of the Month (2) Stampin' Up! (43) Stamping Bella (10) Stand and Salute (6) StarJamLines (1) Stencils (4) Stick It Down (7) Storybook (12) Straight from the Nest (8) Stretch Your Dies (5) Summer (60) Summer Celebrations (1) Sunny Day Crafting (6) Sunny Studio (6) SVG Attic (1) SVGCuts (15) SVGCuttingFiles (55) Swaps (5) Sweet November (1) Sweet Shop (1) Sweet Tooth Boxes (2) Sweet Treats (10) Sweethearts (8) Sympathy (5) Tacky Tuesday (6) Tags (30) Tags Bags Boxes and More (6) Tags Bags Boxes and More 2 (6) Taylored Expressions (3) Teacher Appreciation (1) Tear Drop (2) Teddy Bear Parade (7) Tent Topper (5) Terrific Tuesday Challenges (10) Thank You (78) Thanksgiving (26) The First Few Years (1) The Four Seasons Challenge (4) The Greeting Farm (21) The Paper Shelter (2) The Paper Variety (3) The Perfect Sentiment (11) The Rabbit Hole Designs (1) The Sweet Shop (1) The Sweet Stop (9) Thinking of You (96) Thrifty Thursday (5) Throwback Thursday (5) Tiddly Inks (2) Tie The Knot (2) Too Cute By Jessica (1) Trendy Twine (38) Trinity Stamps (3) Try Me Tuesday (4) Try Stampin On Tuesday (8) Tuesday Morning Sketches (5) Tutorial (1) Twinkle Toes (3) Unity Stamp Co. (6) Use It Tuesday (13) Valentine's Day (102) Valentine's Sentiments (1) Varsity Letter (1) Victorian Romance (1) Vinyl Projects (2) Wacky Wednesday (1) Waffle Flower (2) Washi (6) Watercolor (16) Welcome Home (1) What A Treat Wednesday (1) Whatever Wednesday (2) Whimsy Stamps (1) Wild Card (31) Winter (35) Winter Frolic (3) Winter Woodland (4) Wrap It Up (5) Your Next Stamp (5) Zig Clean Color (6)

Honorable Gnome

I was Spotted!

Total Pageviews

>

Info

Occasionally I will be posting projects that use products that I have been given as a Design Team Member for a certain team. I will never endorse anything that I do not strongly believe in.

Copyright Info:

Please note that all of my work is original unless otherwise stated. It is for your own personal enjoyment only. Please do not copy for profit, publication, design contest or teams, or pass off as your own. Thank you and Enjoy!