Thursday, May 30, 2013

I'm having a Stampin Up Online Party!!

To see my post with my winners for the Super & Everyday Blog Hop as well as the Craftin Desert Divas Desert Hop, please click HERE


Hi guys! 
Recently my good friend Janis signed up to be a Stampin Up Demo and I am having an online party through her to help me celebrate my birthday! Exciting right?? If you are like me and need to stock up on some cardstock (I love their cardstock!) or just want to shop all of their products, this would be a great time! Not only will you get the product that you love but you will be helping me earn some free goodies just in time for my birthday! hehe!

Some things to remember:
1. You must shop at JanisLewis.stampinup.net (not dot com) and sign in or create an account.

2. Make sure you enter the HOSTESS CODE BEFORE clicking check out or it will not count toward my party sales!!!

3. Hostess Code: MSQXKQP2

4. You can order now through June 21, 2013

5. Have fun shopping!

Thank you all so much!!!
I hope you have a fabulous crafty day!!
Photobucket
Wednesday, May 29, 2013

Winners!

Hi everyone!
Happy Wednesday!

Today I have a couple of winners to announce for my blog candy for the 
Super & Everyday Hero blog hop
as well as the
Craftin' Desert Divas Blogoversary Desert Hop.

Before I announce the winners, I would like to take a moment to thank each and every one of you for taking the time to stop by and hop with me on these super fun hops!
I appreciate it so much!
I hope you had a great time and got some inspiration along the way!
Thank you!

Ok, onto the winners.....
I had Random.org pick my winners from the comments on each hop.

Drum roll please.......
For the Super & Everyday Hero Blog Hop, the winner of the paper pad and embossing folder is:

#19 Boots And Bling Time
Awesome awesome awesome!!! Love it!!! You are so creative my friend!
Hugs,
Sheree

For the Craftin' Desert Divas Blogoversary Desert Hop, the winner of the paper pad is:

#7 DebC
Great projects! This theme is super fun! Loving the hop!
Deb C
Bugjuiced


Congrats ladies!!!!
Winners will have one week to contact me at 
staceyscreativecorner @ gmail . com 
(no spaces)
to claim their prize or else prize will be forfeited.

Thanks so much for stopping by!
I hope you have a fabulous crafty day!
Photobucket
Tuesday, May 28, 2013

Use It Tuesday #56---Anything Goes


Happy Tuesday!
Are you guys ready for another great challenge from 

Challenge #56--Anything Goes!


I decided to make a graduation card for my Niece.
Her school colors are Black and Burgundy so that is what I went with for my card.


For my hoarded supplies I used:
  1. Black Brad: I went through a phase where I bought brads all the time. The good thing about that is I am fully stocked now lol! I haven't bought brads in at least 3 years, so the one I used is at least that old, if not older.
  2. DMC floss is over 10 years old. I use to be an avid cross stitcher so I have piles of DMC Floss that never get used anymore. Yep, cross stitching kinda got put on the back burner once I discovered paper crafting lol!


Here is the inside:
I made a little flat card that slides in the pocket so that we can write her a message


And here is one more picture showing the flat card and the money in the pocket:


I got my card base for this cute little card from the Silhouette Store.
It is called Lori Whitlock Graduation Card with Pocket.
Design ID #41562

I hope you will stop by the Use It Tuesday blog and join in on the challenge!

Let's see you use up some of those hoarded products :) 
While you are there, don't forget to look at the amazing creations my wonderful DT sisters came up with.

Thanks so much for stopping by my blog today and taking a look at my latest creation!
I really appreciate it!
I hope you have a fabulous crafty day!
Photobucket
Supplies:
Cardstock: Black (core'dinations), White (Georgia Pacific), Burgundy (?)
Misc.: DMC Floss, Brad 
Monday, May 27, 2013

Wishing you blue skies

Happy Monday!
I hope you all had a fabulous weekend and are ready to get crafty with new challenges from
and 

Paper Playtime (PPT) #11: Use 2 or more Ribbons/Fibers
&
Both challenges begin Monday May 27, 2013
and end Sunday June 9, 2013

Winner announced on the Winner's Page Tab at Paper Playtime and Pause Dream Enjoy Challenges.

Here is my project that incorporates both challenges:

For PPT, use 2 or more ribbons/fibers, I use some white and pink twine on the bows and some blue ribbon on the top of my card as well as the little bird's hair accessory. 


For PDEC, use foam tape, I put some behind my biggest cloud as well as the kite. 

Thanks so much for stopping by my blog today and taking a look at my latest creation!
I really appreciate it!

Don't forget to stop by Paper Playtime & Pause Dream Enjoy Challenges
to see the amazing creations my fabulous Design Team sisters came up with for the challenges as well as entering the challenge yourself! I would love to see what you create!

I hope you have a fabulous crafty day!
Photobucket
Supplies:
Cardstock: White (Georgia Pacific), All other colors (Recollections)
Silhouette: Bird Flying Kite Design ID# 42080
Punch: Scallop Sentiment (Fiskars)
Ink: Tuxedo Black (Memento), Broken China (Tim Holtz)
Cuttlebug: Swiss Dots Embossing Folder
Misc.: Glossy Accents, Foam Adhesive, Pearls (Queen & Co.), Ribbon (Offray), Twine (The Twinery)

Saturday, May 25, 2013

Super & Everyday Hero Blog Hop

For my Craftin' Desert Diva Blogoversary Desert Hop post, please scroll down one post or click HERE

Happy Saturday!
Welcome to the Super & Everyday Hero Blog Hop!

I am so happy you could join us on this fabulous hop!
If you have arrived from Megan's blog, you are in the right spot. 
If you just happened to stumble across the hop today on my blog and would like to start at the beginning,
then be sure to hop on over and see Joy at Joyslife.com.

For my project, I decided to make a gift for my daughter, who loves super heroes!
We are getting pretty excited about the new Superman movie that is getting released in theaters next month so I decided to go with Superman!


For my card, I used the Superman shield, found in the Silhouette online store, and popped that up using some foam adhesive onto my blue card base. I added a little border across the bottom of my card using some white cardstock and yellow cardstock that was punched with the upper crest border punch. Before I adhered my bottom border onto my card base, I stamped that super cute sentiment from the MY HERO stamp set from Joy's Life Stamps and added some red satin ribbon. Once that was done and adhered, I simply rounded the top corners of my card and added a little bling. 

Here is a close up of my sentiment:

Cute huh?
 There are so many great sentiments on the MY HERO stamp set from Joy's Life Stamps.

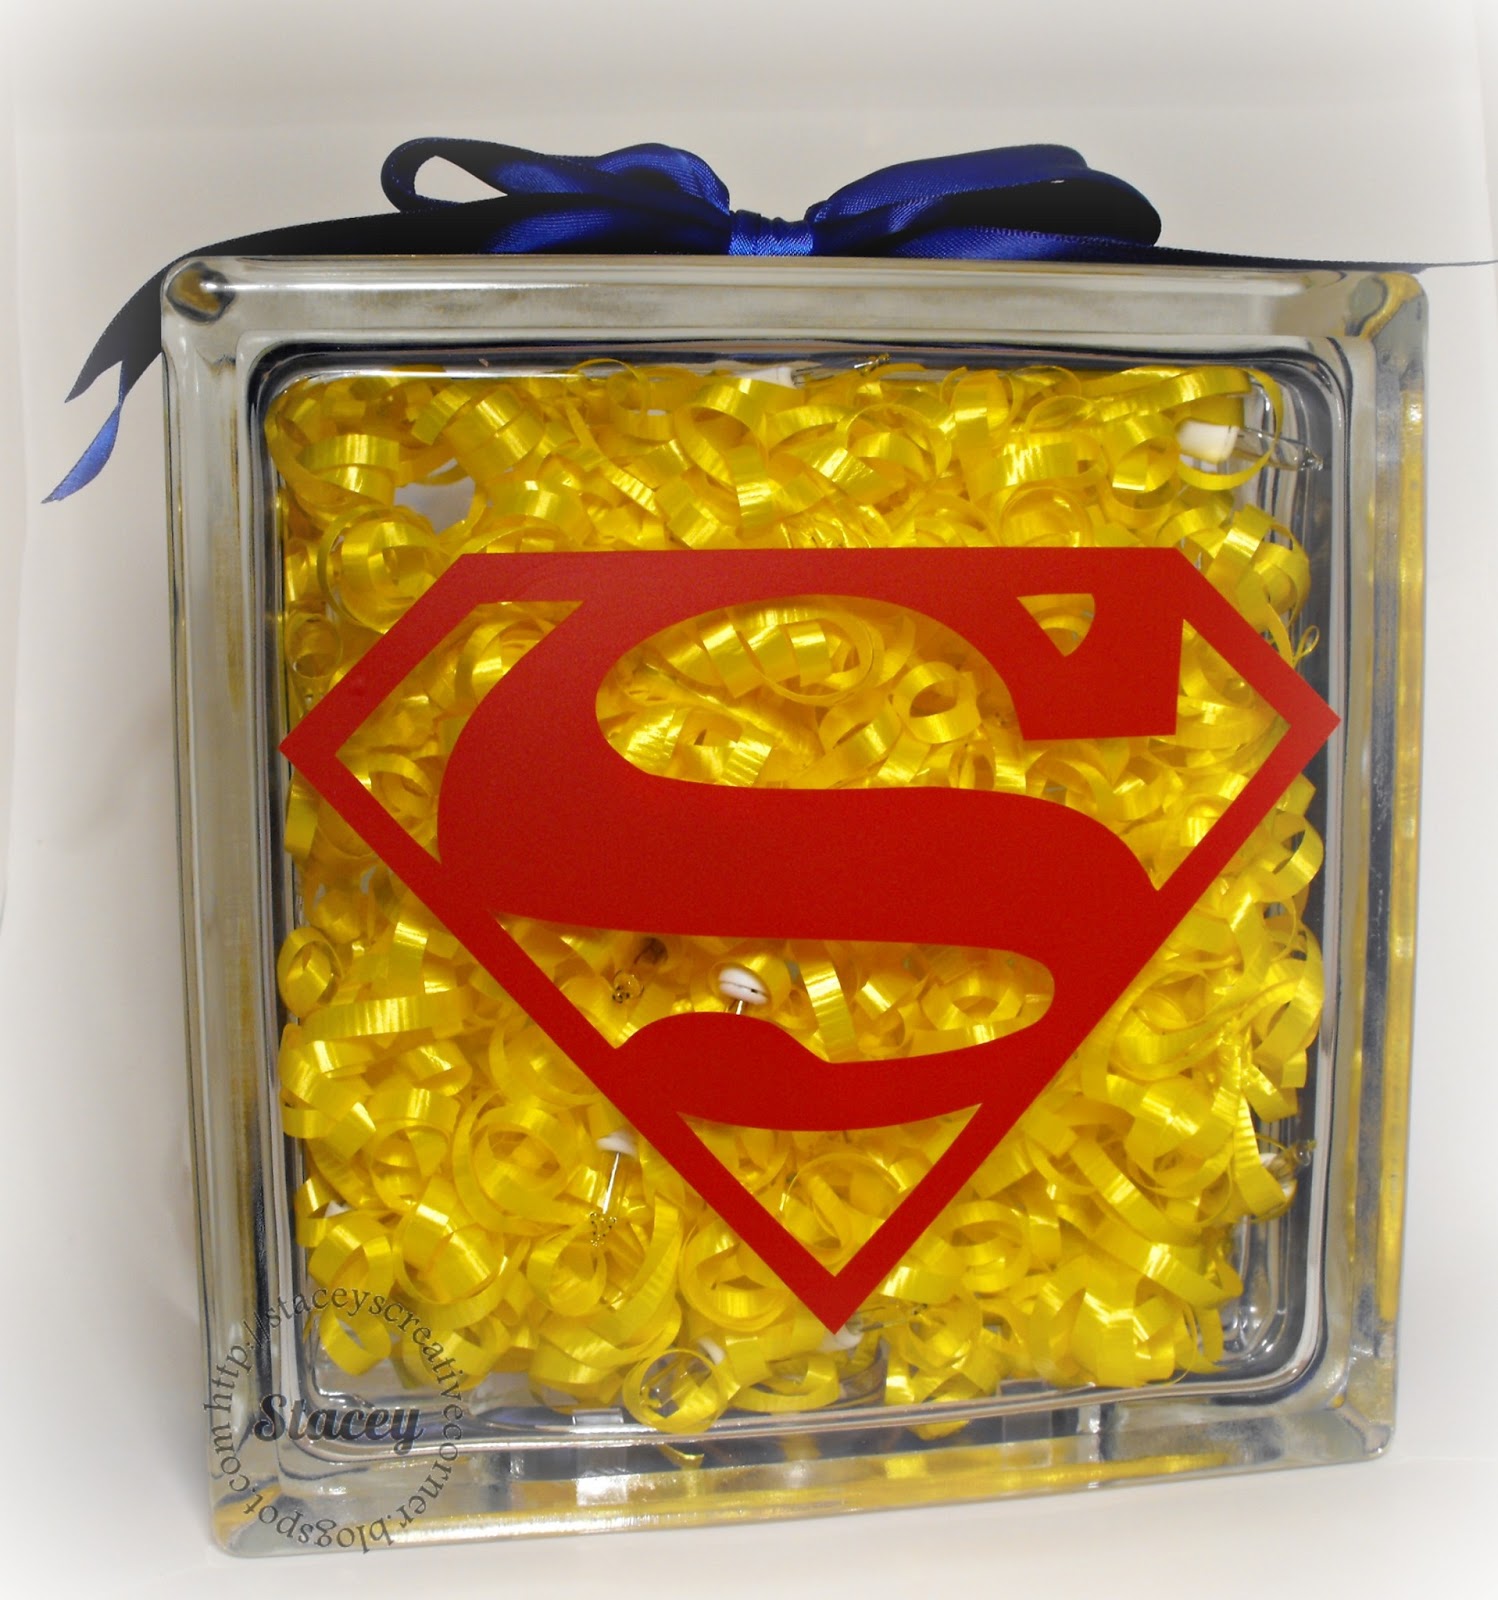
I also decided to make her a decoration for her room to go along with the card.


I simply cut out the Superman shield using some red vinyl and adhered it to the front of my glass block.
I wasn't too crazy about the white cording from the lights showing so I tied some yellow curling ribbon to the light string and then put my lights inside the block. Then I added some blue satin ribbon to the sides and tied it together at the top of the block with a bow. 

Here is a picture of the block lit up:

One final picture of the card and block together:

She loves it! She is a "super kid" so this is perfect for her!
Now we just have to patiently wait for the movie to be released lol!

What's a blog hop without some candy?
I am going to give the following prize away to a follower of my blog:

For your chance to win this 6x6 paper pad and embossing folder, all you have to do is:

1. Be a follower of my blog
&
2. Leave me a comment on this post

That's it! Easy Peasy! :)
I will have random.org pick a winner next Wednesday (May 29, 2013)
so make sure you come back and check to see if you are the winner!

I was your last stop on this hop and I hope you had a fabulous time!
Thanks so much for hopping with us!

You can see all of Joy's Life products HERE

Here is the complete lineup:
Joy: http://joyslife.com    

I hope you have great crafty day!
Photobucket
*I created this project while on the Joy's Life Design Team*
Supplies:
Cardstock: Midnight Muse (SU!), Red (Core'dinations), Black & Yellow (Recollections), White (Georgia Pacific)
Silhouette: Superman Shield Design ID 32640
Ink: Midnight Muse (SU!)
Punch: Upper Crest Border Punch (Fiskars)
Misc.: Glass block, Ribbon (Offray), Bling (Studio G), Foam Adhesive, Red Vinyl (Cricut), Clear Lights, Yellow Curling Ribbon

Craftin' Desert Divas Blogaversary Desert Hop

Happy Saturday!!
I hope you are all having a great start to your weekend!
Today we are celebrating with Tara over at Craftin Desert Divas for her very first BLOGOVERSARY!!!

Happy Blogoversary Tara!!!


If you just happened to have stumbled upon my blog, please start at 
Craftin Desert Divas so you don't miss out on a thing. If you have arrived from Michelle of http://mumoftwoblog.blogspot.com/ then you are in the right spot. 


We have blog candy for those who are a follower of Craftin Desert Divas and leave a comment on every stop of the hop! Winners will be announced Tuesday May 28th at Craftin Desert Divas!


$20 Giftcard to their store

$10. CTHM Giftcard

$15. Giftcard to their store

What great prizes right??

Ok, onto the hopping :)
This is a "Desert" Diva Celebration!!

Here is the project that I have created for this hop...


For my A2 sized card, I used my Cricut as well as my Silhouette. My cactus came from the OLE' cricut cartridge and was cut out at 1.39"x 2.25" (CCR). My coyote howling came from the Silhouette online store and is design ID # 11413. For my sand, I simply took some kraft cardstock and tore it into strips and layered them on top of each other. My moon was cut out of a scrap piece of yellow cardstock using a 1 3/8" circle punch. The coyote is popped up with some foam adhesive to give my card a little more dimension.


I decided to also make a little jar of candies to go along with my card. I simply altered a frappe jar by wrapping some cardstock around the middle of my jar. My cactus for the jar was cut from the OLE' cricut cartridge at 2.25" x 2.25". I ran it through my cuttlebug with the swiss dots embossing folder and then lightly ran an ink pad over the top so that the "bumps" were a different color to give it some dimension. The flowers on my cactus are from a fiskars flower punch. I simply layered some flowers on top of each other and then attached them to my cactus. I finished the jar off with some green tulle and some brown and white bakers twine around the bottle neck. The jar is filled with some dark green chocolate candy sixlets.

Here is a picture of both items together:


I think it came out so cute yet masculine. I already gave it to my hubby as a little surprise and he loved it!
Then again, he loves candy! lol!

Speaking of candy, I have a little of my own candy to give away.
I will be giving the following 6x6 paper pack away to one lucky follower of my blog:

All you have to do for my blog candy is
1. Be a follower of my blog
&
2. Make sure you leave a comment on this post. 
I will pick my winner on Wednesday May 29, 2013 
so make sure you come back by to see if you won.

Thanks so much for hopping with us today!
I really appreciate it!

Your next stop is the very talented Janis of Pause Dream Enjoy

Here's the complete line up in case you get lost along the way.


I hope you have a fabulous crafty day!
Photobucket
Supplies:
Cardstock: Midnight Muse (SU!), Kraft & Black (Recollections), Yellow & Green (scraps)
Cricut Cartridge: OLE'
Silhouette: Coyote Design ID 11413
Cuttlebug: Swiss Dots Embossing Folder
Ink: Tuxedo Black (Memento)
Punches/Dies: Scallop Sentiment Border Punch (Fiskars), Classic Scallop Circles (Spellbinders), 1 3/8" Circle Punch (SU!), Flower Punch (Fiskars)
Misc.: Buttons, Foam Adhesive, Frap Jar (Starbucks), Tulle (Nicole), Twine (Trendy Twine), Green Sixlets Candy
Friday, May 24, 2013

Buzz & Bumble Layout

Hi everyone!
Happy Friday!
I hope you have some fun plans for the weekend :) 

Today I get to show you another project that I made using the 

On the back of the instruction manual, there is a photo of another layout.
I decided to try my hand at copying that cause I loved it so much.

Here it is:

Isn't it fabulous? I have so many large (8x10) photos that typically just sit in the folder from the photographer since I just don't seem to have enough walls to possibly hang them all. I love that this layout allows me to put an 8x10 on a layout. 

Here is a closeup of some of the stamping elements as well as that gorgeous paper that comes in the kit:

I think this is my favorite collection so far. 

So to recap, with ONE workshop on the go kit, I was able to create TWO 2 page layouts and 1 card.
In case you missed the previous projects, here they are:


AND look at all that I still have left over:

Still so much paper, bling, a wax seal and of course those awesome stamps!
You definitely get your monies worth with the 

Thanks so much for stopping by today!

Don't forget to visit Dr. Phil Scraps for daily inspiration as well as weekly giveaways:)

I hope you have a fabulous crafty day!
Photobucket
*I created this project while on the Dr. Phil Scraps Design Team*

Supplies:
CTMH Products:

Other Products:
Scallop Sentiment Border Punch (Fiskars)
Studio G Ink
Foam Adhesive
Thursday, May 23, 2013

Bee Yourself

Hi everyone!
Happy Thursday!

 Today I would like to show you a card that was made from some of the leftovers from the
Buzz and Bumble Scrapbooking Kit (G1054)

Everything on my card was from the kit. The only extra thing that I needed besides my trimmer was some brown ink.

Look at those gorgeous papers!
Fabulous bling, wooden 3D bee and wax seal too?
Oh my!


Thanks so much for stopping by today!
Don't forget to come back tomorrow! I will have another project to show you using more of the leftovers from the Buzz and Bumble Scrapbooking Kit (G1054)!

Be sure to check out Dr. Phil Scraps for daily inspiration and weekly giveaways!

I hope you have a fabulous crafty day!
Wednesday, May 22, 2013

Friendship Layout

Hi everyone! 
I hope you are having a marvelous Wednesday!

Today I would like to show you a layout made with the 

For my layout, I simply followed the included instructions that come with the kit. 
(you can click on the picture for a larger view)

The great thing about this kit, besides the beautiful papers and embellishments, is the included instructions.
It completely takes all the guess work of putting together a layout. All the measurements are given so you know exactly what size to cut what. Perfect! I often stumble with ideas or get mental blocks so it definitely comes in handy. Of course you don't have to follow the directions, but they are there if needed :) 

Here is a close up on the bottom left corner of my layout. 
The wax seal, wooden flower and bling all come with the kit. 
The larger flowers and the seed packet are stamps (also included in the kit)


Here is a close up of the corner on the right hand size of the page. 
The flight path, Wonderful Beautiful, You Are My Happy & the big flower are included stamps.
The small wooden flowers, wooden bee and bling are also included in the kit. 

Super pretty right? All the papers are beautiful and compliment each other perfectly!

Thanks so much for stopping by today!
Be sure to come back tomorrow to check out another project made with the left overs from the kit.
Don't forget to check out Dr. Phil Scraps for daily inspiration and weekly giveaways!

I hope you have a fabulous crafty day!
Photobucket
*I created this project while on the Dr. Phil Scraps Design Team*

Supplies:
CTMH Products:

Other products:
Foam Adhesive
Studio G Ink
Silhouette for "Friendship"
Saturday, May 18, 2013

Flip Flop Home Decor

Happy Saturday!

Today I am so excited to share with you my very first post as a returning member of the 
It feels so good to be back!

This week is all about Home Decor.
I enlisted the help of my hubby with this one and asked him to cut me out a flip flop shape out of some wood. Power tools scare me lol!

Here is what he cut out for me:

I painted it up with some acrylic paint and then glued my pieces together with some wood glue.
I found a cute little wooden dragonfly and flower at my craft store and painted them and glued them onto my flip flop. I added some stickles to the dragonfly and flower and some pearls for my dragonfly's flight pattern.

Here is the finished result:

I stamped ENJOY THE SUMMER, which can be found in Joy's Pun In The Sun stamp set to my flower center using some archival ink. It stamped perfectly onto the wood and I think it was just the right touch to finish off my flip flop.


This is now hanging on my front porch that stays shaded all year round, so I am hoping the stickles will be fine since they won't be in direct sunlight. 

The Pun In The Sun stamp set from Joy's Life is perfect for all your summer crafting!
You can see all of Joy's Products by clicking HERE

Thanks so much for stopping by and taking a look at my latest creation!
I really appreciate it!
Don't forget to check out the Joy's Life Design Team Blog for daily inspiration using those awesome Joy's Life Stamps :)

I hope you have a fabulous crafty day!
Photobucket
*I created this project while on the Joy's Life Design Team*

Supplies:
Ink: Archival Ink Jet Black (Ranger)
Scrap Wood & Wood Shapes (Flower and Dragonfly)
Acrylic Paint
Stickles: Fruit Punch, Firefly & Diamond
Pearls: Queen & Co
Elmer's Wood Glue
Thursday, May 16, 2013

Love Always


Hi everyone!
Happy Thursday!

Today I get to show you another fun card using that awesome


I decided to make a fun little clean and simple card using some washi tape. 
For my card, I simply cut out a piece of cardstock measuring 4x5.25". Then I went about laying down the washi tape is diagonal lines from top to bottom. After it was complete, I trimmed off the excess and placed it onto my card base. I then cut out another piece of white cardstock measuring 3.75x5" and used a heart punch to punch out my heart. I added my sentiment and then ran it through my cuttlebug and just embossed the left side of my card with my swiss dots embossing folder.  I then added my ribbon. After that was done, I added some foam adhesive on all around the edges on the back and adhered on top of my washi layer. I love how the washi ended up looking like patterned paper! Of course I added some Rainforest CANDi to the right hand corner of my card to finish it off. I love how CANDi finishes off every project beautifully! 

Here is a close up of my CANDi:


I used Rainforest CANDi on my project:


There are so many great colors and patterns in the CANDi line!
You should definitely check them out :) 

For the UK store, click HERE

You can find CANDi in the US at many online retailers including

Thanks so much for stopping by my blog today and taking a look at my latest creation!
I really appreciate it!

Don't forget to stop by the Craftwork Cards USA DT blog for daily inspiration!

I hope you have a fabulous crafty day!
Photobucket
*I created this project while on the Craftwork Cards USA Design Team*


Supplies:
Cardstock: Pear Pizzazz (SU!), White (Georgia Pacific)
Cuttlebug: Swiss Dots Embossing Folder
Stamp: Tag You're It Set One (Joy's Life Stamps)
Ink: Pear Pizzazz (SU!)
Punch: Xtra Large Full Heart (SU!)
CANDi: Rainforest & CANDi Fix
Misc.: Ribbon, Foam Adhesive, Washi Tape(Recollections)

Related Posts Plugin for WordPress, Blogger...